Make sure this part fits

GM 15854396
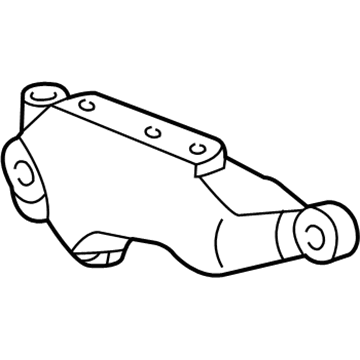
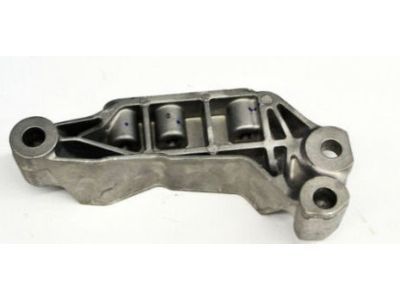
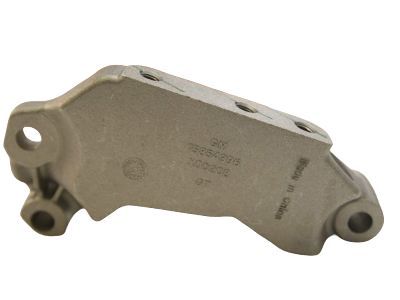
Mounting Bracket

2002-2017 GM

Customer Questions & Expert Answers (33)
GM 15854396 Mounting Bracket
  • Part Description
    Adapter, Engine Mounting; Engine Mount Torque Strut; Engine Mount Bracket; Motor Mount
  • Replaces
    22689529
  • Manufacturer
    General Motors
Make sure this part fits
$81.92 MSRP: $128.33
You Save: $46.41 (37%)
Currently Unavailable

Due to manufacturer supply shortage, this item isn't currently available for ordering.

  • Related Parts
  • Product Specifications
  • Vehicle Fitment
  • Customer Questions & Expert Answers
  • Product Specifications

    BrandGenuine GM
    Manufacturer Part Number15854396
    Part DescriptionAdapter, Engine Mounting; Engine Mount Torque Strut; Engine Mount Bracket; Motor Mount
    Other NamesMount Bracket; Front Mount Bracket; Adapter; Bracket, Engine Mounting
    Item Dimensions10.2 x 5.7 x 5.5 inches
    Item Weight1.80 Pounds
    ConditionNew
    Fitment TypeDirect Replacement
    Replaces22689529
    ManufacturerGeneral Motors
    SKU15854396
    WarrantyThis genuine GM part is guaranteed by GM's factory warranty.
    Shipping & ReturnShipping Policy Return Policy
    Warning: California's Proposition 65
  • Vehicle Fitment

    Year Make Model Trim Engine
    2012-2015 Chevrolet Captiva SportLS, LT, LTZ4 Cyl 2.4 L FLEX
    2005-2010 Chevrolet CobaltBase, LS, LT, LTZ, Sport, SS4 Cyl 2.0 L GAS, 4 Cyl 2.2 L GAS, 4 Cyl 2.4 L GAS
    2010-2017 Chevrolet EquinoxL, LS, LT, LTZ, Premier4 Cyl 2.4 L FLEX, 4 Cyl 2.4 L GAS
    2006-2011 Chevrolet HHRLS, LS Panel, LT, LT Panel, SS, SS Panel4 Cyl 2.0 L GAS, 4 Cyl 2.2 L FLEX, 4 Cyl 2.2 L GAS, 4 Cyl 2.4 L FLEX, 4 Cyl 2.4 L GAS
    2010-2017 GMC TerrainDenali, SL, SLE, SLT4 Cyl 2.4 L FLEX, 4 Cyl 2.4 L GAS
    2007-2009 Pontiac G5Base, GT4 Cyl 2.2 L GAS, 4 Cyl 2.4 L GAS
    2003-2007 Saturn Ion1, 2, 3, Red Line4 Cyl 2.0 L GAS, 4 Cyl 2.2 L GAS, 4 Cyl 2.4 L GAS
    2002-2010 Saturn VueBase, Green Line, Hybrid, XE, XR4 Cyl 2.2 L GAS, 4 Cyl 2.4 L FULL HYBRID EV-GAS (FHEV), 4 Cyl 2.4 L GAS
  • Customer Questions & Expert Answers

    Q:
    Is this 15854396 designed for my car? Posted by ChevyPartsGiant Specialist
    A:
    Please Select Your Vehicle model to see if part number 15854396 is suitable before ordering.
    Posted by ChevyPartsGiant Specialist
    Q:
    How to replace the engine mount on Chevrolet Cobalt? Posted by Customer
    A:
    The first step to replace the Engine Mount requires air cleaner assembly removal. The engine needs support through a hydraulic floor jack that should have a wooden block placed between the jack and the Oil Pan. Begin by taking out the Engine Mount from the engine compartment after removing the Engine Mount to bracket bolts and the Engine Mount to side rail nuts. Mount the engine bracket onto the side rail studs before you can install it with side rail nuts following the specific torque sequence to 100 nm (74 ft. Lbs.). Perform the installation process of the Engine Mount to bracket bolts by using a wrench but not applying any uncalled-for pressure to the Engine Mount for hole alignment. Install and torque these bolts to a value of 50 nm (37 ft. Lbs.) while following the specified bolt order. You must finish by taking away the floor jack then reinstall the air cleaner assembly.
    Posted by ChevyPartsGiant Specialist
    Q:
    How to replace the Engine Mount Bracket on Chevrolet Cobalt? Posted by Customer
    A:
    The first step to replace an Engine Mount Bracket involves Engine Mount removal before proceeding. You need to start by removing both Engine Mount Bracket to engine bolts then you can pull out the Engine Mount Bracket. Position the Engine Mount Bracket on the engine before installing the bolts where you must use long bolts in forward and lower front holes and a short bolt in the upper rear hole. Adhere to the fastener warning from the manufacturer to stop vehicle damage. Tighten the Engine Mount Bracket bolts starting with 100 nm (74 lb ft) torque while following the specified sequence then reattach the Engine Mount.
    Posted by ChevyPartsGiant Specialist
    Q:
    How to balance the engine mount, motor and transmission mount on Chevrolet HHR? Posted by Customer
    A:
    First you must lift the vehicle then put it on support before performing the balancing operation. Next proceed with dropping the vehicle after you have loosened the front transaxle mount through bolt and rear transaxle mount through bolt. Two floor jacks equipped with wood blocks should be placed under the engine and transaxle to maintain powertrain assembly suspension. You should start by creating a 1/8 inch gap between the mount and bracket using both floor jacks that are repositioned correctly. After that, tighten the transaxle mount to transaxle bolts and the engine mount to bracket bolts. The transaxle mount should be installed to transaxle bolts which require tightening to 45 n.m (33 lb ft) then proceed with engine mount bolt installation followed by a 50 n.m (37 lb ft) torque setting. Shake the powertrain whole unit from front to rear through vigorous motion then allow the assembly to settle before removing the jacks situated below the Oil Pan. The technician should lift the vehicle again before securing the rear transaxle mount through bolt to 100 n.m (74 lb ft) and finishing with the front transaxle mount through bolt at 100 n.m (74 lb ft) before putting the vehicle down.
    Posted by ChevyPartsGiant Specialist
    Q:
    How to replace the engine mount on Chevrolet HHR? Posted by Customer
    A:
    The air cleaner assembly and windshield washer solvent reservoir need to be removed before starting the Engine Mount replacement. A hydraulic floor jack with wood should support the engine at the Oil Pan while you remove the mount. Unfasten the Engine Mount brackets from the bolts while also removing the nuts from the side rail studs until you can successfully pull out the Engine Mount from the compartment. Mount the engine component to steel rail studs while installing the side rail nuts before torquing them to 100 n.m (74 lb ft). The Engine Mount to bracket bolts require hand-tightening without using the Engine Mount to shift its position into hole alignment. Tighten Engine Mount to bracket bolts starting from the middle and proceeding to the rear and front with a torque of 50 n.m (37 lb ft). The installation process continues with hydraulic floor jack removal from under the Oil Pan followed by proper reinstallation of the windshield washer solvent reservoir along with the air cleaner assembly.
    Posted by ChevyPartsGiant Specialist
    Q:
    How to replace the Engine Mount Bracket on Chevrolet HHR? Posted by Customer
    A:
    The first step involves taking out the Engine Mount before proceeding with bracket replacement. Begin by removing the Engine Mount Bracket engine bolts before taking out the Engine Mount Bracket from the engine bay. Place the Engine Mount Bracket against the engine structure then bolt in place with the long bolts threaded through forward and lower rear holes alongside the short bolt inserted into the upper rear hole. Following the provided fastener caution rules will help avoid vehicle damage. You should install and tighten Engine Mount Bracket bolts starting with the upper rear position and moving next to the lower rear before settling on the forward position at 50 nm (37 lb ft). Finally, install the Engine Mount.
    Posted by ChevyPartsGiant Specialist
    Q:
    How to replace the Engine Mount Bracket on GMC Terrain? Posted by Customer
    A:
    To remove the Engine Mount Bracket, begin by removing the Engine Mount. Next, remove the Engine Mount Bracket (to engine bolts) to then remove the Engine Mount Bracket itself. For installation, place the Engine Mount Bracket to the engine and insert the Engine Mount Bracket bolts and use long bolts in the forward and lower rear holes and use short bolts in the upper rear hole. Make sure to adhere to the fastener caution to prevent vehicle damage. Lastly, tighten the Engine Mount Bracket bolts in the described pattern to 100 nm (74 lb ft) and reinstall the Engine Mount.
    Posted by ChevyPartsGiant Specialist
    Q:
    How to replace the LH Motor and Transmission Mount on GMC Terrain? Posted by Customer
    A:
    To change the left transmission mount, first, remove battery tray and underhood electrical center. Lift and support the vehicle while supporting the engine and the transmission. Disassemble front transmission mount to frame bolt and the rear transmission mount to rear transmission mount bracket bolt. Lower the vehicle before taking off and removing the left transmission mount to transmission bolts and the left transmission mount to frame rail bolts. Lower the transmission as much as possible to give clearance for left transmission mount and remove the left transmission mount. For installation, start off by installing the left transmission mount and make sure that the left transmission mount is installed to frame rail bolts and tighten to 27 nm (20 lb ft). Raise the transmission until the left transmission mount meeting the left transmission mount, then install front transmission mount to transmission bolts and tighten 50 nm (37 lb ft). Lift the vehicle once more and install rear transmission mount to rear transmission mount bracket bolt and tighten 110 nm (81 lb ft), followed by front transmission mount to frame bolt tightened at 110 nm (81 lb ft). Lower the vehicle, take off the engine and the transmission support and finally the battery tray and the under hood center.
    Posted by ChevyPartsGiant Specialist
    Q:
    What should be removed after raising for the 2005 Chevrolet Cobalt? Posted by Customer
    A:
    Remove the front transaxle mount thru bolt and the bolts connecting the front transaxle mount to the transaxle.
    Posted by ChevyPartsGiant Specialist
    See expert answers on similar Motor And Transmission Mount
    Q:
    What is the first step to replace the engine mount for the 2007 Chevrolet HHR? Posted by Customer
    A:
    Remove the air cleaner assembly and the windshield washer solvent reservoir.
    Posted by ChevyPartsGiant Specialist
    See expert answers on similar Engine Mount
    Q:
    What should be done after removing the engine mount for the 2007 Chevrolet Cobalt? Posted by Customer
    A:
    Take out the intermediate bracket from the engine.
    Posted by ChevyPartsGiant Specialist
    See expert answers on similar Engine Mount Bracket
    Q:
    What is the first step in the installation process for the 2009 Chevrolet Cobalt? Posted by Customer
    A:
    Install the transmission mount to the mid-rail, ensuring to tighten the mid-rail bolts to 27 Nm (20 lb ft).
    Posted by ChevyPartsGiant Specialist
    See expert answers on similar Motor And Transmission Mount
    Q:
    How should the engine mount intermediate bracket bolts be tightened for the 2005 Chevrolet Cobalt? Posted by Customer
    A:
    Hand tighten the engine mount intermediate bracket bolts in the long bolts' forward and front lower holes and the short bolt in the rear upper hole.
    Posted by ChevyPartsGiant Specialist
    See expert answers on similar Engine Mount Bracket
    Q:
    What should be done after aligning the engine mount for the 2005 Chevrolet Cobalt? Posted by Customer
    A:
    Hand tighten the engine mount to body nuts and install the engine mount to bracket bolts, ensuring to follow the Fastener Notice in Service Precautions.
    Posted by ChevyPartsGiant Specialist
    See expert answers on similar Engine Mount
    Q:
    What is the torque specification for the rear transaxle mount to frame bolts for the 2008 Chevrolet Cobalt? Posted by Customer
    A:
    Tighten the rear transaxle mount to frame bolts to 60 N.m (44 lb ft).
    Posted by ChevyPartsGiant Specialist
    See expert answers on similar Motor And Transmission Mount
    Q:
    What is the first step to replace the left side transmission mount for the 2007 Chevrolet Cobalt? Posted by Customer
    A:
    Remove the underhood electrical center bracket and reposition the electrical center.
    Posted by ChevyPartsGiant Specialist
    See expert answers on similar Motor And Transmission Mount
    Q:
    How do you install the new engine mount for the 2007 Chevrolet Cobalt? Posted by Customer
    A:
    Position the engine mount to the vehicle and align it to the mount bracket using a dowel.
    Posted by ChevyPartsGiant Specialist
    See expert answers on similar Engine Mount
    Q:
    How should the transmission mount to transmission bolts be installed for the 2010 Chevrolet Cobalt? Posted by Customer
    A:
    Hand start the bolts in the sequence: rear bolt, middle bolt, front bolt.
    Posted by ChevyPartsGiant Specialist
    See expert answers on similar Motor And Transmission Mount
    Q:
    What action should be taken to ensure the powertrain settles for the 2009 Chevrolet Cobalt? Posted by Customer
    A:
    Shake the powertrain vigorously from front to rear and allow it to settle.
    Posted by ChevyPartsGiant Specialist
    See expert answers on similar Motor And Transmission Mount
    Q:
    What bolts and nuts need to be removed to take out the engine mount for the 2009 Chevrolet Cobalt? Posted by Customer
    A:
    Remove the engine mount to bracket bolts and the engine mount to side rail nuts.
    Posted by ChevyPartsGiant Specialist
    See expert answers on similar Engine Mount
    Q:
    How should the engine mount bracket be positioned for the 2006 Chevrolet Cobalt? Posted by Customer
    A:
    Position the engine mount bracket to the engine.
    Posted by ChevyPartsGiant Specialist
    See expert answers on similar Engine Mount Bracket
    Q:
    What is the final step after tightening the bolts for the 2006 Chevrolet Cobalt? Posted by Customer
    A:
    Lower the vehicle.
    Posted by ChevyPartsGiant Specialist
    See expert answers on similar Motor And Transmission Mount
    Q:
    What is the final step after tightening the engine mount bracket bolts for the 2007 Chevrolet HHR? Posted by Customer
    A:
    Install the engine mount.
    Posted by ChevyPartsGiant Specialist
    See expert answers on similar Engine Mount Bracket
    Q:
    What should be done last in the replacement process for the 2009 Chevrolet HHR? Posted by Customer
    A:
    Connect the engine control module harness connectors, reconnect the negative battery cable, and install the underhood electrical center cover.
    Posted by ChevyPartsGiant Specialist
    See expert answers on similar Motor And Transmission Mount
    Q:
    How should the new engine mount be installed for the 2010 Chevrolet HHR? Posted by Customer
    A:
    Place the engine mount onto the side rail studs, ensuring to install the engine mount to side rail nuts and tighten them to 100 Nm (74 lb ft).
    Posted by ChevyPartsGiant Specialist
    See expert answers on similar Engine Mount
    Q:
    What is the first step to replace the transmission front mount for the 2008 Chevrolet HHR? Posted by Customer
    A:
    Raise and support the vehicle.
    Posted by ChevyPartsGiant Specialist
    See expert answers on similar Motor And Transmission Mount
    Q:
    What should be removed after raising for the 2006 Chevrolet HHR? Posted by Customer
    A:
    Remove the rear transaxle mount through bolt and heat shield, followed by the rear transaxle mount to frame bolts, and then take out the rear transaxle mount.
    Posted by ChevyPartsGiant Specialist
    See expert answers on similar Motor And Transmission Mount
    Q:
    How should the engine mount to bracket bolts be installed for the 2009 Chevrolet HHR? Posted by Customer
    A:
    Hand start the bolts without prying to align the holes, then tighten these bolts to 65 Nm (48 lb ft).
    Posted by ChevyPartsGiant Specialist
    See expert answers on similar Engine Mount
    Q:
    What is the torque specification for the rear transmission mount thru bolt for the 2007 Chevrolet HHR? Posted by Customer
    A:
    Tighten the rear transmission mount thru bolt to 100 N.m (74 lb ft).
    Posted by ChevyPartsGiant Specialist
    See expert answers on similar Motor And Transmission Mount
    Q:
    What is the procedure for tightening the engine mount to bracket bolts for the 2006 Chevrolet HHR? Posted by Customer
    A:
    The engine mount to bracket bolts must be hand started without prying the engine mount to align the holes, then tighten these bolts to 50 Nm (37 ft. lbs.).
    Posted by ChevyPartsGiant Specialist
    See expert answers on similar Engine Mount
    Q:
    What is the final step after installing the engine mount bracket for the 2006 Chevrolet HHR? Posted by Customer
    A:
    Install the engine mount.
    Posted by ChevyPartsGiant Specialist
    See expert answers on similar Engine Mount Bracket
    Q:
    What should be done after removing the engine mount for the 2008 Chevrolet HHR? Posted by Customer
    A:
    Take out the engine mount bracket to engine bolts and then remove the engine mount bracket.
    Posted by ChevyPartsGiant Specialist
    See expert answers on similar Engine Mount Bracket
    Q:
    What should be done after creating the gap for the 2010 Chevrolet HHR? Posted by Customer
    A:
    Install the transaxle mount to transaxle bolts and tighten them to 45 Nm (33 lb ft), followed by tightening the engine mount bolts to 50 Nm (37 lb ft).
    Posted by ChevyPartsGiant Specialist
    See expert answers on similar Motor And Transmission Mount
    If you have any questions about this product, please don't hesitate to ask us. We will be happy to help you!

OEM GM 15854396, Excellent Performance and Perfect Fitment

To ensure reliability, purchase GM part # 15854396 Mounting Bracket. It is sometimes referred to as GM Engine Mount, GM Motor And Transmission Mount, GM Engine Mount Bracket. Choosing OEM parts is the optimal decision for guaranteeing superior quality and perfect performance. These components undergo stringent quality checks and are carefully constructed to comply with GM's factory specifications, ensuring a smooth installation process.

ChevyPartsGiant.com is a leading supplier of genuine GM parts such as GM 15854396 Mounting Bracket. Our website boasts an extensive inventory of OEM GM parts, available at highly competitive prices in the market. Should you require any new genuine GM parts, rest assured we will deliver them swiftly and efficiently to your doorstep. Furthermore, all our parts come with the assurance of a manufacturer's warranty. For detailed Chevy parts information, click here.
Choose ChevyPartsGiant for discounted prices, exceptional service and fast delivery