ChevyParts
My Garage
My Account
Cart
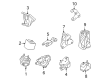
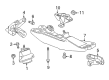
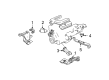
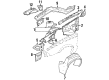
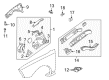
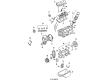
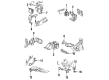
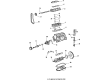
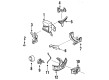
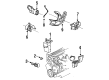
OEM Chevrolet Engine Mount Bracket
Engine Mount- Select Vehicle by Model
- Select Vehicle by VIN
Select Vehicle by Model
orMake
Model
Year
Select Vehicle by VIN
For the most accurate results, select vehicle by your VIN (Vehicle Identification Number).
431 Engine Mount Brackets found

Chevrolet Strut Bracket Part Number: 10306033
$53.33 MSRP: $89.95You Save: $36.62 (41%)Ships in 1-2 Business DaysProduct Specifications- Other Name: Bracket, Engine Mounting; Motor Mount

Chevrolet Mount Bracket, Driver Side Part Number: 23104518
$95.87 MSRP: $150.13You Save: $54.26 (37%)Product Specifications- Other Name: Bracket, Engine Mounting; Engine Mount Bracket; Motor Mount
- Position: Driver Side

Chevrolet Mount Bracket, Driver Side Part Number: 10198329
Product Specifications- Other Name: Bracket; Engine Mount Bracket; Motor Mount; Motor Mount Bracket; Bracket, Engine Mounting
- Position: Driver Side

Chevrolet Mount Bracket, Passenger Side Part Number: 10198330
Product Specifications- Other Name: Bracket; Engine Mount Bracket; Motor Mount; Motor Mount Bracket; Bracket, Engine Mounting
- Position: Passenger Side

Chevrolet Mount Bracket, Passenger Side Part Number: 14019460
Product Specifications- Other Name: Bracket; Engine Mount Bracket; Motor Mount; Bracket, Engine Mounting
- Position: Passenger Side
Chevrolet Mount Bracket, Driver Side Part Number: 14089450
Product Specifications- Other Name: Bracket; Engine Mount Bracket; Motor Mount; Bracket, Engine Mounting
- Position: Driver Side

Chevrolet Support Plate, Passenger Side Part Number: 20717448
Product Specifications- Other Name: Plate; Suspension Support Anchor Plate; Plate, Engine Mounting
- Position: Passenger Side

Chevrolet Engine Plate, Driver Side Part Number: 20717449
Product Specifications- Other Name: Plate, Engine Mounting; Support Plate; Suspension Support Anchor Plate; Plate
- Position: Driver Side

Chevrolet Engine Bracket Part Number: 22575983
Product Specifications- Other Name: Bracket, Engine Mounting; Engine Mount Bracket; Motor Mount; Lower Mount Brace
- Position: Rear Upper Lower


Chevrolet Mount Bracket Part Number: 10137340
Product Specifications- Other Name: Bracket, Engine Mounting; Engine Mount Bracket; Motor Mount; Engine Bracket

Chevrolet Engine Support, Driver Side Part Number: 22646025
Product Specifications- Other Name: Support, Engine Mounting; Engine Mount Bracket
- Position: Driver Side
Chevrolet Engine Support, Passenger Side Part Number: 22634856
Product Specifications- Other Name: Support, Engine Mounting; Engine Mount Bracket
- Position: Passenger Side

Chevrolet Rear Mount Bracket Part Number: 14080952
Product Specifications- Other Name: Bracket, Engine Mounting; Engine Mount Torque Strut; Engine Mount Bracket; Engine Torque Mount; Motor Mount; Mount Rear Bracket

Chevrolet Mount Bracket Part Number: 22587202
Product Specifications- Other Name: Bracket, Engine Mounting; Engine Mount Torque Strut; Engine Mount Bracket; Engine Torque Mount; Motor Mount; Rear Mount Bracket
- Position: Rear

Chevrolet Mount Bracket Part Number: 22581663
Product Specifications- Other Name: Bracket, Engine Mounting; Engine Mount Torque Strut; Engine Mount Bracket; Engine Torque Mount; Motor Mount; Rear Mount Bracket; Rear Bracket
- Position: Rear
Chevrolet Motor Mount Bracket, Driver Side Part Number: 10019186
Product Specifications- Other Name: Bracket, Engine Mounting; Engine Mount Torque Strut; Engine Mount Bracket; Motor Mount
- Position: Driver Side

Chevrolet Strut Bracket Part Number: 22639634
Product Specifications- Other Name: Bracket, Engine Mounting; Engine Mount Torque Strut; Engine Mount Bracket; Motor Mount; Torque Strut Mount Bracket; Motor Mount Rear Bracket; Torque Strut Bracket
Chevrolet Strut Bracket Part Number: 22576879
Product Specifications- Other Name: Bracket, Engine Lift; Engine Mount Torque Strut; Motor Mount; Torque Strut Bracket; Bracket, Engine Mounting
Chevrolet Mount Bracket, Passenger Side Part Number: 14039436
Product Specifications- Other Name: Bracket, Engine Mounting; Engine Mount Bracket; Motor Mount
- Position: Passenger Side


Chevrolet Lower Mount Bracket Part Number: 22590181
Product Specifications- Other Name: Bracket, Engine Mounting; Engine Mount Bracket; Motor Mount
| Page 1 of 22 |Next >
1-20 of 431 Results
Chevrolet Engine Mount Bracket
Want to cut long-term maintenance and repair costs? Choose OEM Engine Mount Bracket. Those parts deliver top durability you can trust. On our site, you'll find a huge catalog of genuine Chevrolet parts. Prices are unbeatable, so you can keep more in your pocket. Every OEM Chevrolet Engine Mount Bracket includes a manufacturer's warranty. You can also get an easy return policy that keeps buying risk free. Fast delivery, get your car on the road quickly. It's simple to search, compare, and order. Stop guessing about quality or fit. Order today and save with parts that last.
Chevrolet Engine Mount Bracket Parts Questions & Experts Answers
- Q: How to Properly Service and Repair the Engine Mount Bracket on Chevrolet Camaro?A:Commence procedures for Engine Mount Bracket replacement by removing the engine mounts first. Start with unscrewing bolts 1 and 2 that secure the right Engine Mount Bracket and after that remove the bracket itself. Next comes the disconnection of the Engine Mount stud cable harness and removing its harness clamp and battery positive cable harness nut and rf ground strap. The next procedure requires the removal of the left Engine Mount Bracket studs and bolts before taking out the Engine Mount Bracket. The service procedure initiates with installation of the left Engine Mount Bracket along with its stud to the engine block following fastener notice requirements mentioned in service precautions. The left Engine Mount Bracket bolts need torquing to 102 nm (75 ft. Lbs.) and Engine Mount Bracket stud requires torquing to 87 nm (64 ft. Lbs.). Install the positive cable harness by attaching it to the Engine Mount Bracket stud and rf ground strap then connect the harness clamp to the stud before finally torques the battery positive cable harness nut to 25 nm (18 ft. Lbs.). Reinstall the right Engine Mount Bracket into position alongside its bolts (1 and 2) which then need tightening at two Engine Mount Bracket bolts to 102 nm (75 ft. Lbs.) and one Engine Mount Bracket bolt to 50 nm (37 ft. Lbs.).
- Q: How to replace the engine mount and engine mount bracket on Chevrolet Malibu?A:The first task for replacing the engine mount and bracket is disconnecting the throttle body air inlet duct. First raise the car until suitable and use support tools to lift it. After wheel and tire removal proceed with taking off the right engine splash guard. Lower the vehicle by removing its engine mount lower nuts. The universal engine support fixture (J 28467-B) should be used for elevating the engine before you properly support the entire vehicle. The procedure includes removing engine mount bracket-to-oil pan bolts as the first step along with elimination of engine mount and its bracket. The engine mount requires eliminating its upper nuts before separating it from the engine mount bracket. When installing the mount position it on the engine mount bracket while tightening engine mount upper nuts to 47 nm (35 ft. Lbs.). Safely install the engine mount bracket together with its mount to the Oil Pan while tightening the engine mount bracket-to-oil pan bolts to 58 nm (43 ft. Lbs.). Lower the engine with the vehicle before you lift the vehicle for appropriate support of its surface. Then continue to support the vehicle at the desired height. Fasten the engine mount lower nuts to 43 nm (32 ft. Lbs.). The last step involves reinstalling the right engine splash shield as well as the right front wheel and tire but before lowering the vehicle you must remove the universal engine support fixture (J 28467-B). Connect the throttle body air inlet duct with care at the end of the installation.
- Q: How to replace the right side engine mount bracket (2500 LY6) on Chevrolet Tahoe?A:The procedure for right side Engine Mount Bracket (2500 LY6) replacement requires the removal of the Engine Mount. After removing all Engine Mount Bracket bolts you can proceed to remove the Engine Mount Bracket. Set the Engine Mount Bracket on the frame before you fully remove the original adhesive patch traces. After treating the bolt threads with denatured alcohol or a comparable solution allow them to reach full dryness. The bolts need gm threadlock gm p/n 12345382 (Canadian P/N 10953489) or an equivalent product applied to them. Notice must be taken when installing fasteners to prevent vehicle interior or exterior damage. Fasten the Engine Mount Bracket bolts with proper torque of 65 nm (48 lb ft). Finally, install the Engine Mount.


Related Chevrolet Parts
 Chevrolet Fuel Filter
 Chevrolet Oil Pan
 Chevrolet Dipstick Tube
 Chevrolet Engine Oil Cooler
 Chevrolet Oil Drain Plug Gasket
 Chevrolet Timing Belt
 Chevrolet Camshaft Seal
 Chevrolet Crankshaft Thrust Washer Set
 Chevrolet Pushrod
 Chevrolet Rocker Arm
 Chevrolet Timing Belt Tensioner
 Chevrolet Timing Chain Tensioner
Browse Chevrolet Engine Mount Bracket by Models
Nova S10 Colorado C10 Tahoe Cruze Malibu Camaro Equinox Impala SS SSR Silverado 1500 Silverado 2500 HD Caprice Cobalt Suburban Traverse Blazer HHR Sonic Tracker Volt El Camino K10 Spark Trax Trailblazer Astro Cavalier Corvette C20 Beretta C1500 C2500 C30 C3500 Celebrity Chevette City Express Corsica Express 1500 Express 2500 Express 3500 G10 G20 G30 K1500 K20 K2500 K30 K3500 K5 Blazer Lumina Metro Monte Carlo P30 Prizm S10 Blazer Silverado 2500 Sprint Uplander Venture Lumina APV Silverado 3500 Suburban 1500 Trailblazer EXT Avalanche 1500 Avalanche 2500 C10 Suburban C1500 Suburban C20 Suburban C2500 Suburban Captiva Sport Citation II Cruze Limited Impala Limited K10 Suburban K1500 Suburban K20 Suburban K2500 Suburban Malibu Limited P20 R10 R10 Suburban R1500 Suburban R20 R20 Suburban R2500 R2500 Suburban R30 R3500 Silverado 1500 Classic Silverado 1500 HD Silverado 1500 HD Classic Silverado 1500 LD Silverado 1500 LTD Silverado 2500 HD Classic Silverado 3500 Classic Silverado 3500 HD Suburban 2500 V10 V10 Suburban V1500 Suburban V20 V20 Suburban V2500 Suburban V30 V3500