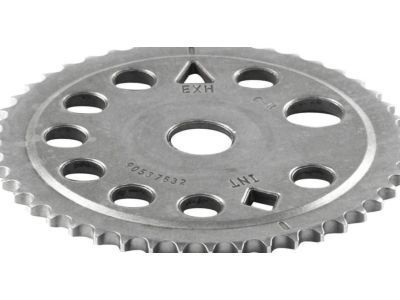
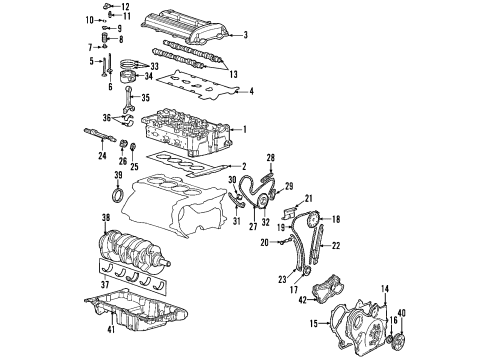
To service and repair the Camshaft gear and sprocket, you'll need the following tools: tensioner tool (J 45027). Remove the negative cable from the battery, remove the Camshaft cover, and lift and block the vehicle. Next, take off the engine front cover and let the vehicle down. Finally, unbolt the Camshaft cover once more and use a 24 mm open-end wrench to turn the Camshaft clockwise to align the no. 1 piston at around 60 degrees before top dead center. Remove the spark plugs to accelerate rotation and the Timing Chain Tensioner, the upper Timing Chain Guide, and hold the camshafts with a 24 mm wrench. Proceed to unfasten the exhaust Camshaft sprocket bolt and sprocket, the Timing Chain Tensioner guide, the Engine Mount, the fixed Timing Chain Guide access plug, and the fixed Timing Chain Guide. Discard the intake Camshaft sprocket bolt and remove the intake Camshaft sprocket then take off the Timing Chain from the top of the cylinder head then remove the crankshaft sprocket, oil nozzle and bolt, balance shaft drive chain tensioner, adjustable balance shaft chain guide, small balance shaft drive chain guide, and upper balance shaft drive chain guide. To make it easier to remove the balance shaft drive chain, ensure all the slack for the chain will be between the crankshaft and water pump sprokets. For installations, begin with the upper balance shaft chain guide and tighten its bolts to 10 nm (89 inch lbs), followed by the small balance shaft chain guide and adjustable balance shaft drive chain guide tighten each of these bolts to 10 nm (89 inch lbs). Twist the tensioner plunger by 90 degrees and squeeze it until a paper clip can be inserted, then install the timing link tensioner and tighten the bolts of the 10 nm (89 inch lbs.). remove the paper clip, install an oil nozzle and bolt confident with 10 nm (89 inch lbs.), and install a crankshaft sprocket with the timing at the 5 o"clock position. Lower the Timing Chain through the opening in the cylinder head, making sure it winds its way around both sides of the cylinder block bosses, then fit the intake Camshaft sprocket with the int diamond at the 2 o'clock position and hand tighten a new intake Camshaft sprocket bolt. Route the Timing Chain over the crankshaft sprocket and over the intake Camshaft sprocket so that the Timing Chain lines up in its colored links with its timing marks. Arranging the Timing Chain matching colored link at the exh triangle, install the exhaust Camshaft sprocket at the 10 o'clock position tight the bolted of the Timing Chain with a torque of 10 nm (89 inch lbs) seize the Timing Chain Tensioner guide. Channel the Camshaft a little using a 24 mm wrench to get the exhaust sprocket into position, then hand tighten a new-bolt creature exhaust Camshaft sprocket, also install the fixed Timing Chain Guide, tighten its bolts to 10 nm (89 inch lbs.). Seal, gm p/n 12345382 (Canadian P/N 10953489), to the Timing Chain Guide bolt access hole plug, and tighten to 90 nm (66 ft. Lbs.). Mount the Engine Mount, check the Timing Chain Tensioner for damage, and measure or take the assembly from end to end and ensure it is in a compressed state of 72 mm (2.83 in). If not, apply steps needed to compress it in j 45027-2 and j 45027-1 . Clean the threaded hole of the Timing Chain Tensioner, install the new Timing Chain Tensioner assembly, and tighten 75 nm (55 ft. Lbs.). Compress the tensioner 2 mm (0.079 in) with an appropriate tool and use a 24 mm wrench to hold the Camshaft and tighten the new Camshaft bolts to 85 nm (63 ft. Lbs.) turned 30 degrees added. Last of all, to install the Camshaft cover, lift the vehicle, install the engine front cover, let the vehicle down and reconnect the negative Battery Cable.
Posted by ChevyPartsGiant Specialist