ChevyParts
My Garage
My Account
Cart
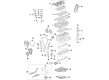
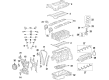
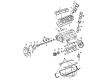
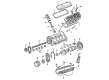
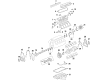
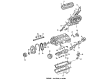
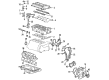
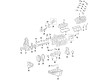
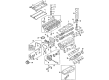
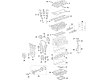
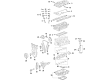
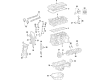
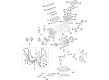
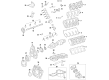
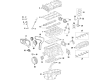
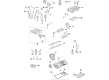
OEM Chevrolet Cam Gear
Camshaft Gear- Select Vehicle by Model
- Select Vehicle by VIN
Select Vehicle by Model
orMake
Model
Year
Select Vehicle by VIN
For the most accurate results, select vehicle by your VIN (Vehicle Identification Number).
119 Cam Gears found


Chevrolet Camshaft Gear Part Number: 12684831
$98.69 MSRP: $169.49You Save: $70.80 (42%)Ships in 1-3 Business DaysProduct Specifications- Other Name: Actuator, Engine Camshaft; Variable Valve Timing Sprocket; Cam Gear; Actuator
- Replaces: 12603744, 12672484, 12665856, 12630917, 12626161


Chevrolet Camshaft Gear Part Number: 55562222
$141.59 MSRP: $241.05You Save: $99.46 (42%)Ships in 1-2 Business DaysProduct Specifications- Other Name: Sprocket, Engine Camshaft; Variable Valve Timing Sprocket; Cam Gear; Actuator


Chevrolet Camshaft Gear Part Number: 340235
$58.88 MSRP: $92.23You Save: $33.35 (37%)Ships in 1-3 Business DaysProduct Specifications- Other Name: Sprocket, Camshaft; Variable Valve Timing Sprocket; Timing Gear; Cam Gear; Timing Gear Set; Sprocket, Engine Camshaft; Gear, Engine Camshaft


Chevrolet Camshaft Gear Part Number: 12551401
$76.14 MSRP: $119.27You Save: $43.13 (37%)Ships in 1-2 Business DaysProduct Specifications- Other Name: Sprocket, Engine Camshaft; Variable Valve Timing Sprocket; Cam Gear


Chevrolet Camshaft Gear Part Number: 12602699
$266.27 MSRP: $418.96You Save: $152.69 (37%)Ships in 1-3 Business DaysProduct Specifications- Other Name: Actuator, Engine Camshaft; Variable Valve Timing Sprocket; Cam Gear; Actuator

Chevrolet Camshaft Gear Part Number: 12552128
$111.44 MSRP: $223.75You Save: $112.31 (51%)Ships in 1-2 Business DaysProduct Specifications- Other Name: Sprocket, Engine Camshaft; Variable Valve Timing Sprocket; Timing Gear; Cam Gear; Timing Gear Set


Chevrolet Camshaft Gear Part Number: 90537632
$30.60 MSRP: $50.39You Save: $19.79 (40%)Ships in 1-3 Business DaysProduct Specifications- Other Name: Sprocket, Engine Camshaft; Variable Valve Timing Sprocket; Cam Gear

Chevrolet Camshaft Gear Part Number: 12630091
$164.86 MSRP: $280.67You Save: $115.81 (42%)Ships in 1-2 Business DaysProduct Specifications- Other Name: Actuator, Engine Camshaft; Variable Valve Timing Sprocket; Cam Gear; Actuator

Chevrolet Camshaft Gear Part Number: 96940665
$24.28 MSRP: $38.03You Save: $13.75 (37%)Ships in 1-3 Business DaysProduct Specifications- Other Name: Gear, Camshaft; Variable Valve Timing Sprocket; Cam Gear; Gear, Engine Camshaft
- Replaces: 96498123

Chevrolet Actuator Part Number: 12701510
$146.60 MSRP: $251.77You Save: $105.17 (42%)Ships in 1-2 Business DaysProduct Specifications- Other Name: Actuator, Engine Camshaft
- Replaces: 12643698

Chevrolet Actuator Part Number: 12668038
$85.22 MSRP: $205.46You Save: $120.24 (59%)Ships in 1-2 Business DaysProduct Specifications- Other Name: Actuator, Engine Camshaft

Chevrolet Camshaft Gear Part Number: 19316192
$264.02 MSRP: $415.42You Save: $151.40 (37%)Ships in 1-3 Business DaysProduct Specifications- Other Name: Sprocket, Engine Camshaft; Variable Valve Timing Sprocket; Cam Gear
Chevrolet Actuator Part Number: 12684805
$120.56 MSRP: $205.24You Save: $84.68 (42%)Ships in 1-2 Business DaysProduct Specifications- Other Name: Actuator, Engine Camshaft
- Replaces: 12661007
Chevrolet Camshaft Gear Part Number: 12691939
$171.73 MSRP: $270.23You Save: $98.50 (37%)Ships in 1-3 Business DaysProduct Specifications- Other Name: Gear Assembly-Camshaft; Variable Valve Timing Sprocket; Timing Gear; Cam Gear; Timing Gear Set
- Replaced by: 12721405

Chevrolet Camshaft Gear Part Number: 55573057
$83.68 MSRP: $131.08You Save: $47.40 (37%)Ships in 1-3 Business DaysProduct Specifications- Other Name: Sprocket, Engine Camshaft; Variable Valve Timing Sprocket; Cam Gear
Chevrolet Actuator Part Number: 12674562
$58.95 MSRP: $101.24You Save: $42.29 (42%)Ships in 1-2 Business DaysProduct Specifications- Other Name: Actuator Assembly-Camshaft Position Exhaust; Actuator, Engine Camshaft
- Replaced by: 12698848

Chevrolet Camshaft Gear Part Number: 24506089
$44.91 MSRP: $70.35You Save: $25.44 (37%)Ships in 1-3 Business DaysProduct Specifications- Other Name: Sprocket, Engine Camshaft; Variable Valve Timing Sprocket; Timing Gear; Cam Gear; Timing Gear Set
Chevrolet Actuator Part Number: 25203207
$132.31 MSRP: $227.24You Save: $94.93 (42%)Ships in 1-3 Business DaysProduct Specifications- Other Name: Actuator, Engine Camshaft
- Replaces: 12638661

Chevrolet Actuator Assembly Part Number: 12581568
Product Specifications- Other Name: Actuator, Engine Camshaft; Actuator
Chevrolet Actuator Assembly Part Number: 12580314
$143.94 MSRP: $226.48You Save: $82.54 (37%)Product Specifications- Other Name: Actuator, Engine Camshaft; Actuator
| Page 1 of 6 |Next >
1-20 of 119 Results
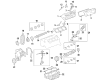
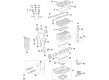
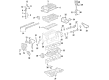
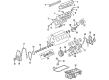
Chevrolet Cam Gear
Want to cut long-term maintenance and repair costs? Choose OEM Cam Gear. Those parts deliver top durability you can trust. On our site, you'll find a huge catalog of genuine Chevrolet parts. Prices are unbeatable, so you can keep more in your pocket. Every OEM Chevrolet Cam Gear includes a manufacturer's warranty. You can also get an easy return policy that keeps buying risk free. Fast delivery, get your car on the road quickly. It's simple to search, compare, and order. Stop guessing about quality or fit. Order today and save with parts that last.
Chevrolet Cam Gear Parts Questions & Experts Answers
- Q: How to replace the Cam Gear for Bank 2 on Chevrolet Camaro?A:The replacement of bank 2 camshaft position actuator starts with removing both the Intake Manifold and the left camshaft cover. The maintenance process starts with sensor removal of the left intake and exhaust camshaft position sensors and additional removal of left intake and exhaust camshaft position actuator solenoids. You should turn the crankshaft balancer bolt to a clockwise direction so the camshafts reach their neutral position before marking the camshaft Timing Chain and position actuators for reassembly. Mark appropriate positions on the Timing Chain links and the neighboring teeth on both the intake and exhaust camshaft position actuators. With an open-end wrench during this procedure grip the camshafts to move them in unison and produce chain slack before removing the en-48313 (Timing Chain Retention Tool) so its legs can retract. Place the en-48313 tool between the front-facing camshaft actuators and adjust its legs to reach the Timing Chain until they just stop but avoid tightening down. After hand-tightening the tool you need to rotate the camshafts to generate additional slack. The brevity of the tool allows it to maintain position of the Timing Chain. An open-end wrench serves as a tool to stop engine rotation before removing the camshaft position actuator bolts so the actuators can be taken off when needed. Begin actuator installation by aligning marks from the actuator to marks on the Timing Chain which were established during removal then place the parts while keeping the bolts loose. Take the en-48313 tool off before installing the correct camshaft thrust washer according to the number of actuator attaching screws. Reapply the new actuator bolts with a torque of 58 nm (43 lb ft) when the actuator needs replacement. The last stage includes reinstallation of the left intake and exhaust camshaft position actuator solenoids along with sensors and left camshaft cover and Intake Manifold.
- Q: How to replace the Cam Gear intake sprocket on Chevrolet Colorado?A:The first task for camshaft intake sprocket replacement requires camshaft cover removal. cek the rotation of the Crankshaft in a clockwise direction for the #1 Piston to pass tdc while located on compression stroke. Position the timing mark from the intake camshaft sprocket onto the following Timing Chain link for marking. Fasten the camshaft holding tool (J 44221) at the back end of the camshafts. Securely position the Timing Chain retention tool (J 44217) along with the chain holding tool (J-44217-45) through their hooks into Timing Chain links near Timing Chain shoes both at the front and back engine sides while tightening wingnuts until the hooks remain firmly in position and gage blocks stay secure. First remove and throw away the intake camshaft sprocket bolt before you uninstall the intake camshaft sprocket. To install the new intake camshaft sprocket begin by positioning its timing mark directly with the marked link of the Timing Chain. Use a new bolt to secure the new intake camshaft sprocket onto the intake camshaft while tightening it with 20 n.m (15 lb ft) torque and 100 degrees additional angle meter (J 45059) measurement. The last step requires you to take off the camshaft holding tool (J 44221) and chain holding tool (J-44217-45) as well as the Timing Chain retention tool (J 44217) before putting back the camshaft cover.
- Q: How to replace the Cam Gear Position Intake Actuator on Chevrolet Malibu?A:Before installing the Camshaft position intake actuator the mechanic must remove the Camshaft cover along with upper Timing Chain Guide bolts and guide. A 24 mm wrench (J 44217) should be used to secure the Camshaft during bolt loosening yet the intake Camshaft actuator bolt remains intact. The Timing Chain tensioner tool (J 44217) should have its tips extended completely into the Timing Chain for replacement purposes. The Timing Chain tensioner tool (J 44217) has one tool that must be installed on the exhaust Camshaft side to hold the Timing Chain before tightening its nuts firmly. Use another tool from the Timing Chain tensioner tool (J 44217) to perform the same operation on the intake Camshaft side. Tag the positioning and location markings for intake and exhaust Camshaft actuators which are present on the Timing Chain. Extract the intake Camshaft actuator bolt and discard it afterward while removing the intake Camshaft actuator from its position on the Camshaft and Timing Chain. When installing the exhaust Camshaft actuator make sure its alignment mark matches the Timing Chain mark precisely. The Timing Chain should be fitted on the intake Camshaft actuator with proper alignment to the Timing Chain mark before installing the actuator onto the Camshaft unit. Fasten the new intake Camshaft actuator bolt until secure but continue holding the tools in place on both the intake and exhaust Camshaft Timing Chain assembly sides before removing them. After securing the Camshaft using a 24 mm wrench (J 44217) you must tightly tighten the new Camshaft actuator bolt to 85 n.m (63 lb ft) by adding another 30 degrees using the angle meter (J 45059). Install the upper Timing Chain Guide followed by its bolts while torquing them to 10 n.m (89 lb in) then replace the Camshaft cover.


Related Chevrolet Parts
 Chevrolet Fuel Filter
 Chevrolet Oil Pan
 Chevrolet Dipstick Tube
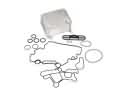 Chevrolet Engine Oil Cooler
 Chevrolet Piston
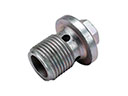 Chevrolet Drain Plug
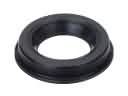 Chevrolet Camshaft Seal
 Chevrolet Exhaust Valve
 Chevrolet Rocker Arm
 Chevrolet Timing Belt Tensioner
 Chevrolet Timing Chain Tensioner
 Chevrolet Valve Cover Gasket
Browse Chevrolet Cam Gear by Models
Nova S10 Colorado C10 Tahoe Cruze Malibu Camaro Equinox Impala SS SSR Avalanche Silverado 1500 Silverado 2500 HD Caprice Cobalt Suburban Traverse Blazer HHR Sonic Tracker Volt El Camino K10 Spark Trax Trailblazer Astro Cavalier Corvette C20 Aveo Beretta C1500 C2500 C30 C3500 Celebrity Chevette City Express Corsica Express 1500 Express 2500 Express 3500 G10 G20 G30 K1500 K20 K2500 K30 K3500 K5 Blazer Lumina Metro Monte Carlo Prizm S10 Blazer Sprint Uplander Venture Lumina APV Silverado 3500 Suburban 1500 Trailblazer EXT Avalanche 2500 Aveo5 C10 Suburban C1500 Suburban C20 Suburban C2500 Suburban Captiva Sport Cruze Limited Impala Limited K10 Suburban K1500 Suburban K20 Suburban K2500 Suburban R10 R10 Suburban R1500 Suburban R20 R20 Suburban R2500 R2500 Suburban R30 R3500 Silverado 1500 LD Silverado 2500 HD Classic Silverado 3500 Classic Silverado 3500 HD Suburban 2500 Suburban 3500 HD V10 V10 Suburban V1500 Suburban V20 V20 Suburban V2500 Suburban V30 V3500