ChevyParts
My Garage
My Account
Cart
OEM GMC Envoy Intake Manifold
Engine Intake Manifold- Select Vehicle by Model
- Select Vehicle by VIN
Select Vehicle by Model
orMake
Model
Year
Select Vehicle by VIN
For the most accurate results, select vehicle by your VIN (Vehicle Identification Number).
5 Intake Manifolds found


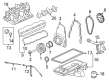
GMC Envoy Intake Manifold Part Number: 12620308
$216.35 MSRP: $351.12You Save: $134.77 (39%)

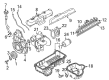
GMC Envoy Intake Manifold Part Number: 89017800
$312.17 MSRP: $495.64You Save: $183.47 (38%)Ships in 1-2 Business Days


GMC Envoy Intake Manifold Part Number: 89017588


GMC Envoy Intake Manifold Part Number: 12580420
$187.90 MSRP: $295.65You Save: $107.75 (37%)
GMC Envoy Intake Manifold Part Number: 89060570
GMC Envoy Intake Manifold
Want to cut long-term maintenance and repair costs? Choose OEM Intake Manifold. Those parts deliver top durability you can trust. On our site, you'll find a huge catalog of genuine GMC Envoy parts. Prices are unbeatable, so you can keep more in your pocket. Every OEM GMC Envoy Intake Manifold includes a manufacturer's warranty. You can also get an easy return policy that keeps buying risk free. Fast delivery, get your car on the road quickly. It's simple to search, compare, and order. Stop guessing about quality or fit. Order today and save with parts that last.
The Intake Manifold in GMC Envoy vehicles charges on the distribution of air or an air/fuel mixture inside the cylinder to increase power and performance. Usually, it is made of plastic as it should be lightweight and good at removing heat, the intake manifold provides equal distribution of air in the engine. Depending on the model, some have upper and lower halves bolted with gaskets whereas others have the coolant passages and thermo-stat mounts on them. Clamp on performance manifolds available in the boost horsepower and torque by optimizing the air/fuel mix. Replacing the conventional cast iron manifold with a better aluminium one can do extra-ordinary wonders especially it is endowed upon an engine tuning. Variable length intake manifolds fine-tune power, torque- and fuel consumption benefits through airflow velocity and pressure, which is influenced by the load condition of the engine. These serve as a basis for creating improved and enhanced engines for GMC Envoy vehicles so that improvements for strength and proficiency can be obtained more expediently.
GMC Envoy Intake Manifold Parts and Q&A
- Q: How to replace the intake manifold on a 4.2L engine on GMC Envoy?A:To change the Intake Manifold to 4.2l engine first the cable off the negative battery and de-pressurise with ch 48027 or without it. Take off the Throttle Body, remove the pcm retaining bolts and nuts before you take off the ecm. Remove the fuel feed pipe from the Fuel Rail and the integral clip from the wire harness bracket, then the engine wire harness bracket bolt. Then pull off the electrical harness and vacuum lines from the Intake Manifold, then disconnect the MAP Sensor electrical connector, crankcase ventilation hose, and vacuum brake booster hose. Take out the generator but make sure not to remove the Intake Manifold bolts as these bolts are trapped in it. Undo and remove Intake Manifold to reveal the rods. For installation, fit in a new Intake Manifold Gasket onto the Intake Manifold, bolt it down tightly to 10 n.m (89 lb in) and reinstall the generator. All the vacuum brake booster hose needs to be attached while getting the inner diameter of the crankcase ventilation hose lubricated before being installed. Connect the MAP Sensor electrical connector, electrical harness, and vacuum lines to the manifold of the intake and secure the engine electrical harness bracket bolt at 10 n.m (89 lb in) attaching the integral clip to the wire harness bracket. Connect the fuel feed pipe to the Fuel Rail and add the pcm mounting studs to the Intake Manifold, then tighten stud to 6 n.m (53 lb in). Mount pcm on studs and fix using retaining bolts and nuts , 8 n.m (71 lb in) tightened. Connect the pcm harness connectors and tighten the retaining bolts to 8 n.m (71 lb in). Lastly, install the Throttle Body, reconnect the negative Battery Cable and check for leaks with the ignition on, engine off for 2 seconds, off for 10 seconds and on and check for fuel leaks.

Related GMC Envoy Parts
 GMC Envoy Fuel Injector
 GMC Envoy Fuel Pump
 GMC Envoy Fuel Tank
 GMC Envoy Gas Cap
 GMC Envoy Air Hose
 GMC Envoy Fuel Pressure Sensor
 GMC Envoy Fuel Pump Gasket
 GMC Envoy Fuel Pump Seal
 GMC Envoy Fuel Tank Filler Neck
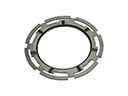 GMC Envoy Fuel Tank Lock Ring
 GMC Envoy Fuel Tank Sending Unit
 GMC Envoy Intake Manifold Gasket