ChevyParts
My Garage
My Account
Cart
OEM GMC Safari Engine Mount
Engine Motor Mount- Select Vehicle by Model
- Select Vehicle by VIN
Select Vehicle by Model
orMake
Model
Year
Select Vehicle by VIN
For the most accurate results, select vehicle by your VIN (Vehicle Identification Number).
13 Engine Mounts found


GMC Safari Motor Mount Part Number: 22188284
$51.94 MSRP: $88.43You Save: $36.49 (42%)Ships in 1-2 Business Days
GMC Safari Motor Mount, Passenger Side Part Number: 15638410
$30.13 MSRP: $62.42You Save: $32.29 (52%)Ships in 1-2 Business Days

GMC Safari Bracket, Passenger Side Part Number: 15999046
$43.37 MSRP: $67.92You Save: $24.55 (37%)GMC Safari Bracket, Driver Side Part Number: 15999045

GMC Safari Bracket Part Number: 15708673
GMC Safari Bracket, Passenger Side Part Number: 15708672
GMC Safari Bracket, Driver Side Part Number: 15697577
GMC Safari Motor Mount, Driver Side Part Number: 15638409
GMC Safari Bracket, Driver Side Part Number: 15612693
GMC Safari Bracket, Driver Side Part Number: 15596459
GMC Safari Bracket, Passenger Side Part Number: 15596458
GMC Safari Mount, Passenger Side Part Number: 15141594
GMC Safari Mount, Driver Side Part Number: 15141593
GMC Safari Engine Mount
Want to cut long-term maintenance and repair costs? Choose OEM Engine Mount. Those parts deliver top durability you can trust. On our site, you'll find a huge catalog of genuine GMC Safari parts. Prices are unbeatable, so you can keep more in your pocket. Every OEM GMC Safari Engine Mount includes a manufacturer's warranty. You can also get an easy return policy that keeps buying risk free. Fast delivery, get your car on the road quickly. It's simple to search, compare, and order. Stop guessing about quality or fit. Order today and save with parts that last.
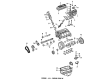
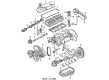
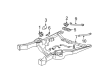
The GMC Safari Engine Mount is an important part recognized for its quality and durability in charge of connecting and fixed the position of the engine inside the body of numerous kinds of GMC Safari. As a part of shock and noise absorber, this Engine Mount gives a more comfortable and stable ride while making the vehicle more efficient and safer. It suits various models of the GMC Safari ranging from the passenger model to the cargo model, it thus considered to be an exceptional model that meets the needs of most drivers. Basically, the construction of the Engine Mount has stiff metal parts and another part that is more flexible rubber, which insulate; it is resistant to the aging process, high temperatures, and any fluids that may cause wear and tear. That is why GMC Safari Engine Mount can be regarded as one of the most notable products in the automotive market with the necessary upgrades in terms of the options, such as fluid-filled hydraulic mounts for the optimal performance. The improvement of such feature is advantageous in improving the general handling of the drive and can be relevant to the vehicle's towing power, which may go up to 2,500 kg. Based in Detroit Michigan and with production running between 1985 to 2005, the GMC Safari is an icon and so the GMC Engine Mount is a true representation of the brand as a result. All in all, the GMC Safari Engine Mount is crucial to the structural and operational health of the vehicle to guarantee its efficiency for a long time.
GMC Safari Engine Mount Parts and Q&A
- Q: How to replace the right engine mount on GMC Safari?A:The first step to replace the right Engine Mount begins with disconnecting the battery negative cable followed by vehicle elevation. Start by removing the right front tire together with the right fender wheelhouse extension before extracting the Starter from the vehicle. The first step involves removing both elements of the Engine Mount through-bolt and accompanying nut. A jack placed at the square tab on the engine block rear section should lift the engine just until the Engine Mount becomes removable. Follow the fender wheelhouse path to reach and unbolt the Engine Mount bracket to engine at its top two mounting points. First remove the Engine Mount bracket before proceeding to eliminate awd vehicle frame bolts on the Engine Mount or disassembling rwd vehicle frame bolts and frame nuts on the Engine Mount. First attach the awd vehicle Engine Mount to frame bolts while tightening them to 59 nm (44 ft. Lbs.) after which install the rwd vehicle right side Engine Mount bolts at 47 nm (35 ft. Lbs.) alongside the nuts at 42 nm (31 ft. Lbs.). Following this step is to install the Engine Mount bracket to the engine and to torque the bracket bolts to 64 nm (47 ft. Lbs.). The Engine Mount through-bolt should be installed while lower the engine and then by tightening it to 68 nm (50 ft. Lbs.). After reinstalling the Starter the technician must replace both the right fender wheelhouse extension and right front tire while lowering the vehicle then reconnect the battery negative cable.
- Q: How to replace the left engine mount on GMC Safari?A:Begin the replacement of a left Engine Mount by disconnecting the negative cable from the battery followed by vehicle elevation. First remove the oil filter adapter before uninstalling both the through-bolt and nut securing the Engine Mount for the targeted side. Crank up the engine block using a jack applied to its square tab at the rear until reaching the removal point for the Engine Mount. Begin by accessing the fender wheelhouse to reach and remove the two upper bolts holding the right Engine Mount bracket. Then uninstall the Engine Mount bracket itself after disengaging all Engine Mount bracket to engine securing bolts. During awd modification the Engine Mount requires removal by first unfastening bolts that secure it to the frame then removing the mount. In order to work on the Engine Mount for a rwd vehicle one must unfasten all bolts and nuts that keep the mount attached to the frame bracket. The left side Engine Mount frame bracket should be removed from the frame only when absolutely needed. Start by mounting the engine to the frame for awd vehicles and tighten the bolts to 59 nm (44 ft. Lbs.). The installation of the frame bracket bolts to 47 nm (35 ft. Lbs.) and the nuts to 42 nm (31 ft. Lbs.) must follow the initial reinstallation of the rwd vehicle left side bolts and nuts together with the Engine Mount frame bracket when it was removed. After slotting the left side Engine Mount onto the frame bracket follow by tightening the mount to frame bolts until they reach 47 nm (35 ft. Lbs.) and finishing with tightening the nuts to 42 nm (31 ft. Lbs.). Fitting the Engine Mount bracket onto the engine requires torquing the bracket bolts to 64 nm (47 ft. Lbs.). Lower the engine before you install both the through-bolt and nut of the Engine Mount and tighten them to 68 nm (50 ft. Lbs.). Finish the procedure by installing the oil filter adapter then lowering the vehicle while also reestablishing the battery negative cable connection.


Related GMC Safari Parts
 GMC Safari Balance Shaft Gear
 GMC Safari Cam Gear
 GMC Safari Camshaft Bearing
 GMC Safari Crankshaft Pulley
 GMC Safari Engine Mount Bracket
 GMC Safari Head Gasket
 GMC Safari Oil Filter
 GMC Safari Pushrod
 GMC Safari Rocker Arm
 GMC Safari Rocker Shaft Spring Kit
 GMC Safari Timing Chain
 GMC Safari Valve Stem Oil Seal