ChevyParts
My Garage
My Account
Cart
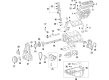
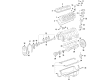
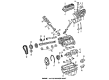
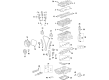
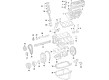
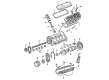
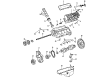
OEM GMC Savana 3500 Timing Chain
Engine Timing Chain- Select Vehicle by Model
- Select Vehicle by VIN
Select Vehicle by Model
orMake
Model
Year
Select Vehicle by VIN
For the most accurate results, select vehicle by your VIN (Vehicle Identification Number).
9 Timing Chains found


GMC Savana 3500 Timing Chain Part Number: 12646386
$63.56 MSRP: $108.21You Save: $44.65 (42%)

GMC Savana 3500 Timing Chain Part Number: 14088783
$87.32 MSRP: $138.63You Save: $51.31 (38%)Ships in 1-2 Business Days

GMC Savana 3500 Timing Chain Part Number: 14087014
$55.75 MSRP: $94.91You Save: $39.16 (42%)Ships in 1-2 Business Days

GMC Savana 3500 Timing Chain Part Number: 12646387
$63.56 MSRP: $108.21You Save: $44.65 (42%)Ships in 1-3 Business Days


GMC Savana 3500 Timing Chain Part Number: 12458911
$56.00 MSRP: $87.74You Save: $31.74 (37%)


GMC Savana 3500 Timing Chain Part Number: 10114177
$112.41 MSRP: $176.87You Save: $64.46 (37%)Ships in 1-3 Business Days
GMC Savana 3500 Timing Chain Part Number: 14022647
$87.49 MSRP: $148.95You Save: $61.46 (42%)GMC Savana 3500 Timing Chain Part Number: 12632727
$40.90 MSRP: $69.63You Save: $28.73 (42%)Ships in 1-3 Business Days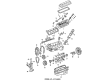
GMC Savana 3500 Timing Chain Part Number: 10128485
$43.02 MSRP: $64.53You Save: $21.51 (34%)Ships in 1-2 Business Days
GMC Savana 3500 Timing Chain
Want to cut long-term maintenance and repair costs? Choose OEM Timing Chain. Those parts deliver top durability you can trust. On our site, you'll find a huge catalog of genuine GMC Savana 3500 parts. Prices are unbeatable, so you can keep more in your pocket. Every OEM GMC Savana 3500 Timing Chain includes a manufacturer's warranty. You can also get an easy return policy that keeps buying risk free. Fast delivery, get your car on the road quickly. It's simple to search, compare, and order. Stop guessing about quality or fit. Order today and save with parts that last.
GMC Savana 3500 Timing Chain Parts Questions & Experts Answers
- Q: How to replace the timing chain and sprockets on GMC Savana 3500?A:Step first, remove the engine front cover and the Crankshaft position reluctor ring; it is recommended to install a new engine front cover afterwards. Turn the Crankshaft around until the number one cylinder is at the top dead center (TDC) on the compression stroke and the marks for the timing are perfectly synced for both sprockets. Then, you will need to eliminate the camshaft sprocket bolts, then camshaft sprocket, then camshaft Timing Chain. The Crankshaft gear installer (J 5825-A) can be used to remove the Crankshaft sprocket and, if needed, woodruff key (crankshaft balancer) as well. For the installation, put the woodruff key (crankshaft balancer) into the Crankshaft, if it was taken off, align the keyway of Crankshaft sprocket with the woodruff key, and use the Crankshaft gear installer (J 5590) and the hammer to fixing the Crankshaft sprocket. Make sure that the no 1 Piston is at tdc, while compressing, and align the timing marks to the sprocket on both, so that the Crankshaft sprocket will have marking at the 12 position. Mount the camshaft sprocket and Timing Chain such that the camshaft sprocket aligns in the 6 o-clock position. Close to the camshaft sprocket bolts to 25 nm (18 ft. Lbs.), align camshaft and Crankshaft sprocket alignment marks, and finally, install the Crankshaft position sensor reluctor ring and the engine front cover.

Related GMC Savana 3500 Parts
 GMC Savana 3500 Balance Shaft Bearing Set
 GMC Savana 3500 Camshaft Seal
 GMC Savana 3500 Coolant Filter
 GMC Savana 3500 Harmonic Balancer
 GMC Savana 3500 Lash Adjuster
 GMC Savana 3500 Oil Drain Plug Gasket
 GMC Savana 3500 Piston
 GMC Savana 3500 Timing Chain Tensioner
 GMC Savana 3500 Timing Cover
 GMC Savana 3500 Valve Cover Gasket
 GMC Savana 3500 Valve Cover Grommet
 GMC Savana 3500 Valve Stem Oil Seal