ChevyParts
My Garage
My Account
Cart
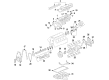
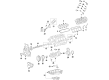
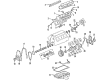
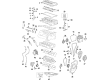
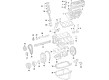
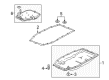
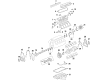
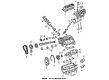
OEM GMC Sierra 1500 Oil Pan
Oil Drain Pan- Select Vehicle by Model
- Select Vehicle by VIN
Select Vehicle by Model
orMake
Model
Year
Select Vehicle by VIN
For the most accurate results, select vehicle by your VIN (Vehicle Identification Number).
21 Oil Pans found


GMC Sierra 1500 Oil Pan Part Number: 12609074
$216.08 MSRP: $367.87You Save: $151.79 (42%)Ships in 1-2 Business Days


GMC Sierra 1500 Oil Pan Part Number: 12640746
$225.02 MSRP: $383.11You Save: $158.09 (42%)Ships in 1-2 Business Days


GMC Sierra 1500 Lower Engine Oil Pan Part Number: 12669909
$48.94 MSRP: $83.30You Save: $34.36 (42%)Ships in 1-2 Business Days
GMC Sierra 1500 Oil Pan Part Number: 12599806
$139.05 MSRP: $335.25You Save: $196.20 (59%)Ships in 1-3 Business DaysGMC Sierra 1500 Oil Pan Part Number: 12579273
$313.43 MSRP: $538.29You Save: $224.86 (42%)Ships in 1-2 Business Days
GMC Sierra 1500 Oil Pan Part Number: 12684605
$221.78 MSRP: $348.96You Save: $127.18 (37%)Ships in 1-3 Business Days

GMC Sierra 1500 Oil Pan Part Number: 93800961
$141.13 MSRP: $242.38You Save: $101.25 (42%)Ships in 1-2 Business Days
GMC Sierra 1500 Oil Pan Part Number: 24043538
$52.66 MSRP: $89.64You Save: $36.98 (42%)
GMC Sierra 1500 Oil Pan, Lower Part Number: 12691192
$405.43 MSRP: $637.92You Save: $232.49 (37%)Ships in 1-3 Business Days
GMC Sierra 1500 Oil Pan Part Number: 12597153
$346.25 MSRP: $544.81You Save: $198.56 (37%)Ships in 1-3 Business Days
GMC Sierra 1500 Oil Pan Part Number: 12732388
$67.00 MSRP: $104.92You Save: $37.92 (37%)Ships in 1-2 Business Days
GMC Sierra 1500 Oil Pan Part Number: 12726914
$43.22 MSRP: $74.22You Save: $31.00 (42%)Ships in 1-2 Business Days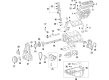
GMC Sierra 1500 Oil Pan Part Number: 12707239
$167.26 MSRP: $287.20You Save: $119.94 (42%)Ships in 1-2 Business Days
GMC Sierra 1500 Oil Pan Part Number: 24045038
$43.97 MSRP: $68.88You Save: $24.91 (37%)Ships in 1-2 Business Days
GMC Sierra 1500 Oil Pan Part Number: 24045035
$37.63 MSRP: $64.61You Save: $26.98 (42%)Ships in 1-2 Business Days

GMC Sierra 1500 Oil Pan Part Number: 55506665
$55.76 MSRP: $87.32You Save: $31.56 (37%)

GMC Sierra 1500 Oil Pan Part Number: 12707243
$182.12 MSRP: $286.56You Save: $104.44 (37%)
GMC Sierra 1500 Oil Pan Part Number: 12640747
$214.41 MSRP: $337.22You Save: $122.81 (37%)
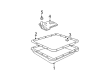
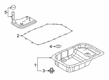
GMC Sierra 1500 Transmission Pan Part Number: 24229660
GMC Sierra 1500 Oil Pan Part Number: 12555653
| Page 1 of 2 |Next >
1-20 of 21 Results
GMC Sierra 1500 Oil Pan
Want to cut long-term maintenance and repair costs? Choose OEM Oil Pan. Those parts deliver top durability you can trust. On our site, you'll find a huge catalog of genuine GMC Sierra 1500 parts. Prices are unbeatable, so you can keep more in your pocket. Every OEM GMC Sierra 1500 Oil Pan includes a manufacturer's warranty. You can also get an easy return policy that keeps buying risk free. Fast delivery, get your car on the road quickly. It's simple to search, compare, and order. Stop guessing about quality or fit. Order today and save with parts that last.
GMC Sierra 1500 Oil Pan Parts Questions & Experts Answers
- Q: How to replace the oil pan on GMC Sierra 1500?A:The initial step to replace the Oil Pan requires vehicle elevation and proper vehicle support. Begin by draining your vehicle's oil by first removing the Drain Plug and filter but only after you have taken out the Oil Pan skid plate bolts and plate. The crossmember bolts and bar should be removed before starting 2-wheel drive replacement work. The front differential carrier needs removal in addition to crossmember bolts and bar for 4-wheel drive vehicles. The replacement process begins with removing the engine harness bracket bolts and Starter and transmission cover and engine harness and transmission tube bracket along with two engine wire harness bracket bolts. Remove manual and automatic transmission bolts when they apply. First remove the bolts securing the Oil Pan before removing the nuts from their position next remove the Oil Pan from the vehicle while getting rid of the old gasket. Check and clean the Oil Pan when needed. Installation requires a 5 mm (0.197 in) wide adhesive bead that should cover the entire engine block junction front and rear oil seal housing junction. Fit a brand-new Oil Pan Gasket during installation when adhesive is still fresh. A proper installation requires the Oil Pan to remain both flush and not extended beyond 0.3 mm (0.011 in) from the rear face of the engine block. Press the gasket into position through the grooves before sliding the Oil Pan back until it contacts a straight edge. After securing the Oil Pan bolts and nuts to a modest torque they should be measured with a feeler gauge to check the Oil Pan-to-transmission housing clearance. Proceed with repeat alignment operations if the clearance measurement exceeds 0.3 mm (0.011 in). Recheck the Oil Pan-to-transmission housing clearance measurement after torquing all bolts and nuts to 25 n.m (18 lb ft) based on the specified tightening sequence. Set the Drain Plug o-ring with a new one and torque it to 25 n.m (18 lb ft). Drive the transmission cover bolts to a torque of 12 n.m (106 lb in) before final installation. Fasten automatic and manual transmission bolts to 50 n.m when possible. You should bolt the engine wire harness bracket bolts to 9 n.m (80 lb in) along with the engine harness and transmission tube bracket bolt at this torque value. Replace the Starter while also reattaching the oil level sensor electrical wiring connector. Fasten the engine harness bracket bolts to 12 newton-meters (106 pounds-inch torque specification). The crossmember and bolts need installation for 2wd vehicles at 100 n.m (74 lb ft), while 4wd vehicles require front differential carrier and crossmember installation at 100 n.m (74 lb ft). The Oil Pan skid plate should be reinstalled with its bolts tightened to a torque of 20 n.m (15 lb ft). Use clean engine oil to treat the Oil Filter gasket before placing the filter and securing it to 30 n.m (22 lb ft). The last step involves lowering the vehicle before adding the correct amount of premium engine oil.

Related GMC Sierra 1500 Parts
 GMC Sierra 1500 Camshaft Bearing
 GMC Sierra 1500 Coolant Filter
 GMC Sierra 1500 Cylinder Head
 GMC Sierra 1500 Dipstick
 GMC Sierra 1500 Engine Mount Bracket
 GMC Sierra 1500 Harmonic Balancer
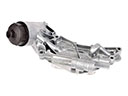 GMC Sierra 1500 Oil Cooler
 GMC Sierra 1500 Oil Filler Cap
 GMC Sierra 1500 Oil Pump Rotor Set
 GMC Sierra 1500 Piston
 GMC Sierra 1500 Rocker Arm
 GMC Sierra 1500 Rod Bearing