ChevyParts
My Garage
My Account
Cart
OEM GMC Yukon Oil Pan
Oil Drain Pan- Select Vehicle by Model
- Select Vehicle by VIN
Select Vehicle by Model
orMake
Model
Year
Select Vehicle by VIN
For the most accurate results, select vehicle by your VIN (Vehicle Identification Number).
15 Oil Pans found


GMC Yukon Lower Engine Oil Pan Part Number: 12669909
$48.94 MSRP: $83.30You Save: $34.36 (42%)Ships in 1-2 Business Days


GMC Yukon Oil Pan Part Number: 12640746
$225.02 MSRP: $383.11You Save: $158.09 (42%)Ships in 1-2 Business Days


GMC Yukon Oil Pan Part Number: 12609074
$216.08 MSRP: $367.87You Save: $151.79 (42%)Ships in 1-2 Business Days

GMC Yukon Oil Pan Part Number: 12557558
$175.72 MSRP: $301.79You Save: $126.07 (42%)Ships in 1-3 Business Days

GMC Yukon Oil Pan Part Number: 55506665
$55.76 MSRP: $87.32You Save: $31.56 (37%)

GMC Yukon Oil Pan Part Number: 12707243
$182.12 MSRP: $286.56You Save: $104.44 (37%)
GMC Yukon Oil Pan Part Number: 24045035
$37.63 MSRP: $64.61You Save: $26.98 (42%)Ships in 1-2 Business Days
GMC Yukon Oil Pan Part Number: 24043538
$52.66 MSRP: $89.64You Save: $36.98 (42%)
GMC Yukon Oil Pan Part Number: 12684605
$221.78 MSRP: $348.96You Save: $127.18 (37%)Ships in 1-3 Business Days
GMC Yukon Oil Pan Part Number: 12619011
$139.55 MSRP: $219.58You Save: $80.03 (37%)Ships in 1-3 Business Days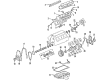
GMC Yukon Oil Pan Part Number: 12579273
$313.43 MSRP: $538.29You Save: $224.86 (42%)Ships in 1-2 Business Days
GMC Yukon Oil Pan Part Number: 23502600
GMC Yukon Oil Pan Part Number: 12563902

GMC Yukon Oil Pan Part Number: 8679931
GMC Yukon Oil Pan Part Number: 12640747
$214.41 MSRP: $337.22You Save: $122.81 (37%)
GMC Yukon Oil Pan
Want to cut long-term maintenance and repair costs? Choose OEM Oil Pan. Those parts deliver top durability you can trust. On our site, you'll find a huge catalog of genuine GMC Yukon parts. Prices are unbeatable, so you can keep more in your pocket. Every OEM GMC Yukon Oil Pan includes a manufacturer's warranty. You can also get an easy return policy that keeps buying risk free. Fast delivery, get your car on the road quickly. It's simple to search, compare, and order. Stop guessing about quality or fit. Order today and save with parts that last.
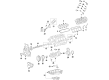
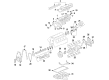
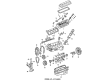
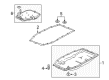
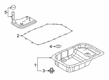
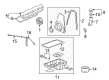
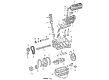
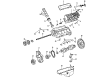
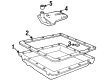
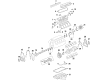
The Oil Pan of GMC Yukon vehicles is in the same category with any other automobile engine lubrication pan that holds the oil to lubricate and cool the engines moving parts. The majority of Yukon's vehicles employ the wet sump system in which the oil pump suck the oil through a pickup tube situated in the pan to move it within the engine. The oil then recycles to the oil pan, a container expected to contain sufficient of oil for all the operational conditions of the vehicle. For the previous generations of Yukon the engine may have stamped steel oil pans while the newer models may come equipped with a cast aluminum oil reservoirs. In general, the Oil Pan of the GMC Yukon vehicles is central to the well-being of the engine and its optimal functioning.
GMC Yukon Oil Pan Parts and Q&A
- Q: How to replace the oil pan on 4WD on GMC Yukon?A:4WD vehicle owners must raise their vehicle to perform Oil Pan replacement. Before work begins, 1500 series vehicle owners must remove skid plate bolts along with the skid plate itself while hybrid (HP2) operators need to remove steering gear motor shield components. In 2500 series vehicles owners should first loosen the rear pan skid plate bolts but must remove both front bolts and skid plate when present. You need to take the engine shield off next followed by the front differential carrier removal steps. Secure the steering rack to a lower position by using suitable oil drain pan placement underneath the Oil Pan Drain Plug. Drain oil from the pan while removing Drain Plug 430 and afterward tighten the plug to 25 nm (18 lb ft). Drain the Oil Filter into a pan located beneath it while you uninstall the filter (437). Reinstall and tighten the filter to 30 nm (22 lb ft) torque. For all 1500 and 2500 series vehicles remove transmission cover bolts from both right and left sides and crossbar bolts/nuts alongside the crossbar. First disconnect the engine harness from the oil level sensor electrical connector before removing the bolts that secure the air conditioning compressor bracket. After that remove the Oil Pan bolts and finally detach the Oil Pan. When using the existing Oil Pan, remove the gasket's rivets through drilling if needed before removing and discarding the gasket and rivets. Begin by putting on a new Oil Pan Gasket followed by applying 5 mm (0.20 in) of sealant on the engine block at both front and rear cover gasket tabs. Install one Oil Pan bolt through the gasket then place the Oil Pan into position with the remaining bolts which must be tightened to m6 bolts at 12 nm (106 lb in) and m8 bolts at 25 nm (18 lb ft). Position the lower transmission bolts first followed by bolt installation at the a/c compressor bracket. Remember to torque these bolts to 50 nm (37 lb ft). Position the engine harness electrical connector to the oil level sensor before cleaning the crossbar bolts threads with threadlock gm p/n 12345493 (Canadian P/N 10953488) or equivalent. The crossbar and bolts/nuts need to be installed with torque to 120 nm (89 lb ft) for 2500 series and 100 nm (74 lb ft) for 1500 series. Each transmission cover bolt should receive a torque of 12 nm (106 lb in) when finally installed. When using the existing Oil Pan install a fresh Oil Filter by lubricating the rubber seal with clean engine oil while achieving a torque of 30 nm (22 lb ft). After torquing the Drain Plug to 25 nm (18 lb ft), return the front differential carrier at this time. The steering rack should be raised while install bolts. Tighten the left bolt to 200 nm (148 lb ft) and the right bolt to 100 nm (74 lb ft). The engine shield installation should include positioning of the Oil Pan skid plate for 2500 series vehicles and tightening the rear bolts to 28 nm (21 lb ft) with optional front bolt installation. During hybrid (HP2) installation install the steering gear motor shield and during 1500 series maintenance install the Oil Pan skid plate then tighten all bolts to 28 nm (21 lb ft). Finish by lowering the vehicle before adding new engine oil and starting the engine to check for any fluid leaks.

Related GMC Yukon Parts
 GMC Yukon Fuel Filter
 GMC Yukon Crankshaft Pulley
 GMC Yukon Crankshaft Seal
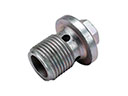 GMC Yukon Drain Plug
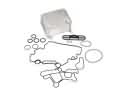 GMC Yukon Engine Oil Cooler
 GMC Yukon Motor And Transmission Mount
 GMC Yukon Oil Filler Cap
 GMC Yukon Oil Pan Gasket
 GMC Yukon Oil Pump Gasket
 GMC Yukon Rocker Arm
 GMC Yukon Timing Cover Gasket
 GMC Yukon Valve Cover Grommet