ChevyParts
My Garage
My Account
Cart
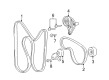
OEM GMC Yukon XL 1500 Drive Belt
Serpentine Belt- Select Vehicle by Model
- Select Vehicle by VIN
Select Vehicle by Model
orMake
Model
Year
Select Vehicle by VIN
For the most accurate results, select vehicle by your VIN (Vehicle Identification Number).
6 Drive Belts found


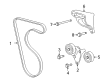
GMC Yukon XL 1500 Serpentine Belt Part Number: 19210691
$39.26 MSRP: $82.92You Save: $43.66 (53%)Ships in 1-2 Business Days


GMC Yukon XL 1500 Serpentine Belt Part Number: 12637204
$44.85 MSRP: $97.10You Save: $52.25 (54%)Ships in 1-3 Business Days


GMC Yukon XL 1500 Serpentine Belt Part Number: 12637202
$45.89 MSRP: $100.22You Save: $54.33 (55%)Ships in 1-2 Business Days


GMC Yukon XL 1500 Serpentine Belt Part Number: 12626222
$33.12 MSRP: $62.20You Save: $29.08 (47%)Ships in 1-3 Business Days


GMC Yukon XL 1500 Serpentine Belt Part Number: 12576447
$22.29 MSRP: $41.86You Save: $19.57 (47%)
GMC Yukon XL 1500 Serpentine Belt Part Number: 12576761
GMC Yukon XL 1500 Drive Belt
Want to cut long-term maintenance and repair costs? Choose OEM Drive Belt. Those parts deliver top durability you can trust. On our site, you'll find a huge catalog of genuine GMC Yukon XL 1500 parts. Prices are unbeatable, so you can keep more in your pocket. Every OEM GMC Yukon XL 1500 Drive Belt includes a manufacturer's warranty. You can also get an easy return policy that keeps buying risk free. Fast delivery, get your car on the road quickly. It's simple to search, compare, and order. Stop guessing about quality or fit. Order today and save with parts that last.
GMC Yukon XL 1500 Drive Belt Parts Questions & Experts Answers
- Q: How to replace the accessory drive belt on GMC Yukon XL 1500?A:The accessory Drive Belt replacement process begins by loosening the air cleaner outlet duct clamps at the Throttle Body and mass airflow/intake air temperature sensor before removing the radiator inlet hose clip from the outlet duct and taking out the air cleaner outlet duct. A breaker bar equipped with a hex-head socket enables you to turn the Drive Belt tensioner bolt clockwise which reduces belt tension. Begin by taking out the belt from its pulley position followed by the Drive Belt tensioner before you release the tension from the tensioner while also removing the socket and breaker bar. Inspect the belt surfaces across all pulleys while performing cleaning operations. The installation process starts by directing the Drive Belt between all pulleys except the idler pulley followed by attaching the breaker bar with hex-head socket to the belt tensioner bolt and using clockwise rotation to reduce tension. After installing the Drive Belt around the idler pulley workers should slowly release tension from the belt tensioner followed by removing both the breaker bar and socket. Before installing the air cleaner outlet duct check that the arrow at the Throttle Body end points toward the Throttle Body attaching stud and that its position is correct. The last step involves fastening the radiator inlet hose clip to the outlet duct then securing all the air cleaner outlet duct clamps at the Throttle Body and maf/iat sensor locations while tightening clamp screws to 7 nm (62 inch lbs.).

Related GMC Yukon XL 1500 Parts
 GMC Yukon XL 1500 A/C Idler Pulley
 GMC Yukon XL 1500 Coolant Pipe
 GMC Yukon XL 1500 Coolant Reservoir Cap
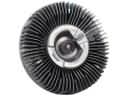 GMC Yukon XL 1500 Cooling Fan Clutch
 GMC Yukon XL 1500 Fan Clutch
 GMC Yukon XL 1500 Fan Motor
 GMC Yukon XL 1500 Fan Shroud
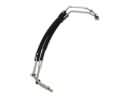 GMC Yukon XL 1500 Oil Cooler Hose
 GMC Yukon XL 1500 Radiator
 GMC Yukon XL 1500 Radiator Hose
 GMC Yukon XL 1500 Thermostat
 GMC Yukon XL 1500 Water Pump Gasket