ChevyParts
My Garage
My Account
Cart
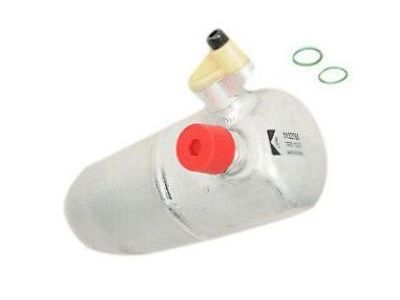
OEM 2000 Chevrolet Corvette A/C Accumulator
Accumulator- Select Vehicle by Model
- Select Vehicle by VIN
Select Vehicle by Model
orMake
Model
Year
Select Vehicle by VIN
For the most accurate results, select vehicle by your VIN (Vehicle Identification Number).
1 A/C Accumulator found

2000 Chevrolet Corvette Drier Part Number: 1132765
$28.33 MSRP: $51.28You Save: $22.95 (45%)Ships in 1-3 Business DaysProduct Specifications- Other Name: Accumulator Assembly A/C; Drier Desiccant Element; A/C Receiver Drier; A/C Accumulator; Accumulator; Accumulator, A/C Refrigerant
- Item Weight: 2.30 Pounds
- Item Dimensions: 7.4 x 6.1 x 11.3 inches
- Condition: New
- Fitment Type: Direct Replacement
- SKU: 1132765
- Warranty: This genuine part is guaranteed by GM's factory warranty.
2000 Chevrolet Corvette A/C Accumulator
With a comprehensive array of OEM 2000 Chevrolet Corvette A/C Accumulator, from fuel pumps to door handles, our website is a one-stop-shop for your needs. All our genuine 2000 Chevrolet Corvette A/C Accumulator are backed by the manufacturer's warranty and are offered at competitive prices in the market. Rest assured, you can shop with complete confidence.
2000 Chevrolet Corvette A/C Accumulator Parts Questions & Experts Answers
- Q: How to replace the A/C Accumulator on 2000 Chevrolet Corvette?A: The accumulator requires replacement by following two initial steps: recovering refrigerant and then removing both battery and heat shield. First detach the nut that holds the heater pipe bracket to the dash panel then shift the bracket position to reach the refrigerant lines. Pause the compressor hose to accumulator retaining bolt yet maintain careful closure of the compressor hose and accumulator with tape or caps to stop possible contaminants. Remove the connection between the accumulator and compressor hose and dispose of the o-ring. Move the accumulator slightly to reach its fitting on the accumulator hose while observing the hose's alignment to the evaporator tube at the back. Apply a back up wrench to the accumulator fitting for educating the accumulator hose fitting until the hose disconnects at which point discard the o-ring. Check the vehicle's insulators for wear by removing both the accumulator component and bracket at this point. A new accumulator should get the drained oil from the old unit so use it for the new one. Replacement accumulators ship without factory-filled refrigerant oil yet need an extra 2-ounce (60 ml) amount. Pour into the new accumulator sixty milliliters (2 ounces) beyond the measured oil volume. Install the lower insulator at the accumulator's bottom end before installing the accumulator to its bracket. Mount the accumulator to the bracket while holding its fastener tight enough to permit small wheel movements. After installing the vehicle-positioned accumulator and bracket remove protective tape and caps from the attached hoses. Clean both the accumulator hose as well as the accumulator using a lint-free cloth and apply mineral base 525 viscosity refrigerant oil to the new o-ring seal, avoiding any oil in the refrigerant system. Fit the o-ring onto the accumulator hose until it reaches full seating position before installing the hose to the accumulator where alignment points match the initial removal steps. Use a back up wrench on the fitting while tightening the connection between accumulator hose and accumulator to reach 41 n.m (30 lb ft). The accumulator installation requires bolts which must reach 10 n.m of torque along with the bracket mounting nuts while maintaining the bracket bolt at identical torque values. First clear both compressor hose and accumulator caps or tape then clean all contact surfaces before placing a thin layer of refrigerant oil on the o-ring seal to prevent substances from entering the system. Use a new o-ring on the compressor hose while coating only the indicated section with oil. Install the hose to the accumulator before tightening the retaining bolt to 20 n.m (15 lb ft). After securing the heater pipe bracket with its retaining nut to 10 n.m (89 lb in) torque, install the battery heat shield followed by the battery. Execute transmitter programming while conducting evacuations along with refrigerant system charging before examining accumulator joint leak possibilities.


