ChevyParts
My Garage
My Account
Cart
OEM 2000 Chevrolet Venture CV Boot
Axle Boot- Select Vehicle by Model
- Select Vehicle by VIN
Select Vehicle by Model
orMake
Model
Year
Select Vehicle by VIN
For the most accurate results, select vehicle by your VIN (Vehicle Identification Number).
2 CV Boots found

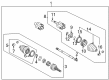
2000 Chevrolet Venture Seal Kit Part Number: 26044380
Product Specifications- Other Name: Boot, Front; Axle Seal; CV Boot; Boot Kit; Outer CV Joint Boot; Inner Boot; Outer Boot; Outer Boot Kit; Boots; Boot
- Item Weight: 1.00 Pounds
- Item Dimensions: 6.6 x 6.2 x 6.0 inches
- Condition: New
- SKU: 26044380
- Warranty: This genuine part is guaranteed by GM's factory warranty.
 Product Specifications
- Other Name: Boot Kit, Front Wheel Drive Axle Shaft; CV Boot; Inner CV Joint Boot; Inner Boot; Inner Boot Kit; Boots
- Position: Front
- Replaces: 26073374
- Item Weight: 1.60 Pounds
- Item Dimensions: 6.6 x 6.4 x 6.2 inches
- Condition: New
- Fitment Type: Direct Replacement
- SKU: 19177868
- Warranty: This genuine part is guaranteed by GM's factory warranty.
2000 Chevrolet Venture CV Boot
With a comprehensive array of OEM 2000 Chevrolet Venture CV Boot, from fuel pumps to door handles, our website is a one-stop-shop for your needs. All our genuine 2000 Chevrolet Venture CV Boot are backed by the manufacturer's warranty and are offered at competitive prices in the market. Rest assured, you can shop with complete confidence.
2000 Chevrolet Venture CV Boot Parts Questions & Experts Answers
- Q: How to replace the front drive axle's CV Boot and CV Joint on 2000 Chevrolet Venture?A: To remove the inner joint and boot from the front drive axle, start by using snap ring pliers (J 8059) to remove the swage ring from halfshaft bar, without damaging halfshaft inboard boot or trilobal tripot bushing. Remove the larger boot retaining clamp off the tripot joint by cutting it with side cutters and slide the halfshaft inboard boot from the trilobal tripot bushings. If you then slide the boot away from the tie and along the halfshaft bar, you can then extract the housing from the tripot joint spider and the halfshaft bar. Spread the spacer ring using snap ring pliers (J 8059) and slide the spacer ring and tripot joint spider over the halfshaft bar. Pry off the halfshaft bar retaining ring from the groove of the halfshaft bar and pull out the tripot joint spider assembly. Delete all old grease and pollutants from the tripot joint spider assembly and housing, drying all parts. Check the halfshaft inboard boot, tripot joint spider assembly, housing, and trilobal tripot bushing for wear and damage. Prepare the new small boot clamp and press it on the small end of the joint boot sliding it on the halfshaft bar. Place small end of the joint boot into joint boot groove on the halfshaft bar, then loosen drive axle swage ring clamp (J 41048) into a vise. Assemble the halfshaft assembly's inboard end to the lower half of j 41048 without pinch points happening over halfshaft inboard boot. The bolts need to be inserted and tightened manually until they are tight enough, then carefully with the use of the ratchet wrench each bolt should be tightened in cycles of 180 which corresponds to half the bolt circle access. To secure the spacer ring onto a halfshaft bar, apply the snap ring pliers (J 8059) with counterbored face of the tripot joint spider facing the end of the halfshaft (50). Move the tripot joint spider assembly towards the spacer ring, then install into the groove the halfshaft bar retaining ring, and back towards the end of the halfshaft bar move the tripot joint spider assembly. Reseat the spacer ring in the groove aligning the trilobal tripot bushing with the face of the housing. Put half the grease from the service kit into the halfshaft inboard boot, and apply the rest into the housing. Install the trilobal tripot bushing on the housing, locate the larger new boot retaining clamp on halfshaft, inboard boot and slide the housing over the tripot joint spider assembly. Make sure to shape the halfshaft inboard boot properly, then place the joint assembly into the correct dimension of the vehicle. During latching, position the halfshaft inboard boot, tripot housing, and large boot retaining clamp, and crimp boot retaining clamp with the drive axle seal clamp pliers (J 35910) to 176 nm (130 ft. Lbs), using a breaker bar and a torque wrench as needed.
Related 2000 Chevrolet Venture Parts
 2000 Chevrolet Venture Air Suspension Compressor
 2000 Chevrolet Venture Axle Shaft
 2000 Chevrolet Venture Axle Shaft Retainer
 2000 Chevrolet Venture CV Joint
 2000 Chevrolet Venture Coil Springs
 2000 Chevrolet Venture Control Arm
 2000 Chevrolet Venture Crossmember Bushing
 2000 Chevrolet Venture Ride Height Sensor
 2000 Chevrolet Venture Shock Absorber
 2000 Chevrolet Venture Steering Knuckle
 2000 Chevrolet Venture Suspension Strut Rod
 2000 Chevrolet Venture Sway Bar Bushing