ChevyParts
My Garage
My Account
Cart
OEM Chevrolet Venture CV Boot
Axle Boot- Select Vehicle by Model
- Select Vehicle by VIN
Select Vehicle by Model
orMake
Model
Year
Select Vehicle by VIN
For the most accurate results, select vehicle by your VIN (Vehicle Identification Number).
4 CV Boots found

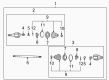
Chevrolet Venture Boot Kit, Rear Part Number: 88891074
$50.08 MSRP: $122.21You Save: $72.13 (60%)
Chevrolet Venture Seal Kit Part Number: 26044380

Chevrolet Venture Seal Kit, Front Part Number: 26044381
Chevrolet Venture Outer CV Joint Boot, Front Part Number: 19177868
Chevrolet Venture CV Boot
Want to cut long-term maintenance and repair costs? Choose OEM CV Boot. Those parts deliver top durability you can trust. On our site, you'll find a huge catalog of genuine Chevrolet Venture parts. Prices are unbeatable, so you can keep more in your pocket. Every OEM Chevrolet Venture CV Boot includes a manufacturer's warranty. You can also get an easy return policy that keeps buying risk free. Fast delivery, get your car on the road quickly. It's simple to search, compare, and order. Stop guessing about quality or fit. Order today and save with parts that last.
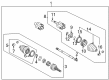
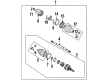
The Chevrolet Venture CV Boot is well-known as people part since it is one of the key components of Chevrolet Venture minivan, which was manufactured from 1997 to 2005. This often flexible rubber or plastic component is intended to safeguard three Constant Velocity (CV) joints that are instrumental in transmitting power from the transaxle to the wheels. Preserving the appropriate greasy substance and keeping out contaminants and particles will assist Chevrolet Venture CV Boot to afford durability together with effectiveness of the automotive vehicle. The Chevrolet Venture compatible CV Boot can be used in Base, LS, LT models and is available in different types of CV joints like, Rzeppa joints for the outer ends and tripod or double offset joints for the inner ends. The Chevrolet Venture CV Boot must be inspected periodically because any rift in it such as cracks, tear as well as lesions leads to a CV joint failure which is inefficient and entails risks. Lower body and a sliding door which is facing the driver makes Chevrolet Venture more accessible and comfortable, that is why it is preferred by families. However, most exceptionally, the Chevrolet Venture CV Boot has, in the automotive market, a very distinct construction from other cars in that it protects the essential components of the drivetrain as it preserves the chances of an improved, safer driving experience. For that reason, with a support of its essential part-the CV Boot the Chevrolet Venture can be considered as worthy minivan, which is really versatile and reliable at the same time.
Chevrolet Venture CV Boot Parts and Q&A
- Q: How to replace the front drive axle's CV Boot and CV Joint on Chevrolet Venture?A:To remove the inner joint and boot from the front drive axle, start by using snap ring pliers (J 8059) to remove the swage ring from halfshaft bar, without damaging halfshaft inboard boot or trilobal tripot bushing. Remove the larger boot retaining clamp off the tripot joint by cutting it with side cutters and slide the halfshaft inboard boot from the trilobal tripot bushings. If you then slide the boot away from the tie and along the halfshaft bar, you can then extract the housing from the tripot joint spider and the halfshaft bar. Spread the spacer ring using snap ring pliers (J 8059) and slide the spacer ring and tripot joint spider over the halfshaft bar. Pry off the halfshaft bar retaining ring from the groove of the halfshaft bar and pull out the tripot joint spider assembly. Delete all old grease and pollutants from the tripot joint spider assembly and housing, drying all parts. Check the halfshaft inboard boot, tripot joint spider assembly, housing, and trilobal tripot bushing for wear and damage. Prepare the new small boot clamp and press it on the small end of the joint boot sliding it on the halfshaft bar. Place small end of the joint boot into joint boot groove on the halfshaft bar, then loosen drive axle swage ring clamp (J 41048) into a vise. Assemble the halfshaft assembly's inboard end to the lower half of j 41048 without pinch points happening over halfshaft inboard boot. The bolts need to be inserted and tightened manually until they are tight enough, then carefully with the use of the ratchet wrench each bolt should be tightened in cycles of 180 which corresponds to half the bolt circle access. To secure the spacer ring onto a halfshaft bar, apply the snap ring pliers (J 8059) with counterbored face of the tripot joint spider facing the end of the halfshaft (50). Move the tripot joint spider assembly towards the spacer ring, then install into the groove the halfshaft bar retaining ring, and back towards the end of the halfshaft bar move the tripot joint spider assembly. Reseat the spacer ring in the groove aligning the trilobal tripot bushing with the face of the housing. Put half the grease from the service kit into the halfshaft inboard boot, and apply the rest into the housing. Install the trilobal tripot bushing on the housing, locate the larger new boot retaining clamp on halfshaft, inboard boot and slide the housing over the tripot joint spider assembly. Make sure to shape the halfshaft inboard boot properly, then place the joint assembly into the correct dimension of the vehicle. During latching, position the halfshaft inboard boot, tripot housing, and large boot retaining clamp, and crimp boot retaining clamp with the drive axle seal clamp pliers (J 35910) to 176 nm (130 ft. Lbs), using a breaker bar and a torque wrench as needed.
- Q: What tools are required to service and repair the rear outer CV Boot on Chevrolet Venture?A:Service and repair of the Constant Velocity Joint Boot for the rear wheel drive shaft outer joint and seal requires these specified tools: The repair and service of Constant Velocity Joint Boot requires Drive Axle Seal Clamp Pliers (J 35566) and Drive Shaft Seal Clamp Pliers (J 42572). Drive Axle Seal Clamp Pliers (J 35566) and Drive Shaft Seal Clamp Pliers (J 42572). First use side cutters to remove the small seal clamp attached to the wheel drive shaft bar before discarding it through proper care of the wheel drive shaft tri-lobal tripot bushing. Use side cutters to remove the large seal clamp from the tripot joint then discard it. To separate the wheel drive shaft outboard seal from the tri-lobal tripot bushing slide it away from the joint along the wheel drive shaft bar. Before disassembly mark down the correct 60-degree offset relation between inner and outer tripot spiders on the wheel drive shaft bar and then eliminate the housing from the tripot joint spider and the wheel drive shaft bar. A brass drift and hammer should be used to compress the wheel drive shaft bar's barrel retaining ring while tapping around the tripot spider face until the tripot spider can be removed along with the discarded barrel retaining ring. Check the wheel drive shaft outboard seal and tripot joint spider assembly along with housing and tri-lobal tripot bushing while inspecting for signs of wear and damage after removing the wheel drive shaft bar joint seal. Put the new small seal clamp on the small end of the joint seal before sliding them onto the wheel drive shaft bar with the small end entering the joint seal groove. With the Drive Shaft Seal Clamp Pliers (J 42572) apply 136 Nm (100 ft. lbs.) of torque to crimp the small seal retaining clamp. Set a new barrel retaining ring on the wheel drive shaft bar while upholding both proper 60-degree offset relationship between parts. Position the tripot spider reference mark against the wheel drive shaft bar to maintain correct alignment of the beveled tripot spider edge when reassembling the equipment. Mount the tripot spider onto the wheel drive shaft bar by securing the barrel retaining ring under pressure with a flat-bladed tool before testing the tripot spider's engagement by attempting to remove it from the wheel drive shaft bar. Use about half of the service kit grease to fill the wheel drive shaft outboard seal before filling the remaining portion inside the housing. When complete, position the housing over the tripot joint spider assembly and install the guide using more grease for retention. Lay the housing flat and carefully insert the tri-lobal tripot bushing while sealing it with housing grease. Afterwards, install the spring and guide by using additional grease for reinforcement. Place the big new seal retaining clamp onto the wheel drive shaft outboard seal before sliding the housing in front of the tripot joint spider assembly. Install the wheel drive shaft outboard seal on the tri-lobal tripot bushing while aligning the seal's lip into position so it fits perfectly into the groove of the bushing without causing any damage. Check the shape of this seal and adjust when needed before positioning the joint assembly within its correct vehicle dimensional range. To achieve proper alignment lift the wheel drive shaft outboard seal together with tripot housing and large seal retaining clamp before using Drive Axle Seal Clamp Pliers (J 35566) for secure latching while verifying complete tang engagement. Spreading the grease through tripot spider bearings requires rotating the outer tripot housing four or five times.


Related Chevrolet Venture Parts
 Chevrolet Venture Air Suspension Compressor
 Chevrolet Venture Axle Shaft
 Chevrolet Venture Axle Shaft Retainer
 Chevrolet Venture CV Joint
 Chevrolet Venture Coil Springs
 Chevrolet Venture Control Arm
 Chevrolet Venture Drive Shaft
 Chevrolet Venture Pinion Washer
 Chevrolet Venture Ride Height Sensor
 Chevrolet Venture Shock Absorber
 Chevrolet Venture Steering Knuckle
 Chevrolet Venture Suspension Strut Rod