ChevyParts
My Garage
My Account
Cart
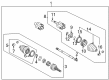
OEM 2004 Chevrolet Venture CV Boot
Axle Boot- Select Vehicle by Model
- Select Vehicle by VIN
Select Vehicle by Model
orMake
Model
Year
Select Vehicle by VIN
For the most accurate results, select vehicle by your VIN (Vehicle Identification Number).
3 CV Boots found

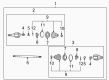
2004 Chevrolet Venture Boot Kit, Rear Part Number: 88891074
$50.08 MSRP: $122.21You Save: $72.13 (60%)Product Specifications- Other Name: Boot Kit, Rear Axle Universal Joint; CV Boot; Boots
- Position: Rear
- Item Weight: 1.00 Pounds
- Item Dimensions: 11.6 x 5.3 x 5.0 inches
- Condition: New
- Fitment Type: Direct Replacement
- SKU: 88891074
- Warranty: This genuine part is guaranteed by GM's factory warranty.

2004 Chevrolet Venture Seal Kit Part Number: 26044380
Product Specifications- Other Name: Boot, Front; Axle Seal; CV Boot; Boot Kit; Outer CV Joint Boot; Inner Boot; Outer Boot; Outer Boot Kit; Boots; Boot
- Item Weight: 1.00 Pounds
- Item Dimensions: 6.6 x 6.2 x 6.0 inches
- Condition: New
- SKU: 26044380
- Warranty: This genuine part is guaranteed by GM's factory warranty.
 Product Specifications
- Other Name: Boot Kit, Front Wheel Drive Axle Shaft; CV Boot; Inner CV Joint Boot; Inner Boot; Inner Boot Kit; Boots
- Position: Front
- Replaces: 26073374
- Item Weight: 1.60 Pounds
- Item Dimensions: 6.6 x 6.4 x 6.2 inches
- Condition: New
- Fitment Type: Direct Replacement
- SKU: 19177868
- Warranty: This genuine part is guaranteed by GM's factory warranty.
2004 Chevrolet Venture CV Boot
With a comprehensive array of OEM 2004 Chevrolet Venture CV Boot, from fuel pumps to door handles, our website is a one-stop-shop for your needs. All our genuine 2004 Chevrolet Venture CV Boot are backed by the manufacturer's warranty and are offered at competitive prices in the market. Rest assured, you can shop with complete confidence.
2004 Chevrolet Venture CV Boot Parts Questions & Experts Answers
- Q: What tools are required to service and repair the rear outer CV Boot on 2004 Chevrolet Venture?A: Service and repair of the Constant Velocity Joint Boot for the rear wheel drive shaft outer joint and seal requires these specified tools: The repair and service of Constant Velocity Joint Boot requires Drive Axle Seal Clamp Pliers (J 35566) and Drive Shaft Seal Clamp Pliers (J 42572). Drive Axle Seal Clamp Pliers (J 35566) and Drive Shaft Seal Clamp Pliers (J 42572). First use side cutters to remove the small seal clamp attached to the wheel drive shaft bar before discarding it through proper care of the wheel drive shaft tri-lobal tripot bushing. Use side cutters to remove the large seal clamp from the tripot joint then discard it. To separate the wheel drive shaft outboard seal from the tri-lobal tripot bushing slide it away from the joint along the wheel drive shaft bar. Before disassembly mark down the correct 60-degree offset relation between inner and outer tripot spiders on the wheel drive shaft bar and then eliminate the housing from the tripot joint spider and the wheel drive shaft bar. A brass drift and hammer should be used to compress the wheel drive shaft bar's barrel retaining ring while tapping around the tripot spider face until the tripot spider can be removed along with the discarded barrel retaining ring. Check the wheel drive shaft outboard seal and tripot joint spider assembly along with housing and tri-lobal tripot bushing while inspecting for signs of wear and damage after removing the wheel drive shaft bar joint seal. Put the new small seal clamp on the small end of the joint seal before sliding them onto the wheel drive shaft bar with the small end entering the joint seal groove. With the Drive Shaft Seal Clamp Pliers (J 42572) apply 136 Nm (100 ft. lbs.) of torque to crimp the small seal retaining clamp. Set a new barrel retaining ring on the wheel drive shaft bar while upholding both proper 60-degree offset relationship between parts. Position the tripot spider reference mark against the wheel drive shaft bar to maintain correct alignment of the beveled tripot spider edge when reassembling the equipment. Mount the tripot spider onto the wheel drive shaft bar by securing the barrel retaining ring under pressure with a flat-bladed tool before testing the tripot spider's engagement by attempting to remove it from the wheel drive shaft bar. Use about half of the service kit grease to fill the wheel drive shaft outboard seal before filling the remaining portion inside the housing. When complete, position the housing over the tripot joint spider assembly and install the guide using more grease for retention. Lay the housing flat and carefully insert the tri-lobal tripot bushing while sealing it with housing grease. Afterwards, install the spring and guide by using additional grease for reinforcement. Place the big new seal retaining clamp onto the wheel drive shaft outboard seal before sliding the housing in front of the tripot joint spider assembly. Install the wheel drive shaft outboard seal on the tri-lobal tripot bushing while aligning the seal's lip into position so it fits perfectly into the groove of the bushing without causing any damage. Check the shape of this seal and adjust when needed before positioning the joint assembly within its correct vehicle dimensional range. To achieve proper alignment lift the wheel drive shaft outboard seal together with tripot housing and large seal retaining clamp before using Drive Axle Seal Clamp Pliers (J 35566) for secure latching while verifying complete tang engagement. Spreading the grease through tripot spider bearings requires rotating the outer tripot housing four or five times.
Related 2004 Chevrolet Venture Parts
 2004 Chevrolet Venture Air Suspension Compressor
 2004 Chevrolet Venture Axle Shaft
 2004 Chevrolet Venture Axle Shaft Retainer
 2004 Chevrolet Venture CV Joint
 2004 Chevrolet Venture Coil Springs
 2004 Chevrolet Venture Control Arm
 2004 Chevrolet Venture Drive Shaft
 2004 Chevrolet Venture Pinion Washer
 2004 Chevrolet Venture Ride Height Sensor
 2004 Chevrolet Venture Shock Absorber
 2004 Chevrolet Venture Steering Knuckle
 2004 Chevrolet Venture Suspension Strut Rod