ChevyParts
My Garage
My Account
Cart
OEM 2001 Chevrolet Prizm Front Cross-Member
Front Engine Cross Member- Select Vehicle by Model
- Select Vehicle by VIN
Select Vehicle by Model
orMake
Model
Year
Select Vehicle by VIN
For the most accurate results, select vehicle by your VIN (Vehicle Identification Number).
1 Front Cross-Member found

2001 Chevrolet Prizm Engine Cradle Part Number: 89027243
Product Specifications- Other Name: Crossmember, Intermediate
- Position: Front
- Replaces: 94856306
- Item Weight: 23.80 Pounds
- Item Dimensions: 40.4 x 20.6 x 11.2 inches
- Condition: New
- Fitment Type: Direct Replacement
- SKU: 89027243
- Warranty: This genuine part is guaranteed by GM's factory warranty.
2001 Chevrolet Prizm Front Cross-Member
With a comprehensive array of OEM 2001 Chevrolet Prizm Front Cross-Member, from fuel pumps to door handles, our website is a one-stop-shop for your needs. All our genuine 2001 Chevrolet Prizm Front Cross-Member are backed by the manufacturer's warranty and are offered at competitive prices in the market. Rest assured, you can shop with complete confidence.
2001 Chevrolet Prizm Front Cross-Member Parts Questions & Experts Answers
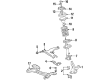
- Q: How to replace the Front Cross-Member on 2001 Chevrolet Prizm?A: To replace the front suspension cross member, start by installing the engine support fixture and lifting the vehicle, therefore. Remove the front tire and wheel assembly, and remove the 3 nuts (12, 15, 16) from the crossmember, and then position it with a jack. Remove the 2 nuts (4, 6) and the front suspension crossmember brace from the bracket studs (3, 7), then take out the bolt and 2 nuts from the left Control Arm and, finally, take out the bolt and 2 nuts from the right Control Arm. Nine, remove the 5 bolts (2, 3, 8, 9, 11) and the stud from the right side, and the 5 bolts (2, 3, 5, 6, 7) and the stud from the right side. Loosen the 2 (5, 10) bolts for the engine splash shields that attached to the trans support from the trans support, the 2 (3, 4) bolts for the front transaxle mount attached to the trans support and the 2 (1, 2) bolts for the trans support attached to the vehicle. Lower the jack to take off of the front suspension crossmember trans.support, 2 front Control Arm (8, 9) and the front stabilizer shaft if relevant. If there is a front stabilizer shaft, take off the nut and stabilizer shaft links insulator clamp, take off the nut and Control Arm Bracket , then take off 2 nuts to pry apart stabilizer shaft links from control arms from the right side of the crossmember. Take off on the bolt and front Control Arm on the right side, do the same in the left side, take off the nut and Control Arm Bracket, bolt, bolt off the crossmember. For the installation, fasten the trans support onto the front suspension crossmember with the nut and bolt tightened to 60 nm. (45 ft. Lbs.). Attach the left front Control Arm with the bolt with no tightening, then install the stabilizer shaft link if applicable, then Control Arm Bracket with nut tightened to 19 nm (14 ft. Lbs). Repeat the same exercise towards the right side of the car where all the components should be secured and tightened as stipulated. Lift the components together as a unit and install the bolts 1,2 which fix the trans support to the vehicle without tightening, install and tighten bolts 3,4 fixing the front transaxle mount to 64nm(47ft.lbs), install and tighten the engine splash shield bolts 5,10 to 10nm (89ft.lbs). Then install the studs (3,7) and tighten them to torque of 147 nm (109 ft. Lbs.) followed by the 5 bolts on both sides of the vehicle without tightening. Secure the right front Control Arm with the 2nuts and bolt in 142 nm (105 ft. Lbs.) then it follows the same for the left front Control Arm. Reinstall the 3 nuts (12, 15, 16) to crossmember and tighten 57 nm(42ft. Lbs.) followed by the front suspension crossmember brace and the 2 nuts (4, 6 ) 69 nm( 51 ft lbs.). Mount the tire and wheel back, lower the vehicle back, and have the weight on the tires. Lift the vehicle once more and stabilize the suspension by pressing the front bumper down 3 times then torque the trans support bolts (1, 2) to 60 nm (45 ft. Lbs.), the inner bolt on to the left Control Arm to 175 nm (129 ft. Lbs.), and the front bolts attaching the left Control Arm and crossmember to the vehicle to 215 nm (158 ft. Lbs.), and 225 nm (167 fit lbs.) respectively. Re-torque the [number of bolts] bolts on the right side again making sure that all bolts to achieve the required torque values. Last, but not least, lower the vehicle, uninstall the engine support fixture, and check the wheel alignment measure and adjust it if necessary.
Related 2001 Chevrolet Prizm Parts
 2001 Chevrolet Prizm Ball Joint
 2001 Chevrolet Prizm Coil Spring Insulator
 2001 Chevrolet Prizm Coil Springs
 2001 Chevrolet Prizm Control Arm
 2001 Chevrolet Prizm Control Arm Bolt
 2001 Chevrolet Prizm Control Arm Bracket
 2001 Chevrolet Prizm Shock Absorber
 2001 Chevrolet Prizm Shock And Strut Mount
 2001 Chevrolet Prizm Steering Knuckle
 2001 Chevrolet Prizm Sway Bar Bushing
 2001 Chevrolet Prizm Sway Bar Link
 2001 Chevrolet Prizm Wheel Seal