ChevyParts
My Garage
My Account
Cart
OEM Chevrolet Prizm Front Cross-Member
Front Engine Cross Member- Select Vehicle by Model
- Select Vehicle by VIN
Select Vehicle by Model
orMake
Model
Year
Select Vehicle by VIN
For the most accurate results, select vehicle by your VIN (Vehicle Identification Number).
1 Front Cross-Member found

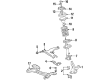
Chevrolet Prizm Engine Cradle Part Number: 89027243
Chevrolet Prizm Front Cross-Member
Want to cut long-term maintenance and repair costs? Choose OEM Front Cross-Member. Those parts deliver top durability you can trust. On our site, you'll find a huge catalog of genuine Chevrolet Prizm parts. Prices are unbeatable, so you can keep more in your pocket. Every OEM Chevrolet Prizm Front Cross-Member includes a manufacturer's warranty. You can also get an easy return policy that keeps buying risk free. Fast delivery, get your car on the road quickly. It's simple to search, compare, and order. Stop guessing about quality or fit. Order today and save with parts that last.
The Chevrolet Prizm Front Cross-Member works as a basic structural component which promotes both reliability and performance capabilities in the vehicle system. The Front Cross-Member stands as a powerful foundation which strengthens the engine and transmission system of the Chevrolet Prizm thereby improving its operational stability. Manufactured from robust steel the component can be bolted across the unibody structure to ensure the body panels remain properly aligned through deflection resistance and torsional strength delivery against twisting forces. The Chevrolet Prizm Front Cross-Member functions with multiple Prizm models thus supporting enduring vehicle structural quality. Chevrolet drivers need a safe Front Cross-Member that stays in good shape because any issues with this structure cause misalignment which harms vehicle performance and safety. The Chevrolet Prizm Front Cross-Member distinguishes itself as a market leader because its exclusive engineering methods maximize both safety features and efficiency improvements. Through its handling-improving and stability-promoting features the Front Cross-Member provides a crucial contribution to deliver exceptional driving comfort. Every car model benefits from Chevrolet's dedication to quality performance through the impeccable the automaker model Front Cross-Member design.
Chevrolet Prizm Front Cross-Member Parts Questions & Experts Answers
- Q: How to replace the Front Cross-Member on Chevrolet Prizm?A:Replacing the front suspension crossmember will involve first the installation of engine support fixture and lifting the vehicle. Turn the ignition switch off and slide the front tire and wheel assembly up and out of the car. Then remove the 3 nuts (12, 15, 16) from the crossmember, and hold the latter up with a jack. Remove the 2 nuts (4, 6) and the front suspension crossmember brace from the bracket studs (3, 7), as well as the bolt and 2 nuts from both the left and right Control Arms. Next, take out the 5 bolts (2,3,8,9,11) from the right side and the stud ' from the right and the ones from the left side; stud ' (2,3,5,6,7). Unbolt the 2 engines splash shields using bolts (5, 10) that clamp the 2 splash shields to the bans support, the 2 bolts (3, 4) that retain the front transaxle mount to the bans support, and the 2 bolts (1, 2) the secure bans support to the vehicle. Lower the jack to remove the front suspension cross member , bans support , 2 front control arms (8,9), and the front stabilizer shaft if applicable. If there is a front stabilizer shaft, remove the nut and the stabilizer shaft insulator clamp on the right side of crossmember remove the nut end Control Arm Bracket from the right side, removing the 2 nuts to loosen the stab stabilizer shaft links from the control arms. Take out the bolt and the front Control Arm from the right side, and then perform the same process on the left side, removing the nut and stabilizer shaft insulator clamp, the nut and Control Arm Bracket, and the bolt of the front Control Arm. Lastly, remove the bolt from the crossmember and the nut to sever off the bans support. For the installation, fix the bans support onto the front suspension crossmember using the nut and bolt, tightening it with 60 nm (45 ft. Lbs.). Mount the left front Control Arm with bolt and don't tighten, and then install the stabilizer shaft link if it applies and tighten the nut. Mount the left Control Arm Bracket with nut to 19 nm (14 ft. Lbs.) and the stabilizer shaft insulator clamp with nut 19 nm (14 ft. Lbs.). Repeat process for the right side making sure that everything is fixed, but not tighten until later. Mount the jack on the assembly to lift and support it, then fasten the 2 bolts, numbers 1 and 2 joining the ban's support to the vehicle without fastening and tighten the 2 bolts, numbers 3 and 4 for the front transaxle mount: tighten them to 64 nm (47 ft. Lbs.). Install the 2 engine splash shield bolts (5, 10) and tighten to 10 nm (89 inch lbs.), and install the (3, 7) studs and tighten to 147 nm (109 ft. Lbs). Bolt the 5 bolts (2, 3, 5, 6, 7) on the left side and the 5 bolts (2, 3 8, 9, 11) on the right side without tightening. Tighten the 2 nuts and bolt to secure the right front Control Arm, snugging them to 142 nm (105 ft. Lbs.) and repeating on the left front Control Arm. Undo the jack and carry out the 3 nuts (12, 15, 16) on the crossmember, tightening them to 57 nm (42 ft. Lbs.). Mount the front suspension crossmember brace and the 2 nuts (4, 6), tighten to 69 nm (51 ft. Lbs.). Replace the tire and wheel assembly, lower the car and bring it in contact with the tires. Lift the vehicle up and position it on a drive-on lift or alignment service rack, press the front bumper 3 times to ensure that the suspension is stable, and tighten the 2 vehicle support fasteners (1, 2) to the vehicle to 60 nm (45 ft. Lbs). Therefore, you are going to torque the inner bolt for the left Control Arm and bracket 175 nm (129 ft. Lbs) and front bolt for the left Control Arm 215 nm (158 ft. Lbs), and the front bolt for cross member 225 nm (167 ft. Lbs). Torque the bracket front bolt and outer bolt for the bracket as 225 nm (167 ft. Lbs.) and 147 nm (109 ft. Lbs.) respectively, an then the rear bolt to 123 nm (91 ft. Lbs.). Should this be possible, use a 5mm hex wrench to hold the left stabilizer shaft link stud while tightening the nut to 44 nm (33 ft. Lbs). Repeat process for the right side Control Arm and bracket, securing all bolts to their correctly allocated torque value. Last, lower the vehicle, take down the engine support fixture, and measure the wheel alignment adjusting if needed.

Related Chevrolet Prizm Parts
 Chevrolet Prizm Ball Joint
 Chevrolet Prizm Coil Spring Insulator
 Chevrolet Prizm Coil Springs
 Chevrolet Prizm Control Arm
 Chevrolet Prizm Control Arm Bolt
 Chevrolet Prizm Control Arm Bracket
 Chevrolet Prizm Shock Absorber
 Chevrolet Prizm Shock And Strut Mount
 Chevrolet Prizm Steering Knuckle
 Chevrolet Prizm Sway Bar Bushing
 Chevrolet Prizm Sway Bar Link
 Chevrolet Prizm Wheel Seal