ChevyParts
My Garage
My Account
Cart
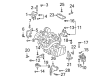
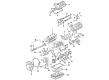
OEM 2003 Buick LeSabre Motor And Transmission Mount
Motor and Trans Mount- Select Vehicle by Model
- Select Vehicle by VIN
Select Vehicle by Model
orMake
Model
Year
Select Vehicle by VIN
For the most accurate results, select vehicle by your VIN (Vehicle Identification Number).
6 Motor And Transmission Mounts found


2003 Buick LeSabre Transmission Mount, White, Rear Part Number: 25723646
$72.16 MSRP: $113.04You Save: $40.88 (37%)Ships in 1-2 Business DaysProduct Specifications- Other Name: Mount Assembly-Transmission Rear *White; Engine Mount Bracket; Transfer Case Mount; Motor Mount; Rear Mount; Mount, Transmission Mounting
- Position: Rear
- Replaces: 25693540, 25705524
- Item Weight: 2.30 Pounds
- Item Dimensions: 9.3 x 8.3 x 6.2 inches
- Condition: New
- Fitment Type: Direct Replacement
- SKU: 25723646
- Warranty: This genuine part is guaranteed by GM's factory warranty.

2003 Buick LeSabre Transmission Mount Part Number: 25736430
$87.67 MSRP: $137.33You Save: $49.66 (37%)Product Specifications- Other Name: Mount, Transmission Mounting; Engine Mount Bracket; Transfer Case Mount; Motor Mount; Front Mount; Front Bracket; Mount
- Position: Front
- Replaces: 25706431
- Item Weight: 7.10 Pounds
- Item Dimensions: 10.4 x 7.6 x 7.4 inches
- Condition: New
- SKU: 25736430
- Warranty: This genuine part is guaranteed by GM's factory warranty.


 Product Specifications
- Other Name: Trans Mount; Engine Mount Bracket; Transfer Case Mount; Motor Mount; Side Transmission Mount; Mount; Mount, Transmission Mounting
- Position: Driver Side
- Replaces: 25662258, 25691733, 25689177, 25713700
- Item Weight: 4.00 Pounds
- Item Dimensions: 8.1 x 6.8 x 4.7 inches
- Condition: New
- Fitment Type: Direct Replacement
- SKU: 25695932
- Warranty: This genuine part is guaranteed by GM's factory warranty.


2003 Buick LeSabre Motor Mount, Passenger Side Part Number: 25710672
Product Specifications- Other Name: Mount; Engine Mount Bracket; Transfer Case Mount; Transmission Mount; Mount, Engine Mount Dampening; Mount, Engine Mounting
- Position: Passenger Side
- Replaces: 25638464, 25681326, 25715770, 25695085, 25695931, 25691731, 25713699
- Item Weight: 4.00 Pounds
- Item Dimensions: 8.3 x 7.1 x 4.7 inches
- Condition: New
- Fitment Type: Direct Replacement
- SKU: 25710672
- Warranty: This genuine part is guaranteed by GM's factory warranty.

2003 Buick LeSabre Support Part Number: 25740662
Product Specifications- Other Name: Bracket, Engine Mounting; Engine Mount Bracket; Transmission Mount; Motor Mount; Bracket
- Replaces: 25647356
- Item Weight: 6.20 Pounds
- Item Dimensions: 12.5 x 9.2 x 8.7 inches
- Condition: New
- Fitment Type: Direct Replacement
- SKU: 25740662
- Warranty: This genuine part is guaranteed by GM's factory warranty.

2003 Buick LeSabre Rear Mount Bracket Part Number: 25677169
Product Specifications- Other Name: Bracket; Engine Mount Bracket; Motor Mount; Rear Bracket; Bracket, Transmission Mounting Support
- Position: Rear
- Item Weight: 6.30 Pounds
- Item Dimensions: 9.6 x 5.6 x 4.5 inches
- Condition: New
- Fitment Type: Direct Replacement
- SKU: 25677169
- Warranty: This genuine part is guaranteed by GM's factory warranty.
2003 Buick LeSabre Motor And Transmission Mount
With a comprehensive array of OEM 2003 Buick LeSabre Motor And Transmission Mount, from fuel pumps to door handles, our website is a one-stop-shop for your needs. All our genuine 2003 Buick LeSabre Motor And Transmission Mount are backed by the manufacturer's warranty and are offered at competitive prices in the market. Rest assured, you can shop with complete confidence.
2003 Buick LeSabre Motor And Transmission Mount Parts and Q&A
- Q: How to replace the LH automatic transmission mount, Motor And Transmission Mount on 2003 Buick LeSabre?A: Follow this procedure to replace the left automatic transmission mount: lift the vehicle while providing support then remove the left front tire followed by the wheel and finally remove the left front fascia extension. You must use a transaxle stand underneath the transaxle to stabilize the powertrain while also removing the mount stud nut to detach the mount from its bracket. The next step requires removing all vehicle nuts and bolts followed by lowering the transaxle stand carefully before complete removal. The vehicle should be lowered before extracting the frame rail bolt retaining screws and put back into its position. The mount becomes accessible when you elevate the frame rail bolts and move the mounting bracket because it tilts toward the vehicle's opposite side before you detach the mount. Position the mount stud into the transaxle mount bracket while pushing up on frame rail bolts to generate mount clearance. Then align loose frame rail bolts with the mount pathway before final installation. First lower the vehicle until the frame rail bolts center with the mounting points while tightening those bolts to 4 Nm (35 inch lbs.). To complete installation, users must lower the vehicle before adding the mount hardware and rotating the mount bolt counter-clockwise to secure the anti-rotation tab into the mount bracket groove. Users should then apply 70 Nm (52 ft. lbs.) of torque to the mount hardware. Place the powertrain onto the transaxle stand for mounting load before installing the stud nut then tightening it to 80 Nm (59 ft. lbs.). After fitting the left front fascia extension along with the wheel and tire, use the transaxle stand to lower the vehicle back to the ground.
Related 2003 Buick LeSabre Parts
 2003 Buick LeSabre Engine Mount
 2003 Buick LeSabre Cam Gear
 2003 Buick LeSabre Camshaft Bearing
 2003 Buick LeSabre Coolant Filter
 2003 Buick LeSabre Crankshaft
 2003 Buick LeSabre Crankshaft Seal
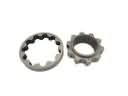 2003 Buick LeSabre Oil Pump Rotor Set
 2003 Buick LeSabre Piston Ring
 2003 Buick LeSabre Rod Bearing
 2003 Buick LeSabre Timing Cover
 2003 Buick LeSabre Valve Cover Grommet
 2003 Buick LeSabre Valve Stem Oil Seal