ChevyParts
My Garage
My Account
Cart
OEM 2005 Cadillac XLR Leaf Spring
Leaf Helper Spring- Select Vehicle by Model
- Select Vehicle by VIN
Select Vehicle by Model
orMake
Model
Year
Select Vehicle by VIN
For the most accurate results, select vehicle by your VIN (Vehicle Identification Number).
1 Leaf Spring found


2005 Cadillac XLR Spring, Rear Part Number: 15233391
Product Specifications- Other Name: Spring, Rear Spring; Coil Springs
- Position: Rear
- Item Weight: 11.80 Pounds
- Item Dimensions: 50.4 x 10.2 x 5.5 inches
- Condition: New
- Fitment Type: Direct Replacement
- SKU: 15233391
- Warranty: This genuine part is guaranteed by GM's factory warranty.
2005 Cadillac XLR Leaf Spring
With a comprehensive array of OEM 2005 Cadillac XLR Leaf Spring, from fuel pumps to door handles, our website is a one-stop-shop for your needs. All our genuine 2005 Cadillac XLR Leaf Spring are backed by the manufacturer's warranty and are offered at competitive prices in the market. Rest assured, you can shop with complete confidence.
2005 Cadillac XLR Leaf Spring Parts Questions & Experts Answers
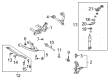
- Q: How to replace the front transverse leaf spring on 2005 Cadillac XLR?A: Begin by using vehicle support systems to lift your car followed by tire and wheel removal. Measure the front spring adjuster bolt gap to use during installation when setting the vehicle trim height if you are replacing the transverse spring. Apply the transverse spring compressor (J 33432-A) onto the transverse spring before compressing it. The procedure begins by taking the lower shock absorber mounting bolts off the Control Arm before disconnecting the stabilizer shaft link from this arm. Insert the ball joint separator (J 42188) between the lower ball joint and Steering Knuckle after partially loosening but not removing the lower ball joint stud nut attached to the lower Control Arm. Then take out both the separator and the nut. After removing the lower ball joint stud nut disconnect both lower control arms using jackstands while also marking the cam bolt positions for reference. Start by removing the lower Control Arm and its cam bolts then move on to remove the transverse spring bolts and keep those old bolts for disposal. Separate the transverse spring from the vehicle along with the compressor unit unless you plan to replace the spring. During new transverse spring installation use transverse spring compressor (J 33432-A) to place it onto the crossmember before removing the compressor after shock absorber installation to prevent damage. Install new transverse spring retainers and bolts on the crossmember while applying torque to 62 nm (46 ft. Lbs.). You should attach the lower Control Arm to the front crossmember before placing the cam bolts into their designated spots but do not apply the final torque value. Screw the ball joint stud of the lower Control Arm to the Steering Knuckle with a brand new ball joint stud nut then torque it to 20 nm. Follow by turning the nut by 210 degrees then verify the minimum tightness at 55 nm (15 ft. Lbs and 41 ft. Lbs). The ball joint stud must first be tightened to 55 nm (41 ft. Lbs.) before an additional 210 degrees of rotation and a final torque check. After securing the lower Control Arm with a jackstand install the shock absorber lower mounting bolts at 28 nm (21 ft. Lbs.). After fitting the stabilizer shaft link onto the lower Control Arm apply a torque of 72 nm (53 ft. Lbs.) on the link nut. Complete the procedure by removing the transverse spring compressor (J 33432-A) from the transverse spring then discard jackstands and reinstall tire and wheel assemblies before adjusting front trim height and performing front wheel alignment.
Related 2005 Cadillac XLR Parts
 2005 Cadillac XLR Alignment Bolt
 2005 Cadillac XLR Coil Springs
 2005 Cadillac XLR Control Arm
 2005 Cadillac XLR Front Cross-Member
 2005 Cadillac XLR Lateral Link
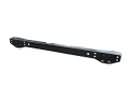 2005 Cadillac XLR Rear Crossmember
 2005 Cadillac XLR Ride Height Sensor
 2005 Cadillac XLR Shock Absorber
 2005 Cadillac XLR Sway Bar Bushing
 2005 Cadillac XLR Sway Bar Kit
 2005 Cadillac XLR Trailing Arm
 2005 Cadillac XLR Wheel Bearing