ChevyParts
My Garage
My Account
Cart
OEM 2008 Cadillac CTS Brake Booster
Brake Power Booster- Select Vehicle by Model
- Select Vehicle by VIN
Select Vehicle by Model
orMake
Model
Year
Select Vehicle by VIN
For the most accurate results, select vehicle by your VIN (Vehicle Identification Number).
1 Brake Booster found

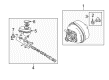
2008 Cadillac CTS Brake Booster
Part Number: 9054184Product Specifications- Other Name: Booster, Power Brake; Booster Assembly; Booster, Hydraulic Power Brake Booster
- Replaces: 15267511
- Item Weight: 11.20 Pounds
- Item Dimensions: 14.0 x 13.1 x 11.3 inches
- Condition: New
- Fitment Type: Direct Replacement
- SKU: 9054184
- Warranty: This genuine part is guaranteed by GM's factory warranty.
2008 Cadillac CTS Brake Booster
With a comprehensive array of OEM 2008 Cadillac CTS Brake Booster, from fuel pumps to door handles, our website is a one-stop-shop for your needs. All our genuine 2008 Cadillac CTS Brake Booster are backed by the manufacturer's warranty and are offered at competitive prices in the market. Rest assured, you can shop with complete confidence.
2008 Cadillac CTS Brake Booster Parts Questions & Experts Answers
- Q: How to replace the power vacuum brake booster on 2008 Cadillac CTS?A: Start the power vacuum Brake Booster replacement by taking off the left side instrument panel insulator panel. You can lower the Steering Column assembly because it stays attached to the intermediate shaft. Keep the column stable with an appropriate support. Unplug the brake position sensor connector on the brake pedal then take out the pushrod retaining clip to detach the pushrod from its pivot point. Take out both parts of the pushrod bushing and wave washer when performing this task. The cross vehicle brace also needs to come out if installed on the vehicle. Remove the master cylinder nut after disconnecting its fluid level sensor electrical connector. Put the master cylinder to the side while leaving the brake pipes connected before removing the air inlet grille panel. To work on the surge tank you must put it temporarily to the vehicle's side. Unhook the vacuum Brake Booster check valve and hose joint. Secure the vacuum Brake Booster in its position with the master cylinder nuts while using the j 22805-b holder. Push the locking tab toward the cowl while using a flat tool to unlock the j 22805-b. Turn the j 22805-b and vacuum Brake Booster counterclockwise until they detach from the bracket. Do not remove the booster completely until after releasing the pushrod clamp. Gently move the vacuum booster forward to spot the retaining clip and then deflate the foam filter before unscrewing the pushrod from the booster. Take out the vacuum Brake Booster from the car and take out the pushrod through the dust boot if needed from inside the vehicle. Install the booster when its internal parts remain sealed and the mounting plate remains secure. Fix any damages on the booster and mounting plate flanges during inspections. Replace any parts that do not work properly. Insert the vacuum Brake Booster pushrod through the dust boot first when necessary and set it in the correct location before attaching it to the booster and pushing the foam filter towards the filter cavity. Turn the booster clockwise to lock its tab in the cowl flange bracket position while holding j 22805-b. Install the vacuum Brake Booster check valve and hose assembly onto its proper space before disposing the unused master cylinder nuts. Attach the master cylinder to the vacuum Brake Booster while applying new nuts that reach 25 n.m (18 lb ft) tightness. Connect the master cylinder fluid level sensor power wire and place back the grille before putting on the surge tank. Place the cross vehicle brace when your vehicle comes with it. Put the vacuum Brake Booster pushrod wave washer and bushing before linking its end to the brake pedal pivot then setting the retaining clip. Connect the pedal position sensor connector afterward put in the Steering Column assembly before calibrating the sensor and installing the insulator panel for the left side panel.
Related 2008 Cadillac CTS Parts
 2008 Cadillac CTS Brake Calipers
 2008 Cadillac CTS Wheel Speed Sensor
 2008 Cadillac CTS ABS Control Module
 2008 Cadillac CTS Brake Backing Plate
 2008 Cadillac CTS Brake Caliper Bracket
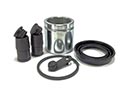 2008 Cadillac CTS Brake Caliper Repair Kit
 2008 Cadillac CTS Brake Dust Shields
 2008 Cadillac CTS Brake Line
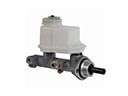 2008 Cadillac CTS Brake Master Cylinder
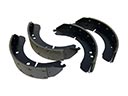 2008 Cadillac CTS Brake Shoe
 2008 Cadillac CTS Hydraulic Hose
 2008 Cadillac CTS Parking Brake Shoe