ChevyParts
My Garage
My Account
Cart
OEM 2009 Cadillac XLR ABS Control Module
Anti Lock Brake Control Module- Select Vehicle by Model
- Select Vehicle by VIN
Select Vehicle by Model
orMake
Model
Year
Select Vehicle by VIN
For the most accurate results, select vehicle by your VIN (Vehicle Identification Number).
1 ABS Control Module found


2009 Cadillac XLR Control Module Part Number: 89060341
Product Specifications- Other Name: Module Kit, Electronic Brake & Traction Control; ABS Control Module; Module Kit, Electronic Brake Control
- Item Weight: 2.30 Pounds
- Item Dimensions: 8.4 x 6.3 x 6.4 inches
- Condition: New
- Fitment Type: Direct Replacement
- SKU: 89060341
- Warranty: This genuine part is guaranteed by GM's factory warranty.
2009 Cadillac XLR ABS Control Module
With a comprehensive array of OEM 2009 Cadillac XLR ABS Control Module, from fuel pumps to door handles, our website is a one-stop-shop for your needs. All our genuine 2009 Cadillac XLR ABS Control Module are backed by the manufacturer's warranty and are offered at competitive prices in the market. Rest assured, you can shop with complete confidence.
2009 Cadillac XLR ABS Control Module Parts Questions & Experts Answers
- Q: How to replace the ABS Control Module on 2009 Cadillac XLR?A: The first procedure when replacing the brake pressure modulator valve starts by turning off the Ignition Switch followed by disconnecting the negative Battery Cable. The required procedure for this task is cooling system draining and filling (GE 47716). The intake manifold sight shield (LC3) or fuel injector sight shield (LH2) needs removal to proceed with the repair along with removal of the air cleaner inlet duct when lh2 is present in the vehicle. Loosen the upper Radiator Hose and the radiator surge tank inlet hose then set them by the side. The next step involves removing either the drive belt tensioner (LC3) or the alternative replacement of the drive belt tensioner (LH2). Before disconnecting the ebcm electrical connector clean both the ebcm electronic brake control module area and brake pressure modulator valve (BPMV) space. Seal all brake pipe fittings during removal by using caps to avoid fluid loss from the left rear, right rear, right front, left front, master cylinder secondary, and primary brake systems. Start by removing nuts from the bpmv before extracting the ebcm/bpmv module assembly from its bracket and removing bpmv insulators while checking for damages. After separating the ebcm bolts the technician will gently detach the ebcm from the bpmv while cleaning the connecting surfaces with denatured alcohol. The installation requires attaching the ebcm gently to the bpmv while avoiding any force before putting the ebcm bolts in place and tightening them to 3 nm (27 lb in). The bpmv insulators must be installed together with the ebcm/bpmv module assembly onto the bracket while torquing bpmv nuts to 12 nm (106 lb in). Use a torque wrench to fasten all master cylinder brake pipe fittings for secondary, primary, right front, left front, left rear, and right rear to 18 nm (13 lb ft). After installing the drive belt tensioner (LC3) or drive belt tensioner replacement (LH2), the intake manifold sight shield (LC3) or fuel injector sight shield (LH2) you must connect the radiator surge tank inlet hose. Install the duct for the air cleaner inlet following which connect the top Radiator Hose. Use cooling system draining and filling procedure (GE 47716), then reestablish connection between the ebcm electrical interface and the negative power supply. Program new ebcms using service programming system (SPS) following their installation and then execute the antilock brake system automated bleed procedure.
Related 2009 Cadillac XLR Parts
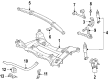
 2009 Cadillac XLR Brake Backing Plate
 2009 Cadillac XLR Brake Calipers
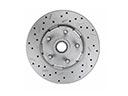 2009 Cadillac XLR Brake Disc
 2009 Cadillac XLR Brake Dust Shields
 2009 Cadillac XLR Brake Line
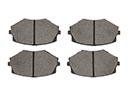 2009 Cadillac XLR Brake Pad
 2009 Cadillac XLR Brake Proportioning Valve
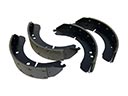 2009 Cadillac XLR Brake Shoe
 2009 Cadillac XLR Parking Brake Cable
 2009 Cadillac XLR Parking Brake Shoe
 2009 Cadillac XLR Wheel Hub Bolt
 2009 Cadillac XLR Wheel Speed Sensor