ChevyParts
My Garage
My Account
Cart
OEM Cadillac XLR ABS Control Module
Anti Lock Brake Control Module- Select Vehicle by Model
- Select Vehicle by VIN
Select Vehicle by Model
orMake
Model
Year
Select Vehicle by VIN
For the most accurate results, select vehicle by your VIN (Vehicle Identification Number).
2 ABS Control Modules found


Cadillac XLR Control Module Part Number: 89060341


Cadillac XLR Control Module Part Number: 18048955
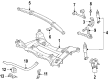
Cadillac XLR ABS Control Module
Want to cut long-term maintenance and repair costs? Choose OEM ABS Control Module. Those parts deliver top durability you can trust. On our site, you'll find a huge catalog of genuine Cadillac XLR parts. Prices are unbeatable, so you can keep more in your pocket. Every OEM Cadillac XLR ABS Control Module includes a manufacturer's warranty. You can also get an easy return policy that keeps buying risk free. Fast delivery, get your car on the road quickly. It's simple to search, compare, and order. Stop guessing about quality or fit. Order today and save with parts that last.
Cadillac XLR ABS Control Module plays an important role as a part of the anti-lock braking system known for its quality and ability to make the vehicles safer and more effective. Replacing the original Cadillac XLR Abs Control Module that is used in models manufactured between the years 2003 to 2009, this of component is crucial in the shipper's efforts of maintaining good control of the vehicle via proper ABS functionality in times of intense braking. It comprises wheel speed detectors, valves, a pump, and the ECU to control the amount of force exerted on the brake in accordance with a current condition, and makes it one of the distinctive features of the Cadillac XLR models. More complex iterations of the ABS Control Module may also include options such as electronic stability control and traction control whereby in cases of slippage, the module selectively applies the brakes to specific wheels. This integration not only promotes safety issue but it also play important role for improvement of Cadillac XLR that is famous for its luxurious appearance and V8 Northstar engine. The Cadillac XLR has the luxuries like electrically folding roof, Magnetic Ride Control adaptive suspension etc., but one must remember that the reliability of the ABS Control Module is one of the controlling factors that keeps the car prompt and comfortable to drive. So, the Cadillac XLR model with the powerful and densely constructed ABS Control Module is positioned on our stand as definite resources that signify the combination of luxury with high-tech performance in the automotive industry.
Cadillac XLR ABS Control Module Parts Questions & Experts Answers
- Q: How to replace the ABS Control Module in LH2 - 8 CYL, 4.6L, DOHC, HO on Cadillac XLR?A:The replacement of abs control modules in lh2 - 8 cyl, 4.6l, dohc, ho vehicles demands a off position Ignition Switch before disconnecting the negative Battery Cable to avoid harming the ABS Control Module/ebtcm units. Angling the ignition key to off will activate a 2-minute waiting time for high-speed lan control modules to become inoperative. Before you begin the replacement you should disconnect the negative Battery Cable while cleaning the ABS Control Module to brake pressure modulator valve (BPMV) area and raise the vehicle. The ABS Control Module and connector will be more accessible after removal of the two bpmv bracket-to-crossmember mounting bolts so stabilize the abs modulator assembly. Route the electrical connector away from the brake fluid pressure sensor while using a finger to activate the lock mechanism and simultaneously push the cam until it disconnects the ABS Control Module connector. House the two bpmv retaining bolts then work to detach the ABS Control Module unit from the bpmv pack. The bpmv sealing surface needs denatured alcohol cleaning before you place the ABS Control Module motor connector into position and install the ABS Control Module onto the bpmv while aligning electrical terminals. The 4 bolts should be installed diagonally across the device and tightened to reaching 5 n.m (44 lb in). Connect the ABS Control Module electrical connector while making sure the cam is in proper position before attaching the brake fluid pressure sensor connector. Tighten the two bolts attaching the bpmv bracket to the crossmember until they reach 27 n.m (20 lb ft), before lower the vehicle while also reconnecting the negative Battery Cable. When replacing an ABS Control Module the programming steps must be completed then a diagnostic system check must run to verify proper system functionality.

Related Cadillac XLR Parts
 Cadillac XLR Brake Backing Plate
 Cadillac XLR Brake Calipers
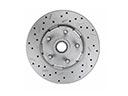 Cadillac XLR Brake Disc
 Cadillac XLR Brake Dust Shields
 Cadillac XLR Brake Line
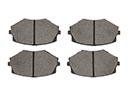 Cadillac XLR Brake Pad
 Cadillac XLR Brake Proportioning Valve
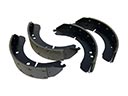 Cadillac XLR Brake Shoe
 Cadillac XLR Parking Brake Cable
 Cadillac XLR Parking Brake Shoe
 Cadillac XLR Wheel Hub Bolt
 Cadillac XLR Wheel Speed Sensor