ChevyParts
My Garage
My Account
Cart
OEM 2009 Cadillac XLR Leaf Spring
Leaf Helper Spring- Select Vehicle by Model
- Select Vehicle by VIN
Select Vehicle by Model
orMake
Model
Year
Select Vehicle by VIN
For the most accurate results, select vehicle by your VIN (Vehicle Identification Number).
1 Leaf Spring found


2009 Cadillac XLR Spring, Rear Part Number: 15233391
Product Specifications- Other Name: Spring, Rear Spring; Coil Springs
- Position: Rear
- Item Weight: 11.80 Pounds
- Item Dimensions: 50.4 x 10.2 x 5.5 inches
- Condition: New
- Fitment Type: Direct Replacement
- SKU: 15233391
- Warranty: This genuine part is guaranteed by GM's factory warranty.
2009 Cadillac XLR Leaf Spring
With a comprehensive array of OEM 2009 Cadillac XLR Leaf Spring, from fuel pumps to door handles, our website is a one-stop-shop for your needs. All our genuine 2009 Cadillac XLR Leaf Spring are backed by the manufacturer's warranty and are offered at competitive prices in the market. Rest assured, you can shop with complete confidence.
2009 Cadillac XLR Leaf Spring Parts and Q&A
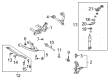
- Q: How to replace the front transverse leaf spring on 2009 Cadillac XLR?A: In order to replace the front transverse spring, lift and support the vehicle, and tire and wheel assemblies. Measure the front spring adjuster bolt gap which will serve you for setting your vehicle trimming height while installing. Take extra care to install the j 33432-a (Transverse Spring Compressor) on the transverse and compress it. Precede their removal by the handling component. Use the single-point of the bending tool and the points of a long-arm lifting tool to loosen the mounting bolts and the stabilizer shaft link, respectively, from the fitting surfaces of the lower Control Arm. Loosen the lower ball joint stud nut, the nut attached to the bottom Control Arm, but do not remove the nut, remove the lower ball joint from the Steering Knuckle using the j 42188 (Ball Joint Separator), and take it out. Support lower control arms with jackstands and mark the position of cam bolts for reference then remove the cam bolts and the lower Control Arm. Remove the transverse spring bolts and retainers (discard old bolts) and remove the transverse spring. If replacing the spring, take off the transverse spring compressor. For installation, fit the j 33432-a to a new spring and install it on the crossmember, avoid removing the compressor prior to installing the shock absorber to avoid damage. Mount new transverse spring retainers and bolts to the crossmember. Tighten these bolts to 62 nm (46 lb ft). Replace the lower Control Arm onto the front cross member and set the marked cam bolt positions and tighten the cam bolts but not to the end torque. Mount the lower Control Arm ball joint stud to the Steering Knuckle, tightening the nut 30 nm (22 lb ft) with an additional 180 degrees. Joseph supports the lower Control Arm from a jackstand and installs and tightens the shock absorber lower mounting bolts to 28 nm (21 lb ft) before connecting the stabilizer shaft link to the lower Control Arm and tightening it down to 72 nm (53 lb ft). The j 33432-a should be removed from the transverse spring, the jackstands should be removed, and the tire and wheel assemblies should be reinstalled. Finally, adjust the front trim height and do a front wheel alignment.
Related 2009 Cadillac XLR Parts
 2009 Cadillac XLR Alignment Bolt
 2009 Cadillac XLR Coil Springs
 2009 Cadillac XLR Control Arm
 2009 Cadillac XLR Front Cross-Member
 2009 Cadillac XLR Lateral Link
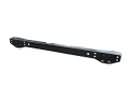 2009 Cadillac XLR Rear Crossmember
 2009 Cadillac XLR Ride Height Sensor
 2009 Cadillac XLR Shock Absorber
 2009 Cadillac XLR Sway Bar Bushing
 2009 Cadillac XLR Sway Bar Kit
 2009 Cadillac XLR Trailing Arm
 2009 Cadillac XLR Wheel Bearing