ChevyParts
My Garage
My Account
Cart
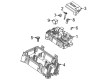
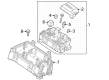
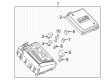
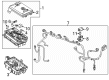
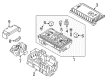
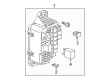
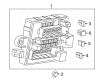
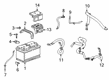
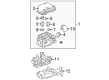
OEM Buick Fuse Box
Fuse Holder Box- Select Vehicle by Model
- Select Vehicle by VIN
Select Vehicle by Model
orMake
Model
Year
Select Vehicle by VIN
For the most accurate results, select vehicle by your VIN (Vehicle Identification Number).
109 Fuse Boxes found


Buick Fuse & Relay Box, Front Part Number: 22938539
$247.01 MSRP: $388.64You Save: $141.63 (37%)Product Specifications- Other Name: Block Assembly-Front Compartment Fuse; Junction Boxes; Fuse Box; Block, Main Wiring Junction And Fuse Block
- Position: Front

Buick Fuse & Relay Box Part Number: 42778908
$123.07 MSRP: $220.76You Save: $97.69 (45%)Ships in 1-3 Business DaysProduct Specifications- Other Name: Block; Junction Boxes; Relay Boxes; Fuse Box; Block, Main Wiring Junction And Fuse Block
- Replaced by: 42823941

Buick Fuse & Relay Box Part Number: 42823945
$104.37 MSRP: $186.38You Save: $82.01 (44%)Ships in 1-2 Business DaysProduct Specifications- Other Name: Block; Block, Main Wiring Junction And Fuse Block

Buick Fuse & Relay Box Part Number: 85140176
$140.63 MSRP: $221.28You Save: $80.65 (37%)Ships in 1-3 Business DaysProduct Specifications- Other Name: Block; Block, Main Wiring Junction And Fuse Block

Buick Fuse & Relay Box Part Number: 95131331
$286.37 MSRP: $450.57You Save: $164.20 (37%)Ships in 1-3 Business DaysProduct Specifications- Other Name: Block; Junction Boxes; Fuse Box; Block, Main Wiring Junction And Fuse Block
- Replaces: 95131333

Buick Fuse Box Part Number: 13379016
$102.92 MSRP: $161.23You Save: $58.31 (37%)Ships in 1-3 Business DaysProduct Specifications- Other Name: Block, Main Wiring Junction And Fuse Block; Junction Boxes; Fuse & Relay Box
- Position: Rear


Buick Fuse & Relay Box Part Number: 26212085
$182.96 MSRP: $287.83You Save: $104.87 (37%)Product Specifications- Other Name: Block; Junction Boxes; Fuse Box; Block, Main Wiring Junction And Fuse Block

Buick Junction Block Part Number: 95250936
$52.20 MSRP: $81.76You Save: $29.56 (37%)Ships in 1-3 Business DaysProduct Specifications- Other Name: Block Assembly-Body Wiring Harness Junction; Junction Boxes; Relay Boxes; Fuse Box; Block, Main Wiring Junction And Fuse Block; Block, Body Wiring
- Replaces: 42627351
Buick Fuse & Relay Box Part Number: 85511698
$120.22 MSRP: $189.11You Save: $68.89 (37%)Ships in 1-3 Business DaysProduct Specifications- Other Name: Block; Junction Boxes; Relay Boxes; Fuse Box
- Replaced by: 85140175

Buick Fuse & Relay Box Part Number: 84281614
$97.26 MSRP: $152.33You Save: $55.07 (37%)Ships in 1-3 Business DaysProduct Specifications- Other Name: Block Assembly-Body Wiring Harness Junction; Junction Boxes; Fuse Box; Block, Body Wiring

Buick Distribution Box Part Number: 84139184
$54.81 MSRP: $85.86You Save: $31.05 (37%)Ships in 1-3 Business DaysProduct Specifications- Other Name: Block Assembly-Battery Distribution Fuse; Block, Main Wiring Junction And Fuse Block
- Replaces: 23359001

Buick Relay Box Part Number: 95250938
$11.24 MSRP: $17.61You Save: $6.37 (37%)Ships in 1-3 Business DaysProduct Specifications- Other Name: Block, Coolant Temperature (Engine Unit); Relay Boxes; Fuse Box; Relay Cover; Block, Main Wiring Junction And Fuse Block
- Position: Front


Buick Fuse & Relay Box Part Number: 84949768
$150.80 MSRP: $237.30You Save: $86.50 (37%)Ships in 1-3 Business DaysProduct Specifications- Other Name: Block; Junction Boxes; Relay Boxes; Fuse Box; Block, Main Wiring Junction And Fuse Block

Buick Fuse & Relay Box Part Number: 25856249
$328.66 MSRP: $517.11You Save: $188.45 (37%)Ships in 1-3 Business DaysProduct Specifications- Other Name: Block Assembly-Accessory Wiring Junction; Junction Boxes; Fuse Box; Block, Main Wiring Junction And Fuse Block; Block, Wiring Junction
- Replaces: 25784722, 25856250, 25784721
Buick Fuse & Relay Box Part Number: 84292760
$153.09 MSRP: $240.83You Save: $87.74 (37%)Ships in 1-3 Business DaysProduct Specifications- Other Name: Block; Junction Boxes; Fuse Box; Block, Main Wiring Junction And Fuse Block
Buick Fuse & Relay Box Part Number: 94520906
$278.01 MSRP: $437.44You Save: $159.43 (37%)Ships in 1-3 Business DaysProduct Specifications- Other Name: Block; Junction Boxes; Relay Boxes; Fuse Box; Block, Main Wiring Junction And Fuse Block

Buick Fuse & Relay Box Part Number: 42604046
$141.82 MSRP: $223.09You Save: $81.27 (37%)Product Specifications- Other Name: Block Kit, Main Wiring Junction And Fuse Block; Junction Boxes; Relay Boxes; Fuse Box
Buick Fuse & Relay Box Part Number: 42811521
$438.04 MSRP: $689.08You Save: $251.04 (37%)Ships in 1-3 Business DaysProduct Specifications- Other Name: Block

Buick Fuse & Relay Box, Front Part Number: 22885508
Product Specifications- Other Name: Block Assembly-Front Compartment Fuse; Junction Boxes; Fuse Box; Block, Main Wiring Junction And Fuse Block
- Position: Front

Buick Junction Block Part Number: 25918680
Product Specifications- Other Name: Block Assembly-Accessory Wiring Junction; Junction Boxes; Relay Boxes; Fuse Box; Block, Main Wiring Junction And Fuse Block
- Replaces: 15778476
| Page 1 of 6 |Next >
1-20 of 109 Results
Buick Fuse Box
Want to cut long-term maintenance and repair costs? Choose OEM Fuse Box. Those parts deliver top durability you can trust. On our site, you'll find a huge catalog of genuine Buick parts. Prices are unbeatable, so you can keep more in your pocket. Every OEM Buick Fuse Box includes a manufacturer's warranty. You can also get an easy return policy that keeps buying risk free. Fast delivery, get your car on the road quickly. It's simple to search, compare, and order. Stop guessing about quality or fit. Order today and save with parts that last.
Buick Fuse Box Parts Questions & Experts Answers
- Q: How to replace the rear Fuse Box on Buick LeSabre?A:Proceeding with the replacement of the rear electrical center or junction block requires starting with removal of the rear seat cushion and negative Battery Cable disconnection while placing the ignition key in the lock position and turning off all electrical devices for safety. Your first step should be to take off the rear fuse block cover then separate the positive Battery Cable nut and positive Battery Cable from the rear electrical center. Lift the electrical center upward after unclipping its four retaining pieces. Then flip it over. Disconnected connectors of all types must be removed from the fuse block after removing its three connector fasteners. To perform installation service the connectors to the rear fuse block before using your hands to start the fasteners using a torque of 7 n.m (62 lb in). Fasten the rear electrical center into its base assembly while verifying the clips secure position before you connect the positive Battery Cable with its nut and finish securing it at 15 n.m (11 lb ft). The last step is to place back the seat cushion beneath and reattach the negative Battery Cable.
- Q: How to replace the instrument panel Fuse Box on Buick LaCrosse?A:The first step to replace either instrument panel electrical center or junction block requires disconnecting the negative Battery Cable from the vehicle. The body wiring harness should be disconnected from the accessory wiring junction block while pulling the harness out to create space for access. Insert starts with the removal of the instrument panel (I/P) compartment together with the junction block bolt. The junction block tabs should be removed from the passenger knee bolster and the junction block extracted away from the i/p for removal. Begin the installation by inserting the junction block bottom tabs before snapping its top section to the passenger knee bolster and tightening the junction block bolt to 10 n.m (89 lb in). Install the body wiring connectors to the junction block while securing each bolt with 2.5 n.m (22 lb in) torque specification. The necessary installation procedure includes placing the i/p compartment back into position followed by loading the outer trim cover and reattaching the negative Battery Cable.
- Q: How to replace the underhood fuse box on Buick Rainier?A:The first step to replace the underhood electrical center or junction block is disconnecting the negative Battery Cable. Open the junction block cover by pushing the tabs toward the interior and raising it upward. The next step involves lifting the fuse relay center cover upward until retaining tabs detach to remove it. Record the positions of the harness end bolts before removing the bolts together with the harness ends from the fuse relay center. Start by unscrew the bolts at the fuse relay center and retrieve it from the junction block bracket. Use downward pressure to unfasten the wiring harness ends from the bottom section of the fuse relay center. The vehicle needs junction block bracket retaining bolts removed before taking the bracket out. To install the junction block bracket position it correctly then start installing bolts at 6 n.m torque before completing with a 53 lb in final torque. Secure the fuse relay center into position with bolts which should be tightened at 6 n.m (53 lb in). Secure the harness end bolts simultaneously before setting the fuse relay center cover onto its bolt points and gently pressing it down to activate the tabs. The installation requires a final step which involves placing and pressing down the junction block cover until its tabs are engaged.


Related Buick Parts
 Buick Camshaft Position Sensor
 Buick Ignition Control Module
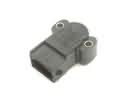 Buick Throttle Position Sensor
 Buick Fuel Pump Relay
 Buick Brake Light Switch
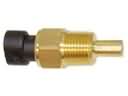 Buick Coolant Temperature Sensor
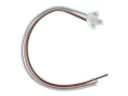 Buick Door Lock Switch Connector
 Buick Headlight Relay
 Buick Igniter
 Buick Instrument Panel Harness Connector
 Buick Spark Plug Wires
 Buick Vehicle Speed Sensor