ChevyParts
My Garage
My Account
Cart
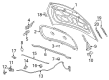
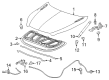
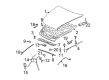
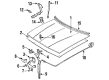
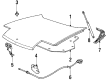
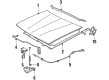
OEM Buick Hood Latch
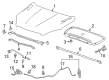
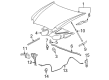
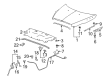
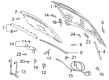
Engine Hood Latch- Select Vehicle by Model
- Select Vehicle by VIN
Select Vehicle by Model
orMake
Model
Year
Select Vehicle by VIN
For the most accurate results, select vehicle by your VIN (Vehicle Identification Number).
58 Hood Latches found


Buick Lock Part Number: 15756432
$65.30 MSRP: $97.19You Save: $31.89 (33%)Ships in 1-3 Business DaysProduct Specifications- Other Name: Latch, Hood Primary; Hood Latch; Latch; Latch, Hood Latch; Latch, Lower Hood
- Replaces: 15706108

Buick Lock Part Number: 39118566
$8.28 MSRP: $12.32You Save: $4.04 (33%)Ships in 1-3 Business DaysProduct Specifications- Other Name: Latch Assembly-Hood Primary & Secondary, Left Hand Driver; Hood Latch; Latch, Hood Latch

Buick Lock Part Number: 19420432
$63.81 MSRP: $94.97You Save: $31.16 (33%)Ships in 1-3 Business DaysProduct Specifications- Other Name: Latch Assembly, Hood Primary & Secondary; Hood Latch; Latch, Hood Latch
- Replaces: 20931533, 20866975, 20822433, 20938337

Buick Lock Part Number: 39085668
$14.63 MSRP: $21.77You Save: $7.14 (33%)Ships in 1-3 Business DaysProduct Specifications- Other Name: Latch Assembly-Hood Primary & Secondary; Hood Latch; Latch; Latch, Hood Latch
- Replaces: 13367151

Buick Lock Part Number: 39085669
$59.28 MSRP: $88.23You Save: $28.95 (33%)Ships in 1-3 Business DaysProduct Specifications- Other Name: Latch Assembly-Hood Primary & Secondary; Hood Latch; Latch; Latch, Hood Latch
- Replaces: 22788573

Buick Latch Part Number: 84068582
$66.68 MSRP: $99.25You Save: $32.57 (33%)Ships in 1-3 Business DaysProduct Specifications- Other Name: Latch Assembly-Hood Primary & Secondary; Hood Latch; Latch, Hood Latch
- Replaces: 22787036, 22869543
Buick Lock Part Number: 19420435
$30.60 MSRP: $45.54You Save: $14.94 (33%)Ships in 1-3 Business DaysProduct Specifications- Other Name: Latch Assembly, Hood Primary & Secondary; Hood Latch; Latch; Latch, Hood Latch
- Replaces: 13313237, 20938335

Buick Lock Part Number: 85535371
$60.83 MSRP: $90.53You Save: $29.70 (33%)Ships in 1-2 Business DaysProduct Specifications- Other Name: Latch Assembly-Hood Primary & Secondary; Latch, Hood Latch
- Replaces: 84999501, 84890850

Buick Lock Part Number: 19420867
$68.63 MSRP: $102.15You Save: $33.52 (33%)Ships in 1-3 Business DaysProduct Specifications- Other Name: Latch Assembly, Hood Primary & Secondary; Latch, Hood Latch
- Replaces: 90799551
Buick Lock Part Number: 19420617
$64.65 MSRP: $96.22You Save: $31.57 (33%)Product Specifications- Other Name: Latch Assembly, Hood Primary & Secondary; Latch, Hood Latch
- Replaces: 22788574

Buick Lock Part Number: 23447708
$66.82 MSRP: $99.45You Save: $32.63 (33%)Ships in 1-3 Business DaysProduct Specifications- Other Name: Latch Assembly-Hood Primary & Secondary; Hood Latch
- Replaced by: 84169355

Buick Lock Part Number: 42595591
$44.78 MSRP: $64.08You Save: $19.30 (31%)Ships in 1-3 Business DaysProduct Specifications- Other Name: Latch Assembly-Hood Primary & Secondary; Hood Latch; Latch; Latch, Hood Latch
- Replaces: 42525397, 42475807


Buick Lock Part Number: 15223216
$75.43 MSRP: $112.27You Save: $36.84 (33%)Product Specifications- Other Name: Latch Assembly-Hood Primary & Secondary; Hood Latch; Latch, Hood Latch


Buick Lock Part Number: 25904878
Product Specifications- Other Name: Latch Assembly-Hood Primary & Secondary; Hood Latch; Latch, Lower Hood


Buick Lock Part Number: 25771737
Product Specifications- Other Name: Latch Assembly-Hood Primary & Secondary; Hood Latch; Latch
- Replaces: 25654428, 25704881


Buick Lock Part Number: 16634628
Product Specifications- Other Name: Latch Assembly-Hood Primary & Secondary; Hood Latch; Latch; Latch, Hood Latch


Buick Lock Part Number: 15112250
Product Specifications- Other Name: Latch Assembly-Hood Primary & Secondary; Hood Latch

Buick Safety Catch Part Number: 10220662
Product Specifications- Other Name: Latch Package; Hood Latch; Latch Package, Hood Upper Latch
Buick Lock Part Number: 1644157
Product Specifications- Other Name: Latch Assembly-Hood Secondary; Hood Latch; Latch, Hood Upper Latch

Buick Safety Catch, Upper Part Number: 10018735
Product Specifications- Other Name: Latch, Hood Upper Latch; Hood Latch
- Position: Upper
| Page 1 of 3 |Next >
1-20 of 58 Results
Buick Hood Latch
Choose OEM Hood Latch, you're making the optimal decision for superior quality and perfect performance. You can feel confident because each component goes through stringent quality checks. Every part is carefully built to comply with Buick's factory specifications. You'll enjoy a smooth, worry-free installation that fits just right. At ChevyPartsGiant.com, you'll find it easy to get top-quality OEM Buick Hood Latch. You can shop at highly competitive prices and protect your budget. All our genuine Buick parts include a dependable manufacturer's warranty. You'll also appreciate our straightforward return policy and swift delivery services for extra convenience.
Buick Hood Latch Parts and Q&A
- Q: How to replace the hood latch on Buick LeSabre?A:Hafting the Hood Latch that connects to the radiator support requires first unscrewing the Hood Latch fasteners before removing the Hood Latch itself. The Hood Latch operation requires disconnecting the hood release cable from its connection with the Hood Latch. The hood release cable needs to be connected to the Hood Latch before installing the Hood Latch and fasteners should be tightened until they reach 9 n.m (80 lb in). Finish by modifying the required settings of the Hood Latch.
- Q: How to replace the hood latch on Buick Regal?A:Open the hood and note down the Hood Latch position with a grease pencil on the Hood Latch support bracket before beginning the replacement. Begin by taking off the Hood Latch support bracket through the process of removing its mounting bolts. After squeezing the cable retainer you should disconnect the Hood Latch release cable then place it safely away while being careful to avoid crimping the cable. Attach the Hood Latch release cable to the new Hood Latch as you position it according to the marks on the support bracket. Use center support bracket bolts to install the Hood Latch while torquing them to 25 n.m (18 lb ft). Use adjustments to the hood before tightly securing the hood in its position.


Related Buick Parts
 Buick Emblem
 Buick Center Console Base
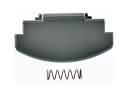 Buick Center Console Latch
 Buick Door Hinge
 Buick Door Striker
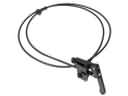 Buick Hood Cable
 Buick Lift Support
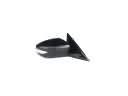 Buick Side View Mirrors
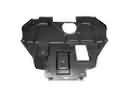 Buick Underbody Splash Shield
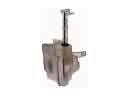 Buick Washer Reservoir
 Buick Weather Strip
 Buick Window Channel