ChevyParts
My Garage
My Account
Cart
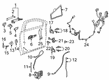
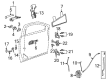
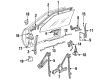
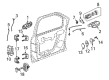
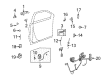
OEM Buick Door Hinge
Interior Door Hinge- Select Vehicle by Model
- Select Vehicle by VIN
Select Vehicle by Model
orMake
Model
Year
Select Vehicle by VIN
For the most accurate results, select vehicle by your VIN (Vehicle Identification Number).
192 Door Hinges found


Buick Hinge Assembly, Front Upper Passenger Side Part Number: 10218445
$57.04 MSRP: $110.64You Save: $53.60 (49%)Product Specifications- Other Name: Hinge Kit, Front Door Upper Hinge; Door Hinge; Lower Hinge; Upper Hinge; Hinge; Hinge Kit, Front Door Lower Hinge
- Position: Front Upper Passenger Side


Buick Lower Hinge, Front Part Number: 13583613
$53.80 MSRP: $80.08You Save: $26.28 (33%)Ships in 1-2 Business DaysProduct Specifications- Other Name: Hinge, Front Door Lower Hinge; Door Hinge; Upper Hinge; Hinge, Front Door Upper Hinge
- Position: Front Lower


Buick Lower Hinge, Rear Part Number: 13501716
$85.31 MSRP: $126.98You Save: $41.67 (33%)Ships in 1-2 Business DaysProduct Specifications- Other Name: Hinge, Rear Side Door Lower Hinge; Door Hinge; Upper Hinge; Hinge, Front Door Lower Hinge; Hinge, Front Door Upper Hinge
- Position: Rear Lower
- Replaces: 15932621

Buick Hinge Strap, Driver Side Part Number: 20351021
$48.49 MSRP: $94.05You Save: $45.56 (49%)Product Specifications- Other Name: Strap Assembly; Door Hinge; Hinge; Hinge, Front Door Upper Hinge
- Position: Driver Side

Buick Lower Hinge, Front Driver Side Part Number: 88937052
$146.30 MSRP: $229.00You Save: $82.70 (37%)Ships in 1-2 Business DaysProduct Specifications- Other Name: Hinge Kit, Front Side Door Lower (Door Side); Door Hinge; Hinge Kit, Door Hinge
- Position: Front Lower Driver Side

Buick Lower Hinge, Front Passenger Side Part Number: 23436138
$139.89 MSRP: $209.14You Save: $69.25 (34%)Ships in 1-2 Business DaysProduct Specifications- Other Name: Hinge, Front Door Lower Hinge; Door Hinge; Hinge, Door Hinge
- Position: Front Lower Passenger Side
- Replaces: 20877346, 25989940, 15119442
Buick Lower Hinge, Front Passenger Side Part Number: 88937055
$152.87 MSRP: $228.55You Save: $75.68 (34%)Ships in 1-3 Business DaysProduct Specifications- Other Name: Hinge Kit, Front Side Door Lower (Door Side); Door Hinge; Hinge Kit, Door Hinge
- Position: Front Lower Passenger Side

Buick Lower Hinge, Driver Side Part Number: 88937059
$94.20 MSRP: $134.79You Save: $40.59 (31%)Ships in 1-2 Business DaysProduct Specifications- Other Name: Hinge Kit, Door Hinge; Upper Hinge
- Position: Driver Side

Buick Lower Hinge, Front Driver Side Part Number: 88937053
$139.51 MSRP: $208.58You Save: $69.07 (34%)Ships in 1-2 Business DaysProduct Specifications- Other Name: Hinge Kit, Front Side Door (Body Side); Upper Hinge; Hinge Kit, Door Hinge
- Position: Front Driver Side

Buick Upper Hinge, Front Passenger Side Part Number: 88937054
$146.29 MSRP: $218.71You Save: $72.42 (34%)Ships in 1-3 Business DaysProduct Specifications- Other Name: Hinge Kit, Front Side Door Upper (Door Side); Door Hinge; Hinge Kit, Door Hinge
- Position: Front Upper Passenger Side

Buick Upper Hinge, Front Passenger Side Part Number: 25943923
$143.49 MSRP: $214.53You Save: $71.04 (34%)Ships in 1-3 Business DaysProduct Specifications- Other Name: Hinge Assembly-Front Side Door Upper; Door Hinge; Hinge, Door Hinge
- Position: Front Upper Passenger Side
- Replaces: 15119440
Buick Upper Hinge, Front Passenger Side Part Number: 88937056
$122.18 MSRP: $182.67You Save: $60.49 (34%)Ships in 1-2 Business DaysProduct Specifications- Other Name: Hinge Kit, Front Side Door (Body Side); Door Hinge; Lower Hinge; Hinge Kit, Door Hinge
- Position: Front Passenger Side

Buick Lower Hinge, Front Part Number: 13505399
$80.08 MSRP: $119.19You Save: $39.11 (33%)Ships in 1-2 Business DaysProduct Specifications- Other Name: Hinge, Front Door Lower Hinge; Door Hinge; Upper Hinge; Hinge, Front Door Upper Hinge
- Position: Front Lower

Buick Lower Hinge, Front Driver Side Part Number: 13389030
$53.07 MSRP: $78.98You Save: $25.91 (33%)Ships in 1-3 Business DaysProduct Specifications- Other Name: Hinge Assembly-Front Side Door Lower (Left-Hand); Door Hinge; Hinge, Front Door Lower Hinge
- Position: Front Lower Driver Side


Buick Lower Hinge, Front Passenger Side Part Number: 25709766
Product Specifications- Other Name: Hinge, Front Door Lower Hinge; Door Hinge; Upper Hinge; Hinge, Rear Side Door Lower Hinge; Hinge, Rear Side Door Upper Hinge; Hinge, Front Door Upper Hinge
- Position: Front Lower Passenger Side
- Replaces: 25695589, 25754599

Buick Lower Hinge, Front Driver Side Part Number: 25709767
$83.94 MSRP: $124.94You Save: $41.00 (33%)Product Specifications- Other Name: Hinge, Front Door Lower Hinge; Door Hinge; Upper Hinge; Hinge, Rear Side Door Lower Hinge; Hinge, Rear Side Door Upper Hinge; Hinge, Front Door Upper Hinge
- Position: Front Lower Driver Side
- Replaces: 25754600, 25693460, 25695590

Buick Hinge, Driver Side Part Number: 14064325
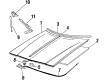
Product Specifications- Other Name: Hinge, Hood Panel; Hinge Assembly, Hood Panel
- Position: Driver Side

Buick Hinge, Passenger Side Part Number: 14064326
Product Specifications- Other Name: Hinge Assembly, Hood-Right-Hand; Hinge Assembly, Hood Panel
- Position: Passenger Side

Buick Hinge, Rear Part Number: 12537265
Product Specifications- Other Name: Hinge Kit, Rear Compartment Lid And End Gate; Door Hinge; Hinge Kit, Rear Compartment Lid
- Position: Rear
- Replaces: 25612355, 25602097, 25612354, 25602096

Buick Lower Hinge, Front Driver Side Part Number: 20693419
Product Specifications- Other Name: Hinge, Front Door Lower Hinge; Door Hinge; Hinge
- Position: Front Lower Driver Side
| Page 1 of 10 |Next >
1-20 of 192 Results
Buick Door Hinge
Want to cut long-term maintenance and repair costs? Choose OEM Door Hinge. Those parts deliver top durability you can trust. On our site, you'll find a huge catalog of genuine Buick parts. Prices are unbeatable, so you can keep more in your pocket. Every OEM Buick Door Hinge includes a manufacturer's warranty. You can also get an easy return policy that keeps buying risk free. Fast delivery, get your car on the road quickly. It's simple to search, compare, and order. Stop guessing about quality or fit. Order today and save with parts that last.
Buick Door Hinge Parts Questions & Experts Answers
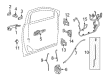
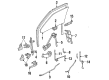
- Q: How to replace the front door hinge on Buick LaCrosse?A:The replacement procedure for the front door hinge starts by using masking tape across the fender and door edges to protect the paint from damage. Start by opening the door while supporting it then wipe the area surrounding the hinge before making the hinge marks with a grease pencil. The procedure for replacing front door hinges starts by removing upper hinge bolts through specific sequences (1, 4) from the door side before removing bolts from the specified sequences (1, 4, 5) at the hinge pillar side. The replacement process for a broken lower hinge includes removing its bolts from the door side sequentially (3, 2) followed by the hinge pillar side in this sequence (3, 2). The replacement procedure requires you to install new hinges to the door by matching marks from the hinge pillar with marks on the door. Place the lower hinge bolts on the hinge pillar side according to sequence (3, 2) while tightening them to 33 N.m (24 lb ft). The installation of lower hinge bolts on the door side follows the specified sequence (3, 2) before being torques to 33 N.m (24 lb ft). Use the correct specified sequence of 1, 4, 5 to install the upper hinge bolts to the hinge pillar side before tightening them to 33 N.m (24 lb ft). Then move onto the upper hinge bolts to the door side which must be installed with the specified sequence of 1, 4 before tightening them to 33 N.m (24 lb ft). Before finishing check the door's function while the support is removed and the tape needs to be taken off.
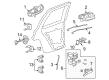
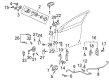
- Q: How to replace the rear side door hinge on Buick LeSabre?A:Before starting the process to install the rear side door hinge you must first remove the door and note the hinge position on the body. The next step requires removing hinge to body fasteners while maintaining securement of the studplate inside the door to avoid any potential dropping. First remove the door trim panel and mark the hinge position on the door before uninstalling the hinge to door fasteners. Installation requires lining up the body side half of the hinge with the marks left on the pillar during disassembly and fastening it to the body structure while referring to the Fastener Notice in Service Precautions. Follow the Fastener Notice in Service Precautions to secure the hinge to body fasteners at 35 N.m (26 lb ft). Install the fasteners on the door half of the hinge by positioning them at the marks which were applied during disassembly and tighten them to 34 N.m (24 lb ft). Apply body color paint to fix any damaged hinge fasteners before attaching the door while adjusting it properly.
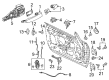
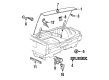
- Q: How to replace the rear side door hinges on Buick Regal?A:Beginning the hinge replacement process involves opening the door before supporting it while also taking out the intermediate door hinge bolts as well as the hinge spring. Drill clean the hinge attachment points on both door and mark the spot with a grease pencil. First clean the body pillar hinge mounting surface after removing both door side hinge bolts and the hinge and mark the surface location with a pencil. Cautiously reduce the torque on the cone adjuster bolt because its loosening could cause the bolt to enter the pillar area. The body side hinge requires the removal of two 13 mm bolts before removing the hinge from the side. Begin by putting new hinge pieces alongside marked reference points before coating the bolts with Locktite(R) Blue GM P/N 12345382 or Canadian P/N 10953489 or their equivalent products. After that, install the bolts loosely before normalizing them. Synchronize the new body side hinge with pre-determined marks on the door while adding Locktite(R) Blue GM P/N 12345382 or Canadian P/N 10953489 or equivalent to both the door side hinge bolts. Then loosely install the 13 mm body side hinges. Position the door to install intermediate bolts and then put in the hinge spring and the intermediate door hinge bolts before tightening them to 33 Nm (24 lb ft) and all body side and door side hinge bolts. Take the door support away after you must close the door while performing the final adjustments.


Related Buick Parts
 Buick Door Handle
 Buick Shift Knob
 Buick Trunk Latch
 Buick Window Motor
 Buick Body Mount Hole Plug
 Buick Door Armrest
 Buick Door Lock Cylinder
 Buick Door Seal
 Buick Door Striker
 Buick Tailgate Handle
 Buick Tailgate Lock
 Buick Window Channel