ChevyParts
My Garage
My Account
Cart
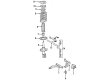
OEM Buick Park Avenue Control Arm
Suspension Arm- Select Vehicle by Model
- Select Vehicle by VIN
Select Vehicle by Model
orMake
Model
Year
Select Vehicle by VIN
For the most accurate results, select vehicle by your VIN (Vehicle Identification Number).
13 Control Arms found


Buick Park Avenue Control Arm, Driver Side Part Number: 25766511
$195.81 MSRP: $317.79You Save: $121.98 (39%)
Buick Park Avenue Control Arm, Passenger Side Part Number: 25766510
$195.81 MSRP: $317.79You Save: $121.98 (39%)
Buick Park Avenue Lower Control Arm, Front Passenger Side Part Number: 25554671
$48.00 MSRP: $79.07You Save: $31.07 (40%)Ships in 1-2 Business Days
Buick Park Avenue Control Arm, Passenger Side Part Number: 19149203
$48.00 MSRP: $79.07You Save: $31.07 (40%)Ships in 1-2 Business Days


Buick Park Avenue Control Arm, Rear Driver Side Part Number: 25820031

Buick Park Avenue Lower Control Arm, Driver Side Part Number: 25660354
Buick Park Avenue Lower Control Arm, Driver Side Part Number: 25660352

Buick Park Avenue Control Arm, Rear Driver Side Part Number: 25614693
Buick Park Avenue Control Arm, Driver Side Part Number: 19149204
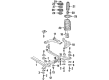
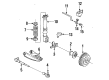
Buick Park Avenue Control Arm
Want to cut long-term maintenance and repair costs? Choose OEM Control Arm. Those parts deliver top durability you can trust. On our site, you'll find a huge catalog of genuine Buick Park Avenue parts. Prices are unbeatable, so you can keep more in your pocket. Every OEM Buick Park Avenue Control Arm includes a manufacturer's warranty. You can also get an easy return policy that keeps buying risk free. Fast delivery, get your car on the road quickly. It's simple to search, compare, and order. Stop guessing about quality or fit. Order today and save with parts that last.
Stephanie Buick Park Avenue Control Arm is one of the critical components of the car that illustrate the brand standards that Buick has set for itself. At per with the frame and running connected with the wheels, Control Arm holds required components like shocks or springs that are required for the smooth wheel operation in reference to the uneven surfaces of the road. This feature adds a value to the comfort as well to the driving stability of the car keeping the Buick Park Avenue, standard as a comfortable ride. Suitable for use on different models of Park Avenue, the Control Arm is produced to achieve functionality while withstanding the daily abuse. The life expectancy of the Control Arm is further supported by its structure, in the recent models the material used is stronger as compared to the previous version; it could be cast iron or aluminum. Also, the Buick Park Avenue Control Arm can be adjusted to suit the type of drive of the automobile, the Street, drag racing or off road. This versatility has made it an unbeatable item in the automotive market since it can suit the needs of anyone. In its construction and the way of integration into the construction of a car, the Control Arm participates not only in the control of the drive but also plays an important role in safety issues of passengers. All in all, Buick Park Avenue Control Arm is the evidence of Buick's commitment to the quality and performance which preserves its position in the market of luxury automobiles.
Buick Park Avenue Control Arm Parts and Q&A
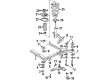
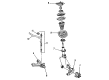
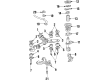
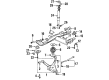
- Q: What tools are required to service and repair the front lower control arm on Buick Park Avenue?A:These tools are needed to service and repair the front lower Control Arm: Ball Joint separator (J 43828). Ball Joint separator (J 43828). First, lift the vehicle before you remove its wheel and tire assembly. Remove first the stabilizer shaft link and then the lower Ball Joint cotter pin. Adults should carefully separate the lower Ball Joint retaining nut from the ball stud by keeping stress away from the tri-pot joints to avoid their internal separation and eventual joint breakdown. Separate the Ball Joint with the Ball Joint separator (J 43828) to remove the lower Ball Joint from the Steering Knuckle before removing the lower Ball Joint retaining nut. Take out the lower Control Arm from the frame by first disassembling its mounting bolts and nuts. During installation start by mounting the lower Control Arm to the frame prior to tightening Control Arm nuts to avoid altering vehicle design trim heights. Start by installing lower Control Arm bolts along with nuts and next secure the lower Ball Joint to the Steering Knuckle. Tighten the lower Ball Joint retaining nut to 10 nm (88 inch lbs.) and the two flats to a minimum of 55 nm (41 ft. Lbs.) so the cotter pin slot can be aligned properly. After inserting the cotter pin you should install the stabilizer shaft link before reintroducing the tire and wheel assembly. Lower the vehicle then follow the specified sequence for tightening the Control Arm nuts before checking trim height measurements. First tighten the rear mounting bolt to 158 nm (117 ft. Lbs.) before torquing the front mounting nut to 126 nm (93 ft. Lbs.).
- Q: How to replace the front lower control arm on Buick Park Avenue?A:The process starts with vehicle lifting and support before moving forward toward Control Arm front lower replacement. First remove the tire and wheel before proceeding to remove the stabilizer shaft link. You should start by eliminating the lower Ball Joint cotter pin and then freeing up the lower Ball Joint retaining nut from the ball stud using a wrench. Be attentive when working with the tri-pot joints to avoid excessive movement because it will trigger internal component separation and joint breakdown. Drilling axle joint seal protectors serves as a protective measure for drive axle maintenance. Start removal of the lower Ball Joint from the Steering Knuckle by inserting the j43828 Ball Joint separator (J43828) and then remove the lower Ball Joint retaining nut. First detach the lower Control Arm mounting bolts with the lower Control Arm nuts; then separate the lower Control Arm from the frame. Before final tightening apply the lower Control Arm to the frame without installing the Control Arm nuts at first; then support the vehicle's weight through the control arms before securing the lower Control Arm bolts and nuts. Use the control arms to suspend the vehicle's weight while reaching proper trim heights and then bolt and nut the lower Control Arm. Secure the lower Ball Joint retaining nut to the Steering Knuckle, while tightening the lower Ball Joint retaining nut to 10 nm (88 inch lbs.) and the two flats to a minimum of 55 nm (41 ft. Lbs.) to create alignment with the cotter pin slot. Reinstall the stabilizer shaft link and tire and wheel before inserting the cotter pin. After dropping the vehicle position each Control Arm nut with attention to proper sequence while testing the trim height alignment. Fasten the rear mounting bolt with 158 nm (117 ft. Lbs.) torque and tighten the front mounting nut to 126 nm (93 ft. Lbs.).


Related Buick Park Avenue Parts
 Buick Park Avenue Wheel Bearing
 Buick Park Avenue Axle Beam Mount
 Buick Park Avenue Axle Support Bushings
 Buick Park Avenue Coil Spring Insulator
 Buick Park Avenue Control Arm Bolt
 Buick Park Avenue Lateral Link
 Buick Park Avenue Shock Absorber
 Buick Park Avenue Steering Knuckle
 Buick Park Avenue Suspension Control Module
 Buick Park Avenue Sway Bar Kit
 Buick Park Avenue Sway Bar Link
 Buick Park Avenue Wheel Seal