ChevyParts
My Garage
My Account
Cart
OEM Buick Rainier Rack And Pinion
Steering Rack And Pinion- Select Vehicle by Model
- Select Vehicle by VIN
Select Vehicle by Model
orMake
Model
Year
Select Vehicle by VIN
For the most accurate results, select vehicle by your VIN (Vehicle Identification Number).
2 Rack And Pinions found

Buick Rainier Steering Gear Part Number: 19330462
Buick Rainier Steering Gear Part Number: 19330461
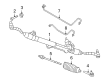
Buick Rainier Rack And Pinion
Want to cut long-term maintenance and repair costs? Choose OEM Rack And Pinion. Those parts deliver top durability you can trust. On our site, you'll find a huge catalog of genuine Buick Rainier parts. Prices are unbeatable, so you can keep more in your pocket. Every OEM Buick Rainier Rack And Pinion includes a manufacturer's warranty. You can also get an easy return policy that keeps buying risk free. Fast delivery, get your car on the road quickly. It's simple to search, compare, and order. Stop guessing about quality or fit. Order today and save with parts that last.
Buick Rainier Rack And Pinion Parts Questions & Experts Answers
- Q: How to replace the Rack and Pinion steering gear on Buick Rainier?A:The Rack And Pinion replacement process starts with vehicle elevation and support and positions a drain pan below the area. Start the replacement process by removing tires and wheels followed by outer tie rods retaining nuts removal with disposal of those nuts afterward. Drive a wedge between the joint and its attached part to stop seal damage during steering linkage joint detachment. Use the tie rod puller of steering linkage j24319-b to disconnect outer Steering Knuckle tie rods. Start by taking out the steering gear crossmember and then disconnect the lower intermediate shaft from the Rack And Pinion. To access the Rack And Pinion hose assembly and its removal you must first disconnect it from the Rack And Pinion retaining bolt. The vehicle still needs to be supported while removing all bolts from the Rack And Pinion to extract it. Begin installation by putting the outer tie rods into position followed by safely returning the Rack And Pinion into the vehicle. The Rack And Pinion mounting bolts must be tightened to 110 n.m (81 lb ft). Secure the Rack And Pinion hose assembly to the Rack And Pinion by fastening the retaining bolt to a torque of 12 n.m (106 lb in). After securing the lower intermediate shaft to the Rack And Pinion, install the steering gear crossmember before reconnecting the outer tie rods to steering knuckles by torqueing retaining nuts to 60 n.m (44 lb ft). After reinstalling the tires and wheels pull out the drain pan while lowering the vehicle to perform Rack And Pinion system bleeding. Front toe adjustment needs to occur only after replacing a tie rod end or Rack And Pinion. Finally, lower the vehicle.

Related Buick Rainier Parts
 Buick Rainier Steering Wheel
 Buick Rainier Ignition Lock Assembly
 Buick Rainier Ignition Lock Cylinder
 Buick Rainier Power Steering Hose
 Buick Rainier Power Steering Pump
 Buick Rainier Power Steering Reservoir
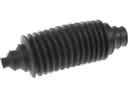 Buick Rainier Rack and Pinion Boot
 Buick Rainier Steering Column
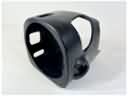 Buick Rainier Steering Column Cover
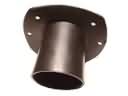 Buick Rainier Steering Column Seal
 Buick Rainier Tie Rod
 Buick Rainier Tie Rod End