ChevyParts
My Garage
My Account
Cart
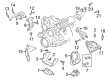
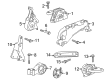
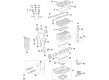
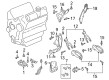
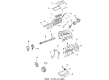
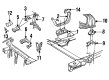
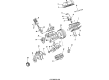
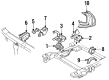
OEM Buick Regal Engine Mount Bracket
Engine Mount- Select Vehicle by Model
- Select Vehicle by VIN
Select Vehicle by Model
orMake
Model
Year
Select Vehicle by VIN
For the most accurate results, select vehicle by your VIN (Vehicle Identification Number).
24 Engine Mount Brackets found


Buick Regal Strut Mount Part Number: 10271462
$207.03 MSRP: $325.75You Save: $118.72 (37%)Ships in 1-2 Business Days
Buick Regal Mount Bracket Part Number: 13227754
$25.86 MSRP: $42.61You Save: $16.75 (40%)Ships in 1-3 Business Days
Buick Regal Motor Mount Part Number: 23144105
$103.59 MSRP: $177.91You Save: $74.32 (42%)Ships in 1-2 Business Days

Buick Regal Strut Bracket, Driver Side Part Number: 24503458


Buick Regal Mount Bracket Part Number: 10321856


Buick Regal Mount Bracket Part Number: 10216970


Buick Regal Mount Bracket Part Number: 10137340

Buick Regal Mount Bracket Part Number: 559271
Buick Regal Mount Bracket Part Number: 14088168


Buick Regal Torque Strut Bracket Part Number: 24500212

Buick Regal Mount Bracket Part Number: 1262679

Buick Regal Strut Rear Mount Part Number: 24501999
Buick Regal Mount Bracket, Driver Side Part Number: 559272
Buick Regal Mount, Rear Part Number: 52362002

Buick Regal Mount Bracket, Passenger Side Part Number: 14094810

Buick Regal Strut Bracket, Passenger Side Part Number: 24507211

Buick Regal Mount Part Number: 22146012
Buick Regal Mount Bracket, Passenger Side Part Number: 14097634
Buick Regal Engine Bracket Part Number: 52362003
Buick Regal Strut Front Bracket Part Number: 10220711
| Page 1 of 2 |Next >
1-20 of 24 Results
Buick Regal Engine Mount Bracket
Want to cut long-term maintenance and repair costs? Choose OEM Engine Mount Bracket. Those parts deliver top durability you can trust. On our site, you'll find a huge catalog of genuine Buick Regal parts. Prices are unbeatable, so you can keep more in your pocket. Every OEM Buick Regal Engine Mount Bracket includes a manufacturer's warranty. You can also get an easy return policy that keeps buying risk free. Fast delivery, get your car on the road quickly. It's simple to search, compare, and order. Stop guessing about quality or fit. Order today and save with parts that last.
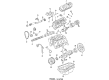
The Buick Regal Engine Mount Bracket functions as a vital structural element that demonstrates excellent reliability on many different Buick Regal car models. The Engine Mount Bracket plays two main roles to minimize engine and transaxle vibrations and chassis support for the engine and transaxle structure. Vehicle comfort during driving becomes better because of this isolation process which simultaneously serves as a crucial factor for protecting vehicle components. Buick Regals across different production years have applied three distinct Engine Mount Bracket systems consisting of metal-rubber insulation combinations and fluid-hydraulic mechanisms and electronic adaptive mounts which modify stiffness at specific RPM ranges for peak performance. Through these innovative features the Buick Regal achieves better efficiency levels and safety measures. The Buick Regal has transformed since 1973 yet the Engine Mount Bracket continues serving as the foundation of its engineering platform to ensure complete structural coherence. The Market recognizes this part for its effectiveness and durability because it works with multiple Regal generations. Once the Engine Mount Bracket shows signs of erosion through time it becomes crucial to maintain and inspect it because such wear could produce vibration and noise problems. The Buick model Engine Mount Bracket showcases how the brand prioritizes quality performance thus becoming an essential component of driving experiences.
Buick Regal Engine Mount Bracket Parts and Q&A
- Q: How to replace the Engine Mount Bracket on Buick Regal?A:The replacement of Engine Mounts starts with disconnecting the negative Battery Cable first. The next procedure requires removal of the fuel injector sight shield, Drive Belt and a detachment of the intake air temperature (IAT) sensor electrical connector. You must begin by unplugging the Throttle Body air duct before removing right and left Engine Mount struts. Lift and stabilize the automobile before taking off the right front tire and wheel in addition to the right engine splash shield retainers and splash shield. The first step is to take off the power steering oil cooler pipe brackets from the frame before detaching the A/C Compressor and its mounting bracket during which no system discharge is required along with post-compressor security measures. The next step involves removing the Catalytic Converter from the right side Exhaust Manifold as well as lower nuts from the Engine Mount located on the frame. Put the vehicle on engine support fixture (J 28467-B) after lowering it into position to lift the motor. Once you raise the vehicle remove all bolts that hold the left front Engine Mount bracket to the engine and the right rear Engine Mount bracket to the engine from their positions. Adjusting jack stands allows you to lower the frame by first loosening left-side frame bolts and then removing right side frame bolts when obtaining access to the Engine Mount brackets. Repeat the following steps to complete the task: first remove the Engine Mount bracket along with the Engine Mount after you untighten the upper nuts followed by installing the Engine Mount to the Engine Mount bracket. Start by installing engineered 78 nm (58 ft. Lbs.) torque on Engine Mount upper nuts before mounting the Engine Mount together with its bracket to the engine. First secure the left front mount and right rear mount bolts by hand before torquing all Engine Mount bracket bolts to 102 nm (75 ft. Lbs.). After placing the frame in its original position with jack stands you can install right side frame bolts and tighten both right and left side frame bolts to 180 nm (133 ft. Lbs.). Utilize the engine support fixture (J 28467-B) together with engine lowering procedures to decrease the engine height. Follow this by raising the vehicle to install and torque the Engine Mount lower nuts to the frame at 58 ft. Lbs. (78 Nm). Begin A/C Compressor bracket installation before tightening the bracket bolts to 50 nm (37 ft. Lbs.), then continue with A/C Compressor mounting nut installation and tightening those nuts to 30 nm (22 ft. Lbs.). The steering system should receive its power steering oil cooler pipe brackets both from the frame and right engine splash shield alongside their retainers and the Catalytic Converter should be placed at the right side Exhaust Manifold. Place the right front wheel along with its tire then lower the vehicle before taking out the engine support fixture (J 28467-B). To complete the engine compartment refitting you must install the air inlet duct to the Throttle Body followed by the Drive Belt, fuel injector sight shield and negative Battery Cable and left and right Engine Mount struts and iat sensor electrical connector.

Related Buick Regal Parts
 Buick Regal Timing Chain
 Buick Regal Balance Shaft Gear
 Buick Regal Camshaft Seal
 Buick Regal Crankshaft Thrust Washer Set
 Buick Regal Cylinder Head
 Buick Regal Engine Mount
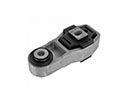 Buick Regal Engine Mount Torque Strut
 Buick Regal Exhaust Valve
 Buick Regal Lash Adjuster
 Buick Regal Oil Pan Gasket
 Buick Regal Timing Cover
 Buick Regal Timing Cover Gasket