ChevyParts
My Garage
My Account
Cart
OEM Buick Regal Rod Bearing
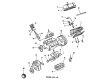
Engine Connecting Rod Bearing- Select Vehicle by Model
- Select Vehicle by VIN
Select Vehicle by Model
orMake
Model
Year
Select Vehicle by VIN
For the most accurate results, select vehicle by your VIN (Vehicle Identification Number).
5 Rod Bearings found

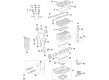
Buick Regal Connecting Rod Bearing Part Number: 12657438
$12.31 MSRP: $19.55You Save: $7.24 (38%)Ships in 1-3 Business Days


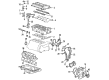
Buick Regal Bearing Set, Green Line Part Number: 12591093
$42.83 MSRP: $72.96You Save: $30.13 (42%)Ships in 1-3 Business Days
Buick Regal Connecting Rod Bearing Part Number: 12480255
$0.38 MSRP: $0.59You Save: $0.21 (36%)Ships in 1-2 Business Days
Buick Regal Rod Bearings Part Number: 89017700
$16.09 MSRP: $25.21You Save: $9.12 (37%)Ships in 1-2 Business Days
Buick Regal Bearings Part Number: 18008494
Buick Regal Rod Bearing
Want to cut long-term maintenance and repair costs? Choose OEM Rod Bearing. Those parts deliver top durability you can trust. On our site, you'll find a huge catalog of genuine Buick Regal parts. Prices are unbeatable, so you can keep more in your pocket. Every OEM Buick Regal Rod Bearing includes a manufacturer's warranty. You can also get an easy return policy that keeps buying risk free. Fast delivery, get your car on the road quickly. It's simple to search, compare, and order. Stop guessing about quality or fit. Order today and save with parts that last.
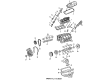
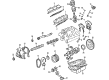
The Buick Regal Rod Bearing is a part that as a component that exemplifies the Resilience and efficiency of Buicks midsize cars. Being geared towards protecting valuable elements in the engine such as the crankshaft and the camshaft, the Rod Bearing possesses the critical requirement expected of an oil film that is supplied under pressure in order to allow the engine to work optimally. Having bi-metal and tri-metal constructions, this Buick Regal Rod Bearing is specifically designed to lock itself into the bearing saddles of the engine and thus to improve the efficiency and safety of a car. Depending on design, which usually range between 0.001" and 0.0035", these Rod Bearings are vital in minimum and maximum control of friction and heat especially for the performance inclined Regal models. Starting from the 1973 model, the Buick Regal has come a long way, and its compatibility with several types of Regal such as the liftback sedan and TourX station wagon proves this. The rod bearing is traditionally tri-metal, and may have a proprietary dry film lubricant coating; the material has high strength to weight ratio and good heat resistant as well as ideal for automotive parts purchasing needs and it is widely used in the automobile industry for improved performance. With the firm's commitment in enhancing its production line, the Regal Rod Bearing is indeed a testimony that Buick will stick to its reputation in delivering efficient cars that offer reliability in every model of the Regal. Thanks to it the Buick Regal remain to be a synonym of performance and luxury in auto industry so far with the aid of the outstanding Rod Bearings gaining more and more enhancements in the process.
Buick Regal Rod Bearing Parts and Q&A
- Q: How to Service a Rod Bearing on Buick Regal?A:In replacing the connecting Rod Bearing, first you will have to remove the Oil Pan and the Spark Plug(s) from the cylinder(s) being serviced. Has the position of the connecting rod to be serviced at bottom dead center (BDC) by rotating the Crankshaft, then take off the connecting rod cap bolts to remove the connecting rod cap together with the lower connecting Rod Bearing but remember to keep the bearings with the original connecting rod and cap for reassembling. Next, take out the lower connecting Rod Bearing from the connecting rod cap and compress the lower end of the connecting rod with the connecting rod assembly guide which is (J 41507). Through the use of the guide, push up the connecting rod and Piston for access to the upper connecting Rod Bearing; this should be dislodged. Clean off the oil from the bearings and check them, also measure the bearing clearance. For installation, oil the connecting rod cap bolts in clean engine oil, bear with clean engine oil. Install the upper connecting Rod Bearing, then use the connecting rod assembly guide (J 41507) to pull down the Piston, connecting rod, and upper connecting Rod Bearing before removing the guide.mount the lower connecting Rod Bearing onto the connecting rod cap, and the connecting rod cap, making sure that the connecting rod cap bolt holes and mating surfaces are clean and dry. Mount the connecting rod cap bolts, tightening them to 27 nm (20 ft. Lbs.) but using the electronic torque angle meter (J 36660-A) jogging them an additional 50 degrees. Examine binding by prying the connecting rod back and forth, if necessary, loose and retighten the connecting rod cap bolts. Measure the connecting rod side clearance, then re-install the Spark Plug(s) and the Oil Pan, then checking for oil pressure and leaks.

Related Buick Regal Parts
 Buick Regal Cam Gear
 Buick Regal Camshaft Bearing
 Buick Regal Coolant Filter
 Buick Regal Crankshaft Gear
 Buick Regal Crankshaft Pulley
 Buick Regal Cylinder Head
 Buick Regal Dipstick Tube
 Buick Regal Oil Filler Cap
 Buick Regal Oil Pan
 Buick Regal Timing Belt Tensioner
 Buick Regal Valve Cover Gasket
 Buick Regal Valve Stem Oil Seal