ChevyParts
My Garage
My Account
Cart
OEM Buick Transmission Pan
Trans Pan- Select Vehicle by Model
- Select Vehicle by VIN
Select Vehicle by Model
orMake
Model
Year
Select Vehicle by VIN
For the most accurate results, select vehicle by your VIN (Vehicle Identification Number).
6 Transmission Pans found


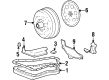
Buick Oil Pan Part Number: 24207558
$20.66 MSRP: $55.25You Save: $34.59 (63%)Ships in 1-2 Business DaysProduct Specifications- Other Name: Pan Kit, Transmission Oil Pan; Automatic Transmission Oil Pan; Transmission Pan; Pan, Transmission Oil Pan
- Replaces: 08651914, 8651914


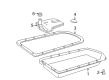
Buick Oil Pan Part Number: 8667545
$43.08 MSRP: $70.97You Save: $27.89 (40%)Ships in 1-3 Business DaysProduct Specifications- Other Name: Pan-Automatic Transmission Oil; Automatic Transmission Oil Pan; Transmission Pan; Filter; Pan Kit, Transmission Oil Pan; Pan, Transmission Oil Pan

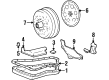
Buick Oil Pan Part Number: 24206181
$109.30 MSRP: $186.08You Save: $76.78 (42%)Ships in 1-2 Business DaysProduct Specifications- Other Name: Pan, Transmission Oil Pan; Automatic Transmission Oil Pan; Hydraulic Filter; Transmission Pan; Filter; Pan Kit, Transmission Oil Pan; Transmission Oil Pan
- Replaces: 24210461

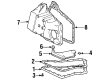
Buick Oil Pan Part Number: 8681485
$46.47 MSRP: $76.09You Save: $29.62 (39%)Product Specifications- Other Name: Pan-Automatic Transmission Oil; Automatic Transmission Oil Pan; Transmission Pan; Pan, Transmission Oil Pan


Buick Transmission Pan Part Number: 8643574
Product Specifications- Other Name: Pan-Automatic Transmission Oil; Automatic Transmission Oil Pan; Pan, Transmission Oil Pan

Buick Oil Pan Part Number: 24229658
$97.15 MSRP: $152.17You Save: $55.02 (37%)Product Specifications- Other Name: Pan Kit, Transmission Oil Pan; Automatic Transmission Oil Pan; Transmission Pan; Filter; Transmission Oil Pan
- Replaces: 24209295, 24215535, 24210915
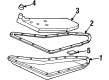
Buick Transmission Pan
Choose OEM Transmission Pan, you're making the optimal decision for superior quality and perfect performance. You can feel confident because each component goes through stringent quality checks. Every part is carefully built to comply with Buick's factory specifications. You'll enjoy a smooth, worry-free installation that fits just right. At ChevyPartsGiant.com, you'll find it easy to get top-quality OEM Buick Transmission Pan. You can shop at highly competitive prices and protect your budget. All our genuine Buick parts include a dependable manufacturer's warranty. You'll also appreciate our straightforward return policy and swift delivery services for extra convenience.
Buick Transmission Pan Parts and Q&A
- Q: How to replace the transmission pan on Buick Lucerne?A:After supporting the vehicle at a proper height you should place a drain pan under the transaxle Oil Pan. Start by unfastening the bolts located on the front and sides of the transaxle Oil Pan but keep the rear bolts slightly loose. Use a rubber mallet along with a screwdriver to avoid damaging the Oil Pan to case mating surfaces when separating them. The Oil Pan needs to drain all fluid before you can remove the other bolts and the Oil Pan itself. Inspection of both the Oil Pan and filter begins after removing the Oil Pan gasket where engine coolant, rubber particles, clutch facing material, steel shavings, and other foreign items should be evaluated to establish the potential source of any contamination. Always replace the distorted or bent Oil Pan flange since bent portions cannot be rectified safely. The removal of bottom oil requires an inspection of Oil Pan bolts washers for inversion which should be replaced at the same time as the bolts. First dry the Oil Pan and case flanges before cleaning each surface with solvent until ready for air drying. Begin by installing both the new Oil Pan gasket along with the Oil Pan with careful bolt application at 14 nm (10 ft. Lbs.). Pour dextron(r) iii fluid in the transaxle but do not surpass the maximum level to avoid foam formation and equipment destruction. Start the engine while keeping the gear selector in park then operate at slow idle conditions before racing the engine. The fluid level needs adjustment while looking for any evidence of leakage.
- Q: How to replace the transmission pan on Buick Regal?A:Begin by first supporting and raising the vehicle before setting a drain pan under the transaxle bottom Oil Pan. Begin the process by unscrewing all front and side Oil Pan bolts then turn the rear bolts four times before carefully loosening the mating surfaces to avoid oil leakage. A rubber mallet or screwdriver can used for gently prying out the Oil Pan after which the liquid drains until all Oil Pan bolts and the Oil Pan with the Oil Pan Gasket can be removed. The bottom Oil Pan and filter screen require inspection for contaminants including metal fragments, clutch facing debris, rubber shavings and engine coolant damage with identification of their cause for correction if found. The Oil Pan flange should undergo inspection for warping and the technician must replace damage to any flange which cannot be made straight with normal procedures. Replace the bottom Oil Pan bolts only after inspecting their washers for inverted orientation because this requires new bolt and washer assemblies. Before proceeding dry and clean the case and Oil Pan Gasket surfaces using solvent then allow them to air dry. Complete removal of old gasket material is essential before adding the new Oil Pan Gasket alongside the Oil Pan itself. Position the Oil Pan bolts before torquing them to 14 nm (10 ft. Lbs.) then lower the vehicle and dissolve the transaxle with the recommended dexron iii fluid amount. Set the gear selector to park then begin the engine at low speed with no racing. Check and adjust fluid levels while inspecting the work quality to determine any transmission fluid leaks.


Related Buick Parts
 Buick Shift Cable
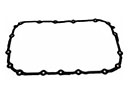 Buick Transmission Gasket
 Buick Automatic Transmission Filter
 Buick Automatic Transmission Shift Levers
 Buick Automatic Transmission Shifter
 Buick Clutch Disc
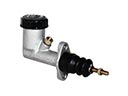 Buick Clutch Master Cylinder
 Buick Flywheel
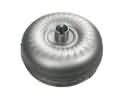 Buick Torque Converter
 Buick Transfer Case
 Buick Transfer Case Seal
 Buick Transmission Assembly