ChevyParts
My Garage
My Account
Cart
OEM Cadillac Antenna Cable
Radio Antenna Cable- Select Vehicle by Model
- Select Vehicle by VIN
Select Vehicle by Model
orMake
Model
Year
Select Vehicle by VIN
For the most accurate results, select vehicle by your VIN (Vehicle Identification Number).
162 Antenna Cables found


Cadillac Antenna Cable Part Number: 25833063
$311.86 MSRP: $585.67You Save: $273.81 (47%)Ships in 1-2 Business DaysProduct Specifications- Other Name: Cable Assembly, Digital Radio Antenna; Cable, Radio Antenna

Cadillac Cable Part Number: 22874411
$13.83 MSRP: $25.05You Save: $11.22 (45%)Ships in 1-2 Business DaysProduct Specifications- Other Name: Cable, Mobile Telephone Radio


Cadillac Antenna Cable Part Number: 22942140
$28.63 MSRP: $51.83You Save: $23.20 (45%)Ships in 1-2 Business DaysProduct Specifications- Other Name: Cable, Radio Antenna; Cable

Cadillac Cable Part Number: 20941490
$59.26 MSRP: $107.24You Save: $47.98 (45%)Ships in 1-2 Business DaysProduct Specifications- Other Name: Cable, Mobile Telephone Radio; Cable, Vehicle Navigation/Information; Cable, Radio Antenna

Cadillac Cable Part Number: 25794493
$32.21 MSRP: $58.28You Save: $26.07 (45%)Ships in 1-2 Business DaysProduct Specifications- Other Name: Cable, Radio Antenna
- Replaces: 15828111

Cadillac Antenna Cable Part Number: 86772285
$50.95 MSRP: $90.98You Save: $40.03 (44%)Ships in 1-3 Business DaysProduct Specifications- Other Name: Cable Assembly-Antenna Coaxial (Body)

Cadillac Antenna Cable Part Number: 84051754
$64.12 MSRP: $120.42You Save: $56.30 (47%)Ships in 1-2 Business DaysProduct Specifications- Other Name: Cable Assembly-Radio Antenna Cable Extension; Cable, Radio Antenna

Cadillac Antenna Cable Part Number: 25833051
$107.35 MSRP: $194.30You Save: $86.95 (45%)Ships in 1-2 Business DaysProduct Specifications- Other Name: Cable Assembly, Digital Radio Antenna


Cadillac Antenna Cable Part Number: 23129686
$44.24 MSRP: $80.10You Save: $35.86 (45%)Ships in 1-2 Business DaysProduct Specifications- Other Name: Cable, Radio Antenna

Cadillac Antenna Cable Part Number: 84926926
$50.99 MSRP: $91.06You Save: $40.07 (44%)Ships in 1-2 Business DaysProduct Specifications- Other Name: Cable Assembly-Antenna Coaxial (Body); Cable; Cable, Radio Antenna

Cadillac Antenna Cable Part Number: 15324597
$21.24 MSRP: $39.88You Save: $18.64 (47%)Ships in 1-2 Business DaysProduct Specifications- Other Name: Cable Assembly, Mobile Telephone Antenna; Cable, Radio Antenna

Cadillac Antenna Cable Part Number: 85561054
$55.20 MSRP: $98.58You Save: $43.38 (44%)Ships in 1-2 Business DaysProduct Specifications- Other Name: Cable Assembly-Antenna Coaxial (Body); Cable, Radio Antenna
- Replaced by: 87827622
Cadillac Antenna Cable Part Number: 84843811
$61.56 MSRP: $109.92You Save: $48.36 (44%)Ships in 1-3 Business DaysProduct Specifications- Other Name: Cable Assembly-Antenna Coaxial (Headlining); Cable, Radio Antenna
- Replaced by: 85059493
Cadillac Antenna Cable Part Number: 84961325
$44.12 MSRP: $78.78You Save: $34.66 (44%)Ships in 1-3 Business DaysProduct Specifications- Other Name: Cable Assembly-Antenna Coaxial (Instrument Panel); Cable, Radio Antenna
- Replaces: 84735867

Cadillac Antenna Cable Part Number: 20962930
$27.09 MSRP: $50.89You Save: $23.80 (47%)Ships in 1-2 Business DaysProduct Specifications- Other Name: Cable Assembly-Mobile Telephone & Vehicle Locating Antenna

Cadillac Cable Part Number: 88987710
$36.23 MSRP: $64.70You Save: $28.47 (44%)Product Specifications- Other Name: Cable, Navigation Antenna Coaxial; Cable, Vehicle Navigation/Information

Cadillac Antenna Cable Part Number: 15294584
$77.58 MSRP: $138.53You Save: $60.95 (44%)Product Specifications- Other Name: Cable, Radio Antenna; Cable; Cable, Radio Receiver
- Replaces: 15205597, 15124307


Cadillac Antenna Cable Part Number: 22827843
Product Specifications- Other Name: Cable Assembly-Radio Antenna; Cable, Radio Antenna
- Replaces: 25994421
Cadillac Antenna Cable Part Number: 15289725
Product Specifications- Other Name: Cable, Radio Antenna
- Replaces: 15828540

Cadillac Antenna Cable Part Number: 12239297
Product Specifications- Other Name: Cable Assembly, Radio Antenna; Cable, Radio Antenna
| Page 1 of 9 |Next >
1-20 of 162 Results
Cadillac Antenna Cable
Want to cut long-term maintenance and repair costs? Choose OEM Antenna Cable. Those parts deliver top durability you can trust. On our site, you'll find a huge catalog of genuine Cadillac parts. Prices are unbeatable, so you can keep more in your pocket. Every OEM Cadillac Antenna Cable includes a manufacturer's warranty. You can also get an easy return policy that keeps buying risk free. Fast delivery, get your car on the road quickly. It's simple to search, compare, and order. Stop guessing about quality or fit. Order today and save with parts that last.
Cadillac Antenna Cable Parts Questions & Experts Answers
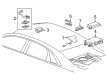
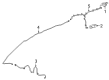
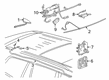
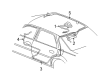
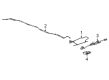
- Q: How to replace the Antenna Cable between both modules on Cadillac Escalade?A:The first step to replacing the Radio Antenna Module Cable is to lower the rear section of the headliner. Unplug the cable connector from both the radio control module and the radio antenna module. First remove the cable from the roof cross member by detaching the cable retainer clips before removing the cable from the vehicle. The first step for installation involves attaching the cable to the roof cross member while using the retainer clips . First install the connector cable to the radio antenna module and then attach it to the radio control module . Finally, reinstall the headliner.
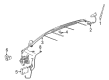
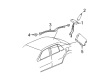
- Q: How to replace the digital radio antenna cable on Cadillac CTS?A:Start by removing the rear shelf panel combined with the driver's side sail panel to access the digital radio antenna cable for replacement. You need to position the rear headliner down to access the satellite radio coax cable while disconnecting its electrical connectors until you remove the coax cable. Start by installing the new coax cable followed by electrical connector connections. Install the headliner first then put back the driver's side sail panel and finish with the rear shelf panel.
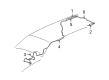
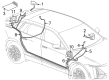
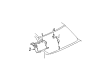
- Q: How to Replace an Antenna Cable for a Digital Radio on Cadillac XLR?A:Begin by accessing the antenna cable connectors through the trunk area cloth cover after which you should cut both ends from the antenna cable adjacent to the digital receiver. Begin by detaching the right front IP closeout panel together with the right front carpet retainer followed by the loosening and setting aside of the right side door manual release lever. First you need to take off the right side lock pillar trim to find the harness that passes through the pillar and door opening's plastic seal and then pull the seal back. First pull back the seal and disconnect the digital antenna connector while cutting off the body side connector. After processing the left front carpet retainer and parking brake assembly follow up by seeking the harness on the left side of the IP then detach the digital antenna connector before cutting the body side connector away. Installation involves guiding a mechanic's wire through the IP/center console space to bring the left antenna cable end to the left side of the IP by following the original cable route. The installation requires pushing the new connector through the plastic seal by the left side pillar to door pass-through before reconnecting then resecuring the plastic seal with necessary tie straps when securing the new antenna cable beneath the left dashboard side. Reconnect the left and right IP pillar to door pass-through connector while making sure to properly secure the seal at each location. The new antenna cable must follow the original cable path behind carpeting to reach the digital receiver by using required tie straps for stability and then reconnect the cable to the digital receiver. Complete the installation by putting back the right side door manual release lever along with the right side IP closeout panel, right front carpet retainer and finally the right side lock pillar trim and the left front carpet retainer and the parking brake assembly.


Related Cadillac Parts
 Cadillac Speedometer
 Cadillac Air Suspension Compressor
 Cadillac Antenna
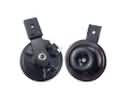 Cadillac Horn
 Cadillac Ignition Switch
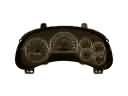 Cadillac Instrument Cluster
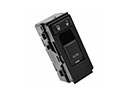 Cadillac Door Lock Switch
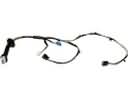 Cadillac Door Harness Connector
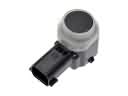 Cadillac Parking Assist Distance Sensor
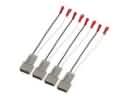 Cadillac Speaker Connector
 Cadillac Suspension Control Module
 Cadillac Wiper Pulse Module