ChevyParts
My Garage
My Account
Cart
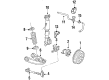
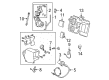
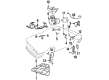
OEM Cadillac Air Suspension Compressor
Suspension Levelling Compressor- Select Vehicle by Model
- Select Vehicle by VIN
Select Vehicle by Model
orMake
Model
Year
Select Vehicle by VIN
For the most accurate results, select vehicle by your VIN (Vehicle Identification Number).
16 Air Suspension Compressors found


Cadillac Compressor Part Number: 19299545
$482.97 MSRP: $903.51You Save: $420.54 (47%)Ships in 1-2 Business DaysProduct Specifications- Other Name: Compressor, Air Suspension Compressor; Air Suspension Compressor
- Replaces: 15254590, 15056494, 10395825, 15101577, 15070878


Cadillac Compressor, Rear Part Number: 84355910
$334.46 MSRP: $654.85You Save: $320.39 (49%)Product Specifications- Other Name: Compressor Assembly-Rear Air Spring; Air Suspension Compressor; Compressor, Air Suspension Compressor
- Position: Rear
- Replaces: 23129283, 22983463, 84219810, 23353754, 22936012, 84160004, 23446561, 23468864


Cadillac Compressor Part Number: 23316154
$273.30 MSRP: $535.07You Save: $261.77 (49%)Product Specifications- Other Name: Compressor, Air Suspension Compressor; Air Suspension Compressor
- Replaces: 23282712, 23232591, 22797525


Cadillac Compressor Part Number: 22941806
$618.60 MSRP: $957.21You Save: $338.61 (36%)Product Specifications- Other Name: Compressor, Air Suspension Compressor; Air Suspension Compressor
- Replaces: 15296756, 20837299, 20930288, 15949881, 25913289


Cadillac Compressor Assembly Part Number: 22137259
Product Specifications- Other Name: Compressor, Air Suspension Compressor; Compressor; Air Suspension Compressor


Cadillac Compressor, Rear Part Number: 20827740
Product Specifications- Other Name: Compressor Assembly-Rear Air Spring; Air Suspension Compressor; Compressor, Air Suspension Compressor
- Position: Rear
- Replaces: 15886734, 25994396

Cadillac Relay Part Number: 22137470
Product Specifications- Other Name: Compressor, Air Suspension Compressor; Multi Purpose Relay; Compressor

Cadillac Compressor Assembly Part Number: 88957190
Product Specifications- Other Name: Compressor, Air Suspension Compressor; Compressor; Air Suspension Compressor

Cadillac Compressor Assembly Part Number: 25806015
Product Specifications- Other Name: Compressor, Air Suspension Compressor; Compressor; Air Suspension Compressor
- Replaces: 15811960
Cadillac Compressor Assembly Part Number: 22137472
Product Specifications- Other Name: Compressor, Air Suspension Compressor; Multi Purpose Relay; Relay; Compressor; Air Suspension Compressor

Cadillac Compressor Assembly Part Number: 22137446
Product Specifications- Other Name: Compressor, Air Suspension Compressor; Compressor; Air Suspension Compressor
- Replaces: 22134640

Cadillac Air Compressor Part Number: 22062531
Product Specifications- Other Name: Compressor, Air Suspension Compressor; Compressor Assembly; Compressor; Air Suspension Compressor

Cadillac Air Compressor Part Number: 22049808
Product Specifications- Other Name: Compressor, Air Suspension Compressor; Compressor; Air Suspension Compressor

Cadillac Compressor Part Number: 22049806
Product Specifications- Other Name: Compressor, Air Suspension Compressor; Air Suspension Compressor

Cadillac Compressor Assembly Part Number: 12494809
Product Specifications- Other Name: Compressor, Air Suspension Compressor; Compressor; Air Suspension Compressor

Cadillac Air Compressor Part Number: 12487573
Product Specifications- Other Name: Compressor, Air Suspension Compressor; Compressor Assembly; Compressor; Air Suspension Compressor
- Replaces: 22120632
Cadillac Air Suspension Compressor Parts Questions & Experts Answers
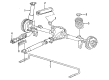
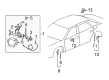
- Q: How to replace the Air Suspension Compressor on Cadillac Escalade?A: To replace the air compressor, first; lift and hold the vehicle noting to clean the parts and the surrounding area so that dirt will not enter the air setting before detaching the Air Hose from the air compressor. Remove the air tube from the dryer to the air and the electrical connection. Unfasten the mounting nuts and take out the air inlet and hose from the fuel filler neck bracket. Slide the air compressor rearward to clear frame slots and take it off the vehicle. For installation fix the air compressor back to the vehicle sliding it forwards in order to fix the fasteners into the frame slots and the mounting nuts to 15nm (11 lb ft). Install the air inlet hose back into the fuel filler neck bracket, connect the air tube to the air dryer, then reconnect the electrical connection. Turn the ignition and wait for about 45 seconds to have the air adjustable shock absorbers appear complete with residual pressure, then lower the machine.
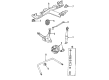
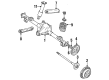
- Q: How to Change the Air Suspension Compressor on a Cadillac SRX?A: Begin Air Suspension Compressor replacement by elevating the vehicle while using support equipment. Start by disconnecting the exhaust system from rear exhaust hangers before removing the automatic level control (ALC) compressor bracket mounting bolts to finish with a slow descent of the alc compressor assembly. Start the replacement by twisting the air tube from the alc compressor clamp then disconnecting the alc electrical harness connector. Begin by removing the side mounting nut from the alc compressor bracket and extracting the complete alc compressor assembly with bracket out of the vehicle. Remove first the alc compressor top bracket mounting screw and electrical harness connector from the alc bracket before disconnecting the bleed hose from its clip. Use a screwdriver to take out the alc bracket screws that hold the bracket to the alc compressor before removing the bracket from the system. Proper placement of the alc bracket on alc compressor requires screw installation to compressor components and torque adjustment to 9 nm (80 lb in). Connect the bleed hose to the clip and mount the electrical connector to the alc compressor bracket and fit the air tube on the alc compressor. After reconnecting the alc electrical harness and installing the side mounting nut you must tighten all bracket mounting bolts to 9 nm (80 lb in). The exhaust system installation ends with reattachment to rear exhaust hangers followed by lowering the vehicle.
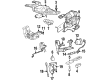
- Q: How to replace the Air Suspension Compressor on Cadillac STS?A: Start by elevating and stabilizing the vehicle before installing a new Air Suspension Compressor. You need to start by detaching the exhaust system from its rear exhaust hangers before you uninstall the automatic level control (ALC) compressor bracket mounting bolts to lower the alc compressor assembly carefully. Loosen the alc compressor clamp air tube while disconnecting the alc electrical harness connector. Separate the side mounting nut from the alc compressor bracket while removing the compressor assembly including bracket from the vehicle. Start by taking the alc compressor bracket mounting screw and electrical harness connector out from the bracket along with disconnecting the bleed hose from its clip. Remove the screws attached to the alc bracket and later remove the bracket from the alc compressor. Install the alc bracket on the compressor by screwing alc compressor screws and tightening them up to 9 n.m (80 lb in). You must first attach the bleed hose to the clip followed by the electrical connector installation onto the alc compressor bracket and the final connection between the air tube and the alc compressor. Reconnect the alc electrical harness connector while you install the alc bracket side mounting nut and secure the alc bracket mounting bolts which need to be tightened to 9 n.m (80 lb in). The last step involves reattaching the exhaust system to rear exhaust hangers while lowering down the vehicle.


Related Cadillac Parts
 Cadillac TPMS Sensor
 Cadillac Neutral Safety Switch
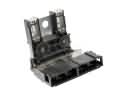 Cadillac Battery Fuse
 Cadillac Fuel Level Sensor
 Cadillac Headlight Switch
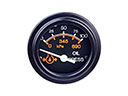 Cadillac Oil Pressure Gauge
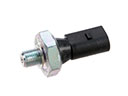 Cadillac Oil Pressure Switch
 Cadillac Parking Assist Distance Sensor
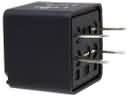 Cadillac Relay
 Cadillac Seat Switch
 Cadillac Suspension Control Module
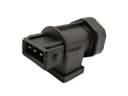 Cadillac Vehicle Speed Sensor