ChevyParts
My Garage
My Account
Cart
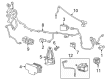
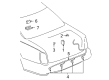
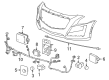
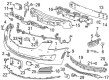
OEM Cadillac Parking Assist Distance Sensor
Parking Assist Distance Sensor Guide- Select Vehicle by Model
- Select Vehicle by VIN
Select Vehicle by Model
orMake
Model
Year
Select Vehicle by VIN
For the most accurate results, select vehicle by your VIN (Vehicle Identification Number).
61 Parking Assist Distance Sensors found


Cadillac Sensor, Front Rear Part Number: 15283682
$138.71 MSRP: $248.80You Save: $110.09 (45%)Ships in 1-3 Business DaysProduct Specifications- Other Name: Sensor, Theft Deterrent Or Front/Rear/Side Object; Sensor,Theft Deterrent Or Front/Rear/Side/Intake Object
- Position: Front Rear


Cadillac Distance Sensor Part Number: 88891836
$242.53 MSRP: $350.04You Save: $107.51 (31%)Ships in 1-3 Business DaysProduct Specifications- Other Name: Sensor, Theft Deterrent Or Front/Rear/Side Object; Parking Sensors; Reverse Sensor; Sensor Kit for Theft Deterrent or Object Detection; Front/Rear Bumper/Fascia.
- Position: Rear
- Replaces: 88956561


Cadillac Switch, Front Rear Part Number: 84132240
$63.74 MSRP: $96.15You Save: $32.41 (34%)Ships in 1-2 Business DaysProduct Specifications- Other Name: Switch, Theft Deterrent Or Front/Rear/Side Object; Switch,Theft Deterrent Or Front/Rear/Side/Intake Object
- Position: Front Rear
- Replaces: 23509078

Cadillac Antitheft Module Part Number: 23298802
$46.27 MSRP: $82.62You Save: $36.35 (44%)Ships in 1-3 Business DaysProduct Specifications- Other Name: Sensor Assembly-Content Theft Deterrent; Sensor; Sensor,Theft Deterrent Or Front/Rear/Side/Intake Object


Cadillac Sensor Part Number: 23150514
$48.80 MSRP: $87.14You Save: $38.34 (44%)Ships in 1-3 Business DaysProduct Specifications- Other Name: Speaker, Pedestrian Sound Alert


Cadillac Inclination Sensor, Front Rear Part Number: 23142864
$95.42 MSRP: $170.40You Save: $74.98 (44%)Ships in 1-3 Business DaysProduct Specifications- Other Name: Sensor, Theft Deterrent Or Front/Rear/Side Object; Sensor; Sensor,Theft Deterrent Or Front/Rear/Side/Intake Object
- Position: Front Rear
Cadillac Sensor, Front Rear Part Number: 13309524
$131.59 MSRP: $236.04You Save: $104.45 (45%)Ships in 1-3 Business DaysProduct Specifications- Other Name: Sensor, Theft Deterrent Or Front/Rear/Side Object; Sensor,Theft Deterrent Or Front/Rear/Side/Intake Object
- Position: Front Rear

Cadillac Antitheft Module, Front Rear Part Number: 13437064
$47.13 MSRP: $92.26You Save: $45.13 (49%)Ships in 1-3 Business DaysProduct Specifications- Other Name: Sensor, Theft Deterrent Or Front/Rear/Side Object; Sensor; Sensor,Theft Deterrent Or Front/Rear/Side/Intake Object
- Position: Front Rear
Cadillac Antitheft Module, Front Rear Part Number: 13580416
$34.60 MSRP: $61.78You Save: $27.18 (44%)Ships in 1-3 Business DaysProduct Specifications- Other Name: Sensor, Theft Deterrent Or Front/Rear/Side Object; Sensor; Sensor,Theft Deterrent Or Front/Rear/Side/Intake Object
- Position: Front Rear

Cadillac Control Module, Front Rear Part Number: 84761801
$16.80 MSRP: $26.29You Save: $9.49 (37%)Product Specifications- Other Name: Module, Theft Deterrent Or Front/Rear/Side Object; Module; Module,Theft Deterrent Or Front/Rear/Side/Intake Object
- Position: Front Rear

Cadillac Module, Front Rear Part Number: 84761798
$42.24 MSRP: $66.14You Save: $23.90 (37%)Ships in 1-3 Business DaysProduct Specifications- Other Name: Module, Theft Deterrent Or Front/Rear/Side Object; Module,Theft Deterrent Or Front/Rear/Side/Intake Object
- Position: Front Rear
Cadillac Control Module, Front Rear Part Number: 84761799
$46.96 MSRP: $95.09You Save: $48.13 (51%)Ships in 1-3 Business DaysProduct Specifications- Other Name: Module, Theft Deterrent Or Front/Rear/Side Object; Module; Module,Theft Deterrent Or Front/Rear/Side/Intake Object
- Position: Front Rear

Cadillac Distance Sensor Part Number: 84132388
$295.64 MSRP: $446.01You Save: $150.37 (34%)Ships in 1-2 Business DaysProduct Specifications- Other Name: Sensor, Cruise Control; Parking Sensors; Radar Sensor; Sensor
- Replaced by: 84523853

Cadillac Reverse Sensor Part Number: 89046909
$217.78 MSRP: $325.60You Save: $107.82 (34%)Ships in 1-3 Business DaysProduct Specifications- Other Name: Sensor, Theft Deterrent Or Front/Rear/Side Object; Parking Sensors; Sensor; Sensor Kit,Theft Deterrent Or Front/Rear/Side/Intake Object; Sensor Kit, Front And Rear Bumper/Fascia Face
- Position: Rear
- Replaces: 88890430

Cadillac Sensor Part Number: 84983781
$138.68 MSRP: $207.31You Save: $68.63 (34%)Ships in 1-3 Business DaysProduct Specifications- Other Name: Sensor Assembly-Pedestrian Impact Detection; Sensor,Theft Deterrent Or Front/Rear/Side/Intake Object
- Replaces: 23156478

Cadillac Parking Sensor Part Number: 25947184
$307.98 MSRP: $448.39You Save: $140.41 (32%)Ships in 1-2 Business DaysProduct Specifications- Other Name: Sensor Kit, Front And Rear Bumper/Fascia Face; Parking Sensors; Reverse Sensor; Sensor
- Position: Rear
- Replaced by: 23202663

Cadillac Sonar Sensor Part Number: 84979744
$214.38 MSRP: $320.51You Save: $106.13 (34%)Ships in 1-3 Business DaysProduct Specifications- Other Name: Sensor Assembly-Pedestrian Impact Detection; Parking Sensors; Sensor,Theft Deterrent Or Front/Rear/Side/Intake Object
- Replaces: 22895853, 23269229

Cadillac Sonar Sensor, Front Rear Part Number: 23269228
$287.70 MSRP: $430.14You Save: $142.44 (34%)Ships in 1-3 Business DaysProduct Specifications- Other Name: Sensor, Theft Deterrent Or Front/Rear/Side Object; Sensor,Theft Deterrent Or Front/Rear/Side/Intake Object
- Position: Front Rear
- Replaced by: 84978274
- Replaces: 22959934

Cadillac Alarm Switch, Front Rear Part Number: 23459787
$30.40 MSRP: $45.86You Save: $15.46 (34%)Ships in 1-2 Business DaysProduct Specifications- Other Name: Switch, Theft Deterrent Or Front/Rear/Side Object; Switch; Switch,Theft Deterrent Or Front/Rear/Side/Intake Object
- Position: Front Rear
- Replaces: 23210827, 23138374


Cadillac Parking Sensor Part Number: 25905389
$249.98 MSRP: $373.74You Save: $123.76 (34%)Product Specifications- Other Name: Sensor Kit, Front And Rear Bumper/Fascia Face; Parking Sensors; Reverse Sensor; Sensor; Sensor Kit,Theft Deterrent Or Front/Rear/Side/Intake Object
- Position: Rear
| Page 1 of 4 |Next >
1-20 of 61 Results
Cadillac Parking Assist Distance Sensor
Choose OEM Parking Assist Distance Sensor, you're making the optimal decision for superior quality and perfect performance. You can feel confident because each component goes through stringent quality checks. Every part is carefully built to comply with Cadillac's factory specifications. You'll enjoy a smooth, worry-free installation that fits just right. At ChevyPartsGiant.com, you'll find it easy to get top-quality OEM Cadillac Parking Assist Distance Sensor. You can shop at highly competitive prices and protect your budget. All our genuine Cadillac parts include a dependable manufacturer's warranty. You'll also appreciate our straightforward return policy and swift delivery services for extra convenience.
Cadillac Parking Assist Distance Sensor Parts and Q&A
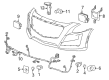
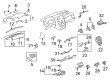
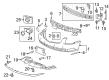
- Q: How to service and repair the Parking Assist Distance Sensor on Cadillac CTS?A:Proceed with the replacement of rear object sensors by taking out the rear bumper fascia first. First disconnect the electrical connector from the rear object sensor before lifting the housing locking tabs to take out the sensor. The installation of a new sensor requires avoiding paint application on previously painted sensors since extra paint will disable operational functionality. Use a basecoat/clearcoat paint combination to coat the rear object sensor but do not apply more than 6 mils of paint by inspecting it with a suitable paint thickness gauge for non-ferrous metals (Paint Gages ()). Starting from installation of the sensor into its housing, complete the sequence with electrical connector connection and ending with the rear bumper fascia reinstallation.
- Q: How to replace the rear Parking Assist Distance Sensor on Cadillac Escalade?A:The first step to replace a rear object sensor involves removing the rear bumper fascia followed by disconnecting the electrical connector from the rear object sensor. The removal of the rear object sensor starts by lifting the locking tabs located on its housing. Painting the rear object sensor requires using suitable non-ferrous metal equipment to measure paint levels and avoiding refinish work on previously painted sensors because excessive paint will disable the sensor operation. Place the sensor inside the housing before attaching its electrical connector to the rear object sensor and then put the rear bumper fascia back in place.


Related Cadillac Parts
 Cadillac Antenna
 Cadillac Antenna Base
 Cadillac Body Wiring Harness Connector
 Cadillac Door Jamb Switch
 Cadillac Fuse
 Cadillac Headlight Relay
 Cadillac Headlight Switch
 Cadillac Instrument Panel Harness Connector
 Cadillac Seat Heater Switch
 Cadillac Shift Interlock Solenoid
 Cadillac Shift Solenoid
 Cadillac Suspension Control Module