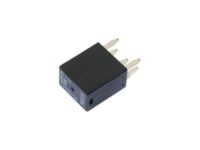
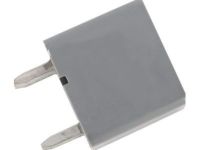
Make sure this part fits

GM 88891836
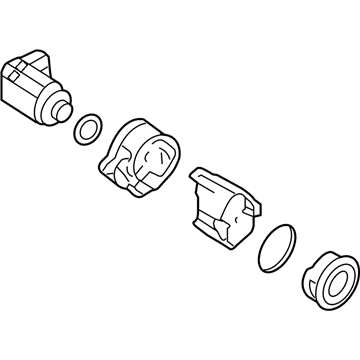
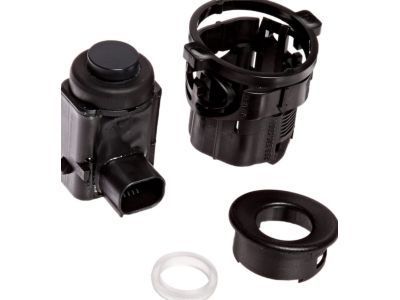
Distance Sensor

2001-2011 GM

Customer Questions & Expert Answers (18)
GM 88891836 Distance Sensor
  • Part Description
    Sensor, Theft Deterrent Or Front/Rear/Side Object; Parking Sensors
  • Position
    Rear
  • Replaces
    88956561
  • Manufacturer
    General Motors
Make sure this part fits
$242.53 MSRP: $350.04
You Save: $107.51 (31%)
Ships in 1-3 Business Days
1
ADD TO CART
  • Related Parts
  • Product Specifications
  • Vehicle Fitment
  • Customer Questions & Expert Answers
  • Product Specifications

    BrandGenuine GM
    Manufacturer Part Number88891836
    Part DescriptionSensor, Theft Deterrent Or Front/Rear/Side Object; Parking Sensors
    Other NamesReverse Sensor; Sensor Kit for Theft Deterrent or Object Detection; Front/Rear Bumper/Fascia.
    Item Dimensions4.3 x 4.3 x 2.2 inches
    Item Weight0.40 Pounds
    PositionRear
    ConditionNew
    Fitment TypeDirect Replacement
    Replaces88956561
    ManufacturerGeneral Motors
    SKU88891836
    WarrantyThis genuine GM part is guaranteed by GM's factory warranty.
    Shipping & ReturnShipping Policy Return Policy
    Warning: California's Proposition 65
  • Vehicle Fitment

    Year Make Model Trim Engine
    2002-2006 Cadillac EscaladeBase8 Cyl 5.3 L GAS, 8 Cyl 6.0 L GAS
    2003-2006 Cadillac Escalade ESVBase8 Cyl 6.0 L GAS
    2002-2006 Cadillac Escalade EXTBase8 Cyl 6.0 L GAS
    2005-2011 Cadillac STSBase, Platinum, V6 Cyl 3.6 L GAS, 8 Cyl 4.4 L GAS, 8 Cyl 4.6 L GAS
    2004-2009 Cadillac XLRBase, Platinum, V8 Cyl 4.4 L GAS, 8 Cyl 4.6 L GAS
    2002-2006 Chevrolet Avalanche 1500Base, LS, LT, North Face, On Road Edition, WBH, Z66, Z718 Cyl 5.3 L FLEX, 8 Cyl 5.3 L GAS
    2002-2006 Chevrolet Avalanche 2500Base, LS, LT8 Cyl 8.1 L GAS
    2001-2006 Chevrolet Suburban 1500Base, LS, LT, LTZ, Z718 Cyl 5.3 L FLEX, 8 Cyl 5.3 L GAS, 8 Cyl 6.0 L GAS
    2001-2006 Chevrolet Suburban 2500Base, LS, LT8 Cyl 6.0 L GAS, 8 Cyl 8.1 L GAS
    2002-2006 Chevrolet TahoeBase, LS, LT, Z718 Cyl 4.8 L GAS, 8 Cyl 5.3 L FLEX, 8 Cyl 5.3 L GAS
    View More
  • Customer Questions & Expert Answers

    Q:
    Is 88891836 compatible with my car? Posted by ChevyPartsGiant Specialist
    A:
    Please Select Your Vehicle model to see if part number 88891836 is suitable before ordering.
    Posted by ChevyPartsGiant Specialist
    Q:
    How to replace the rear Parking Assist Distance Sensor on Cadillac Escalade ESV? Posted by Customer
    A:
    The electrical connectors to the rear object sensor need to be detached before trying to replace it. Press the housing lock tabs until you can remove the rear object sensor. Apply a small-size screwdriver to detach the housing tabs while you gently pull out the spring through the use of . Pushing the tabs from the housing interior will expose it so you can slide the bezel through the fascia. An operator must paint the new rear object sensor while being cautious to avoid refinished sensors because sensor operation fails with excessive paint buildup; a proper paint thickness gauge checks that the paint does not surpass 6 mils for non-ferrous metals. Take the sensor bezel and fit it inside the fascia so that the keyhole lines up with the key while the bezel sharp ends push from inside. Put the housing into position on the bezel while working on the fascia's rear face until it secures in the bezel's cutouts. Push the spring into place inside the housing until it reaches complete seating position and verify that the sensor remains tightly attached against the bumper fascia at its mounting points on the top and bottom housing surface. Place the decoupling ring on the sensor before placing the sensor within the housing while directing its connector towards the passenger side of the fascia where the housing tabs should snap into placement. Finally, connect the electrical connectors.
    Posted by ChevyPartsGiant Specialist
    Q:
    How to properly service and repair the Parking Assist Distance Sensor on Cadillac XLR? Posted by Customer
    A:
    The first step to replacing a rear object sensor should start with removing the rear fascia then disconnecting the electrical connector from the rear object sensor. Begin sensor replacement by untightening the tabs which secure the device to its housing before extracting the rear object sensor out of the housing unit along with its retainer ring. Prior to installing the sensor, paint its new surface avoiding application on any existing sensor paint for sensor operations will become compromised by thick paint accumulation. An appropriate non-ferrous metal paint thickness gage verifies the maximum 6 mils thickness of paint. Fitting of the sensor retainer ring begins followed by sensor position to the sensor housing before fully inserting the sensor into place. To complete this procedure you should reattach the electrical connector to the sensor then reinstall the rear fascia.
    Posted by ChevyPartsGiant Specialist
    Q:
    How to replace the rear Parking Assist Distance Sensor on Chevrolet Avalanche 1500? Posted by Customer
    A:
    The first step to replace the rear object sensor requires disconnecting its electrical connections. After lifting the housing locking tabs you should take out the rear object sensor. A small screwdriver at should be used to release tabs before the spring can be removed. The housing tabs must experience interior pressure until detachment occurs while you push the bezel through the fascia to remove it. The new rear object sensor requires paint application but processing the previously painted sensors will make the component defective so avoid excessive paint accumulation which can be checked using a non-ferrous suitable paint thickness gauge and must stay under 6 mils. Insert the main keyhole of the sensor bezel into its proper position then apply pressure to the bezel to push it through the fascia. Push the housing onto the bezel from behind the fascia until the bezel cutouts receive the housing. To put the spring into the housing allow it to reach the complete seating position with the sensor maintaining its firm position against the bumper fascia through placement of spring keys on both the housing's upper and lower sections. Place the decoupling ring on the sensor before inserting the sensor into the housing with the connector facing the passenger fascia. Then check the sensor tabs fit the cutouts on the housing. Finally, connect the electrical connectors.
    Posted by ChevyPartsGiant Specialist
    Q:
    How to replace the rear Parking Assist Distance Sensor on Chevrolet Avalanche 2500? Posted by Customer
    A:
    Start by disconnecting all electrical connectors connecting to the rear object sensor. Climb to the notches that lock the housing then detach the rear object sensor. A small-size screwdriver at helps users release tabs before removing the spring from the system. After pushing the tabs from inside the housing you can pull out the assembly after pushing the bezel through the fascia. Render the new rear object sensor while carefully avoiding previous sensor surface paint to prevent sensor malfunction due to too much paint accumulation. The maximum acceptable paint thickness is 6 mils. A paint thickness gauge specific for non-ferrous metals should verify that the paint layer stays below 6 mils during application. Place the keyhole component adjacent to its designated position on the key before pushing the sensor bezel into the fascia. Secure the housing onto the bezel by placing it through the fascia's backside until all bezel cutouts properly accept the housing. Push the spring into the housing until it reaches the complete seat position while maintaining firm sensor attachment to the bumper fascia through spring keys located on housing ends. Use the sensor's decoupling ring to mount it before setting the sensor inside the housing so its connector faces the passenger-side fascia surface while tabs lock into housing cutouts. Finally, connect the electrical connectors.
    Posted by ChevyPartsGiant Specialist
    Q:
    How to replace the rear Parking Assist Distance Sensor on Cadillac STS? Posted by Customer
    A:
    You need to remove the rear bumper fascia before starting the replacement of the rear object sensor. You should first disconnect the electrical connector from the rear object sensor before you lift the housing locking tabs to remove the rear object sensor. Pressing the spring will break its connection with the housing while the tabs on the housing need to be released to remove the part. The rear object sensor bezel must be pushed through the fascia to remove it. When installing a rear object sensor never apply refinishing to previously painted components instead the new element must follow Basecoat/Clearcoat Paint Systems. Check that non-ferrous metal paint thickness remains below 6 mil through usage of a suitable gage. Apply the keyhole to the key before pushing the rear object sensor bezel against the fascia until it rests flat. Install the housing into its cutouts inside the bezel at the back side of the fascia with spring keys fixed at the top and bottom of the housing. You should install the spring to the housing before placing the decoupling ring onto the sensor. Place the sensor into the housing by facing the connector toward the passenger side of the fascia while pressing its tabs through the cutouts on the housing . You must attach the electrical connector to the rear object sensor before reinstalling the rear bumper fascia.
    Posted by ChevyPartsGiant Specialist
    Q:
    How to replace the rear Parking Assist Distance Sensor on Cadillac XLR? Posted by Customer
    A:
    Replacement of the rear object sensor begins with taking off the rear fascia and cutting off the electrical connector attached to the sensor. Detach the locking tabs from the sensor housing to remove the rear object sensor while also taking off its retainer ring from the sensor housing. Operating the new rear object sensor requires refraining from touching previously painted sensors because built-up paint will make the sensor unusable. Use a suitable paint thickness gage for non-ferrous metals to apply paint on the new rear object sensor while maintaining a thickness below 6 mils. You should install the sensor retainer ring onto the sensor before positioning the sensor into the sensor housing and completely seating it into the housing. The electrical connector should be installed on the sensor before putting back the rear fascia.
    Posted by ChevyPartsGiant Specialist
    Q:
    How to replace the rear Parking Assist Distance Sensor on Chevrolet Suburban 1500? Posted by Customer
    A:
    The electrical connectors to the rear object sensor need to be detached before trying to replace it. Press the housing lock tabs until you can remove the rear object sensor. Apply a small-size screwdriver to detach the housing tabs while you gently pull out the spring through the use of . Pushing the tabs from the housing interior will expose it so you can slide the bezel through the fascia. An operator must paint the new rear object sensor while being cautious to avoid refinished sensors because sensor operation fails with excessive paint buildup; a proper paint thickness gauge checks that the paint does not surpass 6 mils for non-ferrous metals. Take the sensor bezel and fit it inside the fascia so that the keyhole lines up with the key while the bezel sharp ends push from inside. Put the housing into position on the bezel while working on the fascia's rear face until it secures in the bezel's cutouts. Push the spring into place inside the housing until it reaches complete seating position and verify that the sensor remains tightly attached against the bumper fascia at its mounting points on the top and bottom housing surface. Place the decoupling ring on the sensor before placing the sensor within the housing while directing its connector towards the passenger side of the fascia where the housing tabs should snap into placement. Finally, connect the electrical connectors.
    Posted by ChevyPartsGiant Specialist
    Q:
    How to replace the rear Parking Assist Distance Sensor on Chevrolet Suburban 2500? Posted by Customer
    A:
    A first step to replace the rear object sensor includes disconnecting all electrical connections from the sensor component. Open the locking tabs of the housing before you can remove the rear object sensor . You should use a small size screwdriver to press the tabs at before removing the spring. You should pull the tabs from inside the housing to take out the housing before you slide the bezel into the fascia. Painting the sensor bezel matching the bumper fascia color constitutes the entire procedure while refraining from sensor painting. Press the sensor bezel into place when its keyhole matches with the key while fitting the fascia. Install the housing toward the back of the fascia while maintaining the spring keys placed at both top and bottom of the housing until it fits the cutouts on the bezel properly. Move the spring into the housing until it reaches complete seating point while making sure the bumper fascia retains a secure hold on the sensor. To begin install the decoupling ring onto the sensor before putting the sensor inside the housing with the electronics facing the passenger side of the fascia. Position the sensor tabs inside the cutouts of the housing . Finally, connect the electrical connectors.
    Posted by ChevyPartsGiant Specialist
    Q:
    How to replace the rear Parking Assist Distance Sensor on GMC Yukon XL 2500? Posted by Customer
    A:
    The electrical connectors to the rear object sensor need to be detached before trying to replace it. Press the housing lock tabs until you can remove the rear object sensor. Apply a small-size screwdriver to detach the housing tabs while you gently pull out the spring through the use of . Pushing the tabs from the housing interior will expose it so you can slide the bezel through the fascia. An operator must paint the new rear object sensor while being cautious to avoid refinished sensors because sensor operation fails with excessive paint buildup; a proper paint thickness gauge checks that the paint does not surpass 6 mils for non-ferrous metals. Take the sensor bezel and fit it inside the fascia so that the keyhole lines up with the key while the bezel sharp ends push from inside. Put the housing into position on the bezel while working on the fascia's rear face until it secures in the bezel's cutouts. Push the spring into place inside the housing until it reaches complete seating position and verify that the sensor remains tightly attached against the bumper fascia at its mounting points on the top and bottom housing surface. Place the decoupling ring on the sensor before placing the sensor within the housing while directing its connector towards the passenger side of the fascia where the housing tabs should snap into placement. Finally, connect the electrical connectors.
    Posted by ChevyPartsGiant Specialist
    Q:
    How to replace the rear Parking Assist Distance Sensor on Chevrolet Tahoe? Posted by Customer
    A:
    The electrical connectors to the rear object sensor need to be detached before trying to replace it. Press the housing lock tabs until you can remove the rear object sensor. Apply a small-size screwdriver to detach the housing tabs while you gently pull out the spring through the use of . Pushing the tabs from the housing interior will expose it so you can slide the bezel through the fascia. An operator must paint the new rear object sensor while being cautious to avoid refinished sensors because sensor operation fails with excessive paint buildup; a proper paint thickness gauge checks that the paint does not surpass 6 mils for non-ferrous metals. Take the sensor bezel and fit it inside the fascia so that the keyhole lines up with the key while the bezel sharp ends push from inside. Put the housing into position on the bezel while working on the fascia's rear face until it secures in the bezel's cutouts. Push the spring into place inside the housing until it reaches complete seating position and verify that the sensor remains tightly attached against the bumper fascia at its mounting points on the top and bottom housing surface. Place the decoupling ring on the sensor before placing the sensor within the housing while directing its connector towards the passenger side of the fascia where the housing tabs should snap into placement. Finally, connect the electrical connectors.
    Posted by ChevyPartsGiant Specialist
    Q:
    What is the correct way to install the spring for the 2003 Cadillac Escalade? Posted by Customer
    A:
    Install the spring to the housing until fully seated, ensuring the spring keys are on the top and bottom of the housing.
    Posted by ChevyPartsGiant Specialist
    See expert answers on similar Parking Assist Distance Sensor
    Q:
    How do you remove the rear object sensor bezel for the 2005 Cadillac STS? Posted by Customer
    A:
    Push the rear object sensor bezel through the fascia to remove it.
    Posted by ChevyPartsGiant Specialist
    See expert answers on similar Parking Assist Distance Sensor
    Q:
    What is the final step in the replacement process for the 2008 Cadillac XLR? Posted by Customer
    A:
    Reinstall the rear fascia.
    Posted by ChevyPartsGiant Specialist
    See expert answers on similar Parking Assist Distance Sensor
    Q:
    What should be done after removing the rear bumper fascia for the 2009 Cadillac STS? Posted by Customer
    A:
    Disconnect the electrical connector from the rear object sensor.
    Posted by ChevyPartsGiant Specialist
    See expert answers on similar Parking Assist Distance Sensor
    Q:
    What should you do with the rear object sensor bezel for the 2007 Cadillac STS? Posted by Customer
    A:
    Push the rear object sensor bezel through the fascia to take it out.
    Posted by ChevyPartsGiant Specialist
    See expert answers on similar Parking Assist Distance Sensor
    Q:
    What is the next step after pressing the rear object sensor bezel for the 2010 Cadillac STS? Posted by Customer
    A:
    Install the housing to the cutouts on the bezel from the back side of the fascia, ensuring the spring keys are positioned at the top and bottom of the housing.
    Posted by ChevyPartsGiant Specialist
    See expert answers on similar Parking Assist Distance Sensor
    Q:
    What is the final step in the installation process for the 2006 Cadillac STS? Posted by Customer
    A:
    Connect the electrical connector to the rear object sensor and reinstall the rear bumper fascia.
    Posted by ChevyPartsGiant Specialist
    See expert answers on similar Parking Assist Distance Sensor
    If you have any questions about this product, please don't hesitate to ask us. We will be happy to help you!

OEM GM 88891836, Excellent Performance and Perfect Fitment

To ensure reliability, purchase GM part # 88891836 Distance Sensor. It is sometimes referred to as GM Parking Assist Distance Sensor. Choosing OEM parts is the optimal decision for guaranteeing superior quality and perfect performance. These components undergo stringent quality checks and are carefully constructed to comply with GM's factory specifications, ensuring a smooth installation process.

ChevyPartsGiant.com is a leading supplier of genuine GM parts such as GM 88891836 Distance Sensor. Our website boasts an extensive inventory of OEM GM parts, available at highly competitive prices in the market. Should you require any new genuine GM parts, rest assured we will deliver them swiftly and efficiently to your doorstep. Furthermore, all our parts come with the assurance of a manufacturer's warranty. For detailed Chevy parts information, click here.
Choose ChevyPartsGiant for discounted prices, exceptional service and fast delivery