ChevyParts
My Garage
My Account
Cart
OEM Cadillac Door Lock Switch
- Select Vehicle by Model
- Select Vehicle by VIN
Select Vehicle by Model
orMake
Model
Year
Select Vehicle by VIN
For the most accurate results, select vehicle by your VIN (Vehicle Identification Number).
135 Door Lock Switches found


Cadillac Window Switch, Driver Side Part Number: 19244656
$114.47 MSRP: $163.80You Save: $49.33 (31%)Product Specifications- Other Name: Switch, Door Lock & Side Window; Door Window Switch; Door Lock Switch; Lock Switch; Switch; Switch, Door And End Gate Electrical
- Position: Driver Side
- Replaces: 15151356


Cadillac Window Switch, Passenger Side Part Number: 22810051
$138.20 MSRP: $206.58You Save: $68.38 (34%)Ships in 1-2 Business DaysProduct Specifications- Other Name: Switch Assembly-Door Lock & Side Window *Argent; Switch, Door Electric And Vacuum Locks; Switch, Door Window
- Position: Passenger Side
- Replaces: 25855133, 25970549

Cadillac Switch, Black Carbon Part Number: 84360363
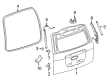
$25.03 MSRP: $39.23You Save: $14.20 (37%)Ships in 1-3 Business DaysProduct Specifications- Other Name: Switch Assembly-Lift Gate Release *Black Carbon; Trunk Lid Release Switch; Switch, Door And End Gate Electrical

Cadillac Lock Switch, Black, Passenger Side Part Number: 84504639
$15.27 MSRP: $49.76You Save: $34.49 (70%)Ships in 1-3 Business DaysProduct Specifications- Other Name: Switch Assembly, Door Lock; Door Lock Switch; Switch, Door Electric And Vacuum Locks; Switch, Door And End Gate Electrical
- Position: Passenger Side
- Replaces: 22988364

Cadillac Lock Switch, Jet Black, Passenger Side Part Number: 84514232
$11.86 MSRP: $36.28You Save: $24.42 (68%)Ships in 1-3 Business DaysProduct Specifications- Other Name: Switch Assembly-Door Lock *Jet Black; Door Lock Switch; Switch, Door Electric And Vacuum Locks
- Position: Passenger Side
- Replaced by: 87823317

Cadillac Window Switch, Passenger Side, Carbon Part Number: 22990481
$31.81 MSRP: $49.84You Save: $18.03 (37%)Ships in 1-3 Business DaysProduct Specifications- Other Name: Switch, Door And End Gate Electrical; Door Lock Switch; Lock Switch
- Position: Passenger Side
- Replaced by: 85620637


Cadillac Lock Actuator, Passenger Side Part Number: 22143724
$36.94 MSRP: $74.81You Save: $37.87 (51%)Ships in 1-2 Business DaysProduct Specifications- Other Name: Switch, Door Electric And Vacuum Locks; Door Lock Actuator Motor; Lock Switch; Switch; Actuator; Switch, Door And End Gate Electrical; Switch, Door Lock
- Position: Passenger Side

Cadillac Lock Switch, Jet Black, Passenger Side Part Number: 84660137
$15.06 MSRP: $23.59You Save: $8.53 (37%)Ships in 1-3 Business DaysProduct Specifications- Other Name: Switch Assembly-Door Lock *Jet Black; Door Lock Switch; Switch, Door Electric And Vacuum Locks
- Position: Passenger Side
Cadillac Lock Switch, Driver Side, Carbon Part Number: 84595721
$25.88 MSRP: $40.52You Save: $14.64 (37%)Ships in 1-3 Business DaysProduct Specifications- Other Name: Switch, Door And End Gate Electrical; Door Lock Switch; Switch, Door Electric And Vacuum Locks
- Position: Driver Side
- Replaces: 22990480

Cadillac Lock Switch, Jet Black, Driver Side Part Number: 84488191
$24.68 MSRP: $38.66You Save: $13.98 (37%)Ships in 1-3 Business DaysProduct Specifications- Other Name: Switch Assembly-Door Lock *Jet Black; Door Lock Switch
- Position: Driver Side
- Replaced by: 86802979
Cadillac Lock Switch, Driver Side Part Number: 84514231
$23.06 MSRP: $36.13You Save: $13.07 (37%)Ships in 1-3 Business DaysProduct Specifications- Other Name: Switch, Door Electric And Vacuum Locks; Door Lock Switch
- Position: Driver Side
- Replaced by: 87823316

Cadillac Window Switch, Passenger Side Part Number: 15186209
$85.12 MSRP: $133.33You Save: $48.21 (37%)Ships in 1-3 Business DaysProduct Specifications- Other Name: Switch Assembly-Door Lock & Side Window; Switch
- Position: Passenger Side
Cadillac Lock Switch, Jet Black, Driver Side Part Number: 84660135
$15.06 MSRP: $23.59You Save: $8.53 (37%)Ships in 1-3 Business DaysProduct Specifications- Other Name: Switch Assembly-Door Lock *Jet Black; Door Lock Switch; Switch, Door Electric And Vacuum Locks
- Position: Driver Side

Cadillac Lock Switch, Jet Black, Driver Side Part Number: 84374123
$9.90 MSRP: $15.49You Save: $5.59 (37%)Ships in 1-3 Business DaysProduct Specifications- Other Name: Switch Assembly-Door Lock *Jet Black; Door Lock Switch; Switch, Door And End Gate Electrical
- Position: Driver Side

Cadillac Lock Switch, Jet Black, Passenger Side Part Number: 84374124
$10.42 MSRP: $16.30You Save: $5.88 (37%)Ships in 1-3 Business DaysProduct Specifications- Other Name: Switch Assembly-Door Lock *Jet Black; Door Lock Switch; Switch, Door And End Gate Electrical
- Position: Passenger Side
Cadillac Lock Switch Part Number: 22954792
$22.62 MSRP: $35.43You Save: $12.81 (37%)Ships in 1-3 Business DaysProduct Specifications- Other Name: Switch, Door Electric And Vacuum Locks; Door Lock Switch
- Replaced by: 23122514

Cadillac Window Switch, Tuxedo Blue, Passenger Side Part Number: 20834884
$61.19 MSRP: $185.96You Save: $124.77 (68%)Ships in 1-2 Business DaysProduct Specifications- Other Name: Switch Assembly-Door Lock & Side Window *Tuxedo Blue; Switch, Door Electric And Vacuum Locks; Switch, Door Window
- Position: Passenger Side
- Replaces: 15848177, 15937958, 15911985

Cadillac Window Switch, Driver Side Part Number: 22810047
$171.95 MSRP: $280.55You Save: $108.60 (39%)Product Specifications- Other Name: Switch Assembly-Door Lock & Side Window *Argent; Door Lock Switch; Lock Switch; Switch, Door Electric And Vacuum Locks; Switch, Door Window
- Position: Driver Side
- Replaces: 25970545, 25783500

Cadillac Power Window Switch Part Number: 1635238
$658.67 MSRP: $989.00You Save: $330.33 (34%)Product Specifications- Other Name: Switch Assembly; Door Lock Switch; Lock Switch; Switch, Door Electric And Vacuum Locks
- Replaced by: 19137599
Cadillac Window Switch, Driver Side Part Number: 25860475
$119.08 MSRP: $177.99You Save: $58.91 (34%)Ships in 1-3 Business DaysProduct Specifications- Other Name: Switch Assembly-Door Lock & Side Window *Cashmere; Switch, Door Electric And Vacuum Locks; Switch, Door Window
- Position: Driver Side
- Replaces: 15911979
| Page 1 of 7 |Next >
1-20 of 135 Results
Cadillac Door Lock Switch
Want to cut long-term maintenance and repair costs? Choose OEM Door Lock Switch. Those parts deliver top durability you can trust. On our site, you'll find a huge catalog of genuine Cadillac parts. Prices are unbeatable, so you can keep more in your pocket. Every OEM Cadillac Door Lock Switch includes a manufacturer's warranty. You can also get an easy return policy that keeps buying risk free. Fast delivery, get your car on the road quickly. It's simple to search, compare, and order. Stop guessing about quality or fit. Order today and save with parts that last.
Cadillac Door Lock Switch Parts Questions & Experts Answers
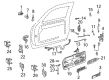
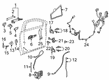
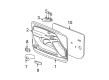
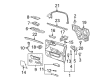
- Q: How to Remove and Install a Door Lock Switch on Cadillac CTS?A:The replacement process starts with detaching the inside handle bezel from the inner door panel by opening the handle while inserting a flat-bladed tool at its front lower corner to pry outward before bezel removal. The electrical connector should be removed from the lock switch. The door lock switch installation requires users to position the switch within the bezel before attaching wires and sliding the bezel toward the door handle and finishing by pressing the lower front corner.
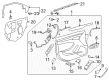
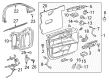
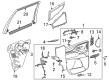
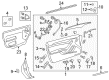
- Q: How to replace the power door lock switch on Cadillac DeVille?A:To change the Power Door Lock Switch, first take off the door panel following the directions for either the Rear Side Door or the Front Side Door Trim Panel replacement. After that, remove the electrical connector from the lock switch. With a flat tool, pop open the locking tabs (1) on the front and back of the switch and then remove the lock switch. The new switch should be snapped into the door trim panel, the electrical connector should be attached and the door trim panel should then be installed correctly following the repair manual.
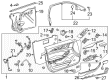
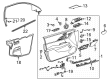
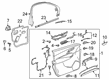
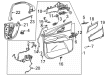
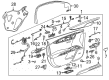
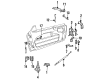
- Q: How to replace the power door lock switch in the driver door on Cadillac XLR?A:The replacement of the power Door Lock Switch in the driver door needs the Ignition Switch to be in off before you begin by removing the door trim panel. Start by removing the retainer screws from the upper trim panel at its back section followed by taking off the upper trim from the door. Begin by taking out the inner energy absorber from the door panel followed by removing four retaining screws from the armrest rear section and one screw from its forward side. After disconnecting the wire harness from the armrest you should remove the assembly while protecting the finish with duct tape before removing the Power Window Switch assembly. Take out the power Door Lock Switch assembly from the pocket inside the door trim panel before disconnecting the wire harness. The new power Door Lock Switch installation requires a connection between wire harnesses at the Door Lock Switch assembly while securing it to the armrest switch plate aplique. Install the lock switch assembly into its pocket of the door trim panel after unwinding any protective tape and connect the wire harness to the Door Armrest assembly. Mount the armrest to the door trim panel by using 4 rear retaining screws along with one forward screw at the end and tighten them to 10 n.m (89 lb in). The technician should put back the inner energy absorber and the upper trim while tightening rear retaining screws to 10 n.m (89 lb in) before installing the door trim panel.


Related Cadillac Parts
 Cadillac Speedometer
 Cadillac TPMS Sensor
 Cadillac Air Suspension Compressor
 Cadillac Fuse Box
 Cadillac Brake Light Switch
 Cadillac Fog Light Connector
 Cadillac Headlight Relay
 Cadillac Headlight Switch
 Cadillac Igniter
 Cadillac Oil Pressure Gauge
 Cadillac Seat Belt
 Cadillac Shift Interlock Solenoid