ChevyParts
My Garage
My Account
Cart
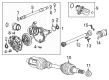
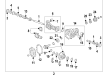
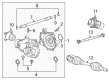
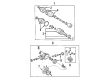
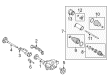
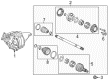
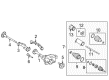
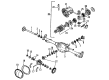
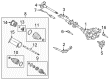
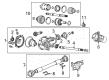
OEM Cadillac Differential
Front Differential- Select Vehicle by Model
- Select Vehicle by VIN
Select Vehicle by Model
orMake
Model
Year
Select Vehicle by VIN
For the most accurate results, select vehicle by your VIN (Vehicle Identification Number).
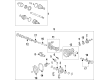
139 Differentials found


Cadillac Axle Housing, Front Part Number: 22894020
$466.88 MSRP: $737.92You Save: $271.04 (37%)Product Specifications- Other Name: Carrier Assembly-Front Differential; Carrier, Differential
- Position: Front
- Replaces: 15876531, 22761723

Cadillac Axle Housing, Front Part Number: 23362369
$1480.36 MSRP: $2339.75You Save: $859.39 (37%)Ships in 1-3 Business DaysProduct Specifications- Other Name: Carrier Assembly-Front Differential; Differential Assy Housing; Carrier Housing; Carrier, Differential
- Position: Front
- Replaces: 12471637, 19121737, 26058827, 15911670

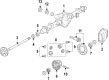
Cadillac Differential Case Part Number: 12479062
$444.45 MSRP: $2454.83You Save: $2010.38 (82%)Ships in 1-2 Business DaysProduct Specifications- Other Name: Differential, Differential Side With Pinion; Differential, Front/Rear Differential And Planet; Differential
- Replaces: 26060243

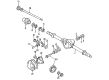
Cadillac Differential Assembly Part Number: 86800563
$2042.31 MSRP: $2628.46You Save: $586.15 (23%)Ships in 1-3 Business DaysProduct Specifications- Other Name: Carrier, With Cap; Carrier; Differential
- Replaced by: 85733995

Cadillac Carrier Assembly, Front Part Number: 84547504
$1000.88 MSRP: $1581.57You Save: $580.69 (37%)Ships in 1-3 Business DaysProduct Specifications- Other Name: Carrier Assembly-Front Differential; Carrier, Final Drive; Differential
- Position: Front
- Replaced by: 84790517

Cadillac Differential Carrier, Front Part Number: 85152266
$336.04 MSRP: $528.74You Save: $192.70 (37%)Ships in 1-3 Business DaysProduct Specifications- Other Name: Carrier Assembly-Front Differential; Carrier; Housing
- Position: Front

Cadillac Differential Case Part Number: 23404623
$391.31 MSRP: $621.28You Save: $229.97 (38%)Product Specifications- Other Name: Differential Assembly-Limited Slip; Differential, Front/Rear Differential And Planet; Differential
- Replaced by: 84443626
- Replaces: 23126913

Cadillac Differential Case Part Number: 15634010
$65.76 MSRP: $610.39You Save: $544.63 (90%)Ships in 1-2 Business DaysProduct Specifications- Other Name: Case, Differential (Ring Gear And Pinion); Case, Front/Rear Differential And Planet; Differential
- Position: Rear

Cadillac Differential Carrier, Front Part Number: 87812305
$386.19 MSRP: $607.54You Save: $221.35 (37%)Ships in 1-3 Business DaysProduct Specifications- Other Name: Carrier Assembly-Front Differential; Axle Housing; Carrier; Housing; Carrier, Differential
- Position: Front
- Replaced by: 85644584

Cadillac Carrier Assembly, Front Part Number: 85596738
$1598.41 MSRP: $2526.34You Save: $927.93 (37%)Ships in 1-3 Business DaysProduct Specifications- Other Name: Carrier Assembly-Front Differential; Differential; Carrier, Final Drive
- Position: Front
- Replaces: 84008352, 84169554, 84008351
Cadillac Differential Assembly Part Number: 86800564
$2429.48 MSRP: $3127.68You Save: $698.20 (23%)Ships in 1-3 Business DaysProduct Specifications- Other Name: Carrier, With Cap; Carrier; Differential
- Replaced by: 85733996

Cadillac Differential Carrier Part Number: 19178784
Product Specifications- Other Name: Carrier Assembly, Differential (3.73 Ratio); Carrier; Carrier, Final Drive; Differential
- Replaces: 25766295

Cadillac Carrier Part Number: 25873496
Product Specifications- Other Name: Carrier Assembly-Differential (3.73 Ratio); Carrier, Final Drive; Differential
- Replaces: 15793717
Cadillac Differential Carrier Part Number: 19178780
Product Specifications- Other Name: Carrier Assembly, Differential (3.42 Ratio); Carrier; Carrier, Final Drive; Differential
- Replaces: 25766296, 12576640, 19181232, 25766288

Cadillac Differential Assembly, Front Part Number: 22933066
Product Specifications- Other Name: Axle Assembly-Front (3.73 Ratio); Differential
- Position: Front
- Replaces: 15829077, 22761726, 23145795, 22744049, 25818424

Cadillac Differential Carrier Part Number: 25979072
Product Specifications- Other Name: Carrier Assembly-Differential (3.73 Ratio); Carrier; Carrier, Final Drive; Differential
- Replaces: 25868437

Cadillac Differential Assembly, Front Part Number: 15095781
Product Specifications- Other Name: Axle Assembly-Front (4.10 Ratio); Differential
- Position: Front

Cadillac Differential Case Part Number: 12471391
Product Specifications- Other Name: Differential; Differential, Front/Rear with Pinion; Case, Front/Rear Differential
- Replaces: 26045313

Cadillac Differential Carrier, Front Part Number: 25931915
Product Specifications- Other Name: Axle Assembly-Front (3.73 Ratio); Differential; Differential Assembly
- Position: Front
- Replaces: 15162651, 10382291, 15189824, 15063784, 15852368, 15123414, 25807896

Cadillac Carrier Assembly, Front Part Number: 23317167
$596.38 MSRP: $942.60You Save: $346.22 (37%)Product Specifications- Other Name: Carrier Assembly-Front Differential; Carrier, Final Drive; Differential
- Position: Front
- Replaces: 23471735, 22963048, 23489040
| Page 1 of 7 |Next >
1-20 of 139 Results
Cadillac Differential
Want to cut long-term maintenance and repair costs? Choose OEM Differential. Those parts deliver top durability you can trust. On our site, you'll find a huge catalog of genuine Cadillac parts. Prices are unbeatable, so you can keep more in your pocket. Every OEM Cadillac Differential includes a manufacturer's warranty. You can also get an easy return policy that keeps buying risk free. Fast delivery, get your car on the road quickly. It's simple to search, compare, and order. Stop guessing about quality or fit. Order today and save with parts that last.
Cadillac Differential Parts Questions & Experts Answers
- Q: How to replace the Differential Carrier Assembly on Cadillac CTS?A:First, move the vehicle to oneside and support. Lower the front frame assembly then remove the front propeller shaft from unit Differential and move to the side out of the way. Following, take out the right and left front wheel drive shafts, and then the intermediate wheel Drive Shaft support bearing. Place a transmission jack underneath the Differential and fix in place. Unfasten the front Differential bolts to Oil Pan, then, remove the intermediate wheel Drive Shaft along with front diff and Oil Pan, then the diff assembly on the car. For installation, mount the Differential on the transmission jack and attach it. With the Differential attached, the install of intermediate wheel Drive Shaft and front Differential to the Oil Pan must be tightened to front Differential to Oil Pan mounting bolts in sequence (1-3) to 110 nm (81 lb ft). Take the transmission jack off and then follow by the intermediate wheel Drive Shaft support bearing, and then the left and right front wheel drive shafts. Reinstall the front prop shaft in the Differential and check the level of lubricant of the Differential. Finally, apply the front frame assembly and drop the vehicle. Use j 44394-a (Seal Protector) when necessary in the process and be careful not to destroy the oil seal when installing the wheel Drive Shaft to avoid lubricant leaks.
- Q: How to assemble the differential carrier on Cadillac SRX?A:To put this Differential carrier together, first use bearing grease to secure the gear and washer in the Differential carrier, followed by lateral axle side gears (107) and washers (106). Then, put in the washers (108) on the pinion gears (109) and put the pinion in the Differential carrier (104) next to each other and across from each other aligning the center Differential shaft (103). Slowly rotate the gear will be aligned then insert the Differential shaft (103) and the matched hole in Differential case (104) and pinion gears (109). Install the bolts with the heads uninstalled to guide into the gear bolt holes and not press too much on to the Differential causing the damage to the gear teeth. Then use a press and the pin ion cone and side bearing installer (J 24 433) to press the ring gear (105) on to the Differential. Replace the guide pin with new ring gear bolts and tighten them to 67 nm (49 ft. Lbs) in criss-cross-pattern. Two different types of bearings fish in place on the drive pinion shaft (111) using the pinion cone and side bearing installer (J 24433) and a hydraulic press, are it's the pinion head bearing onto the drive pinion gear (111), thus, assemble the drive pinion shaft (111) and pinion bearing spacer through the pinion bearing housing with tail bearing over the pinion shaft to press the bearing onto the pinion shaft, with the pinion cone and side bearing installer (J 24433) and a hydraulic press. Install a new pinion seal with the help of pinion sealer (J 46262), and put the pinion flange on the shaft and a new pinion nut . With the use of the pinion flange holder (J 45012), hold the flange with a breaker bar and tighten the pinion flange nut to 241 nm (178 ft. Lbs.) torque wrench and injector nozzle socket 30mm (J 29873). Install stub shaft seal using stub shaft seal installer (J 46265) and universal driver handle (J 8092) and place the selected shims on pinion housing and install the o-ring in the groove on pinion housing. Check the bearing housing and carrier pinion housing bore for nicks or burrs. Use a light coat of gear lube to facilitate installation. Heat the carrier with heat gun (J 25070), align the housing bolt hole to the carrier bolt hole using the long bolts of flange and pinion cage remover (J 45019) as pointer, tighten the bolts, and then press the housing evenly to the bore before taking out the long bolts to put in pinion housing bolts tight, torque to 29 nm (21 ft. Lbs.). Insert the Differential assembly (100) into the Differential carrier, lightly coat the outer diameter of the oil seal may with axle lube, and use the output shaft seal installer (J 45017) to install the oil seal. Fit the carrier cover o-ring into its groove; apply a light coat of gear lube to the o-ring region; move the bolt holes into line with one another; and force the cover onto the Differential carrier evenly, starting thread of the cover bolts by hand, and finish tightening them to 29 nm (21 ft. Lbs.) in a criss-cross pattern. Finally, install the Drain Plug and tighten it 39 nm (29 ft. Lbs.), then after axle and half shaft are installed in the vehicle fill the axle with Differential lube gl75w90 gm p/n 12378261 (Canadian p/n 10953455) or equivalent and fill to the bottom of fill plug threads before installing and tightening with 39 nm (29 ft. Lbs.) plug to the fill plug.
- Q: What steps should be taken to clean and inspect the differential case components and associated parts for damage and wear on Cadillac XLR?A:Thoroughly clean the differential case parts in the solvent and inspect for cracks, threaded bolt holes damage, unusual arduous, scoring, or grooves in the clutch pack area, and scored or abused case side bearing mount flanges. Clean the gears and shafts with solvent then check inspect the gears for chips, cracks, pittings and heat discoloration,wear wear or scoring of the side gear pin bores, wear grooving or scoring of side gear pin and side gear washer, unusual wear or grooving on output gear splines, damage to ring gear threaded bolt holes, and damage of ring gear vehicle speed sensor reluctor ring lobes. Examine the shafts for abnormally wearing spline, grooved, worn and damaged splines as well as damaged C-clip grooves. Check the cleaning of the discs and plates and their inspection for non-standard wear, scoring, grooves in the separator plate friction surfaces, non-standard wear or worn of friction material and of friction plates, bent and warped plates or discs while putting them on a flat surface for the latter. Inspect for a worn, scored or collapsed bellville washer. Check the bearing rollers and cups for pitting, scoring, grooves, extreme wear and other damage, and inspect them for heat discoloration, which varies from a very light yellow to the extreme dark blue indicating overload or improper lube; any of the bearings or cups exhibiting heat discoloration should be replaced. Last but not the least; inspect bent or damaged bearing cages.


