ChevyParts
My Garage
My Account
Cart
OEM Cadillac Pinion Bearing
Transmission Pinion Bearing- Select Vehicle by Model
- Select Vehicle by VIN
Select Vehicle by Model
orMake
Model
Year
Select Vehicle by VIN
For the most accurate results, select vehicle by your VIN (Vehicle Identification Number).
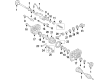
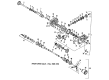
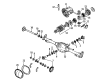
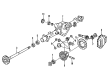
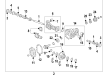
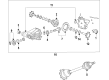
28 Pinion Bearings found


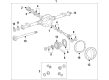
Cadillac Pinion Bearings, Rear Part Number: 22943106
$71.56 MSRP: $138.90You Save: $67.34 (49%)Ships in 1-2 Business DaysProduct Specifications- Other Name: Bearing, Drive Pinion Rear And Intermediate; Differential Pinion Bearing
- Position: Rear


Cadillac Pinion Seal, Outer Part Number: 25824252
$50.05 MSRP: $97.14You Save: $47.09 (49%)Ships in 1-2 Business DaysProduct Specifications- Other Name: Bearing, Differential Drive Pinion Gear Outer; Differential Pinion Bearing; Pinion Bearings; Side Bearings; Bearing; Bearing, Pinion Shaft Front
- Position: Outer


Cadillac Pinion Bearings Part Number: 9413427
$56.84 MSRP: $109.76You Save: $52.92 (49%)Ships in 1-2 Business DaysProduct Specifications- Other Name: Bearing, Differential Drive Pinion Gear Outer; Differential Pinion Bearing; Rear, Front, Outer Pinion Bearings; Differential Drive, Steering Knuckle King, Pinion Shaft, Front Axle Bearings.


Cadillac Pinion Bearings Part Number: 454021
$161.60 MSRP: $292.48You Save: $130.88 (45%)Ships in 1-2 Business DaysProduct Specifications- Other Name: Bearing Assembly, Differential Drive Pinion Gear; Differential Pinion Bearing; Rear Pinion Bearing; Inner Pinion Bearing; Differential Drive Pinion; Rear Wheel Bearing.

Cadillac Pinion Bearings, Outer Part Number: 22943108
$35.57 MSRP: $69.63You Save: $34.06 (49%)Ships in 1-2 Business DaysProduct Specifications- Other Name: Bearing Assembly-Differential Drive Pinion Gear Outer; Differential Pinion Bearing; Axle Bearing; Outer Bearing; Front Pinion Bearing; Bearing, Pinion Shaft Front
- Position: Outer

Cadillac Pinion Bearings Part Number: 9417784
$24.86 MSRP: $68.16You Save: $43.30 (64%)Ships in 1-2 Business DaysProduct Specifications- Other Name: Pinion Gear Front; Differential Pinion Bearing; Axle Bearing; Rear Pinion Bearing; Front Pinion Bearing; Outer Pinion Bearing; Differential Drive Pinion Bearing; Front Axle Bearing.
- Position: Outer


Cadillac Side Bearings Part Number: 11505123
$57.30 MSRP: $169.58You Save: $112.28 (67%)Ships in 1-2 Business DaysProduct Specifications- Other Name: Bearing, Differential Side Gear; Differential Pinion Bearing; Differential Bearing; Bearing


Cadillac Pinion Bearings, Inner Part Number: 25824251
$91.87 MSRP: $179.86You Save: $87.99 (49%)Ships in 1-2 Business DaysProduct Specifications- Other Name: Bearing, Differential Drive Pinion Gear Inner; Differential Pinion Bearing; Side Bearings; Bearing, Drive Pinion Rear And Intermediate
- Position: Inner

Cadillac Side Bearings Part Number: 25824250
$73.65 MSRP: $142.94You Save: $69.29 (49%)Ships in 1-2 Business DaysProduct Specifications- Other Name: Bearing, Differential Side Gear; Differential Pinion Bearing; Differential Bearing
- Replaces: 09418390, 9418390

Cadillac Side Bearings Part Number: 88943839
$48.83 MSRP: $144.56You Save: $95.73 (67%)Ships in 1-2 Business DaysProduct Specifications- Other Name: Bearing, Differential Side Gear; Differential Bearing
- Replaces: 26091723

Cadillac Pinion Bearings Part Number: 84428299
$24.40 MSRP: $45.81You Save: $21.41 (47%)Ships in 1-2 Business DaysProduct Specifications- Other Name: Bearing, Differential Pinion; Differential Pinion Bearing; Front Pinion Bearing
- Position: Front
- Replaced by: 85722137
Cadillac Pinion Bearings, Rear Part Number: 84881466
$67.00 MSRP: $119.64You Save: $52.64 (44%)Ships in 1-3 Business DaysProduct Specifications- Other Name: Bearing, Drive Pinion Rear And Intermediate; Differential Pinion Bearing; Differential Bearing
- Position: Rear
Cadillac Pinion Bearings, Outer Part Number: 15534483
$53.12 MSRP: $94.85You Save: $41.73 (44%)Ships in 1-2 Business DaysProduct Specifications- Other Name: Bearing Assembly, Differential Drive Pinion Gear Outer; Differential Pinion Bearing; Front Pinion Bearing; Bearing, Differential Pinion; Bearing, Pinion Shaft Front
- Position: Outer
- Replaces: 09440836, 9440836
Cadillac Pinion Bearings, Outer Part Number: 22943109
$45.75 MSRP: $88.79You Save: $43.04 (49%)Ships in 1-2 Business DaysProduct Specifications- Other Name: Bearing Assembly-Differential Drive Pinion Gear Outer; Differential Pinion Bearing; Axle Bearing; Outer Bearing; Bearing, Pinion Shaft Front
- Position: Outer
Cadillac Pinion Bearings, Front Outer Part Number: 84428300
$13.92 MSRP: $26.14You Save: $12.22 (47%)Ships in 1-2 Business DaysProduct Specifications- Other Name: Bearing Assembly-Front Differential Drive Pinion Gear Outer; Differential Pinion Bearing; Rear Pinion Bearing; Bearing, Differential Pinion
- Position: Front Outer
- Replaced by: 85722136
Cadillac Output Shaft Bearing Part Number: 84766413
$22.01 MSRP: $41.33You Save: $19.32 (47%)Ships in 1-3 Business DaysProduct Specifications- Other Name: Bearing, Differential Side Gear; Differential Pinion Bearing; Differential Bearing; Axle Bearing; Side Bearings
- Replaces: 84446291


Cadillac Side Bearings Part Number: 22786619
$126.72 MSRP: $245.94You Save: $119.22 (49%)Ships in 1-2 Business DaysProduct Specifications- Other Name: Bearing, Differential Side Gear; Differential Bearing
Cadillac Pinion Bearings, Rear Part Number: 22943107
$57.28 MSRP: $157.48You Save: $100.20 (64%)Ships in 1-2 Business DaysProduct Specifications- Other Name: Bearing, Drive Pinion Rear And Intermediate; Differential Pinion Bearing
- Position: Rear

Cadillac Pinion Bearings Part Number: 7451409
Product Specifications- Other Name: Bearing; Differential Pinion Bearing; Bearing, Transmission Main Shaft; Differential Drive Pinion; Rear Axle Pinion Shaft; Front Bearing.

Cadillac Pinion Bearings Part Number: 90093124
Product Specifications- Other Name: Bearing, Differential Pinion; Differential Pinion Bearing
| Page 1 of 2 |Next >
1-20 of 28 Results
Cadillac Pinion Bearing
Want to cut long-term maintenance and repair costs? Choose OEM Pinion Bearing. Those parts deliver top durability you can trust. On our site, you'll find a huge catalog of genuine Cadillac parts. Prices are unbeatable, so you can keep more in your pocket. Every OEM Cadillac Pinion Bearing includes a manufacturer's warranty. You can also get an easy return policy that keeps buying risk free. Fast delivery, get your car on the road quickly. It's simple to search, compare, and order. Stop guessing about quality or fit. Order today and save with parts that last.
Cadillac Pinion Bearing Parts Questions & Experts Answers
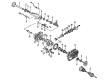
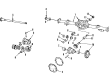
- Q: How to replace the drive pinion bearings on Cadillac Escalade?A:One must obtain the inner bearing race installer (J 7818) along with universal driver handle - 3/4 in - 10 (J 8092), rear Pinion Bearing race installer (J 8611-01), flange and pulley holding tool (J 8614-01), pinion cup bearing installer - rear (J 22306), split plate bearing puller (J 22912-B), pinion cone and side bearing installer (J 24433), inner Pinion Bearing installer (J 36614), and Pinion Bearing cup installer (J 45870) as required tools for begin with vehicle lifting and subsequent Differential assembly and drive pinion removal from the axle keeping. The split plate bearing puller tool (J 22912-B) helps extract the bearing off the drive pinion before you remove the shim and the outer and inner Pinion Bearing cups from the axle housing through hammer strikes with brass drifts. To install both inner and outer Pinion Bearing cups, use the rear Pinion Bearing race installer (J 8611-01) and the pinion cup bearing installer - rear (J 22306) equipped with the universal driver handle (J 8092). Decide the appropriate selective shim size for the drive pinion before inserting it between the inner Pinion Bearing and the gear shoulder. Install the inner Pinion Bearing through appropriate tools either as the pinion cone and side bearing installer (J 24433) or the inner Pinion Bearing installer (J 36614) until the bearing touches the shim. The installation procedure requires a new collapsible spacer and Pinion Bearing lubrication followed by the outer Pinion Bearing insertion into the axle housing. Use pinion cup bearing installer (J 22306) for installing the new pinion oil seal before installing the pinion inside the housing. The application of gm p/n 12346004 (Canadian P/N 10953480) or equivalent sealant on the pinion yoke splines should be followed by installing the yoke while using the initial alignment marks made during removal. Set the pinion yoke on the pinion shaft using a soft-faced hammer before you add the washer and brand new pinion nut. The flange and pulley holding tool (J 8614-01) should maintain the pinion yoke position while you tighten the pinion nut until the pinion end play reaches its limit by continuously rotating the pinion. A torque wrench should measure the pinion torque at 1.0-2.3 n.m (10-20 lb in) for used bearings or 1.7-3.4 n.m (15-30 lb in) for new bearings during the assessment process. Maintenance of the specified torque range requires additional small pinion nut tightening until the torque measurement matches the parameters. To verify the specified torque perform multiple pinion rotations while checking the torque anew before eventual adjustment when necessary. Conclude the procedure by installing the Differential assembly before adding appropriate lubricant to the axle while lowering the vehicle.
- Q: How to replace the drive pinion bearings on 8.6 and 9.5 inch axles on Cadillac Escalade ESV?A:To replace the drive pinion bearings on 8.6 and 9.5 inch axles, gather the necessary tools: j 7818 (Inner Bearing Race Installer), j 8092 (Universal Driver Handle - 3/4 in - 10), j 8611-01 (Rear Pinion Bearing Race Installer), j 8614-01 (Flange and Pulley Holding Tool), j 22306 (Rear Pinion Cup Bearing Installer), j 22912-01 (Split Plate Bearing Puller), j 24433 (Pinion Cone and Side Bearing Installer), j 36614 (Inner Pinion Bearing Installer), j 45870 (Pinion Bearing Cup Installer), and j 45871 (Pinion Bearing Remover). Start by lifting the vehicle then remove both the Differential assembly along with the drive pinion. To remove the Pinion Bearing from an 8.6 inch axle press it off with the j 45871 along with an inverted j 22912-01 around the j 45871. You should utilize the j 22912-01 to press off the bearing from the 9.5 inch axle. Install the shim together with the outer and inner Pinion Bearing cups by striking them off with a hammer and brass drift. The Pinion Bearing cup requires installation with the use of j 8611-01 for 8.6 inches and j 7818 for 9.5 inches along with j 8092. The j 45870 (8.6 inch axle) or j 22306 (9.5 inch axle) together with j 8092 enable installing the inner Pinion Bearing cup. Before inserting the inner Pinion Bearing, place the selected shim between the components and use j 24433 or j 36614 tool to drive the bearing until it rests on the shim. The technician needs to add a new collapsible spacer before applying lubrication to pinion bearings for the subsequent axle housing installation. To proceed, install the j 22388 to fit a brand new pinion oil seal and then push the pinion into the axle housing while applying sealant to the pinion yoke splines. Ask for the pinion yoke installation while keeping it in line with previous removal marks then adjust position through soft-faced hammer taps. The pinion yoke receives securement from the j 8614-01 while tightening the pinion nut until the pinion end play reaches complete utilization. Test the rotating torque of the pinion using an inch-pound torque wrench to obtain values between 1.0-2.3 nm (10-20 inch lbs.) for used or 1.7-3.4 nm (15-30 inch lbs.) for new bearings. Small steps of additional torque to the pinion nut may be needed to obtain the specified measurements then multiple rotations of the pinion will validate correct bearing seating. The final steps include replacing the Differential assembly followed by lubricant addition to the axle before lowering the vehicle.


Related Cadillac Parts
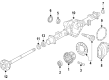
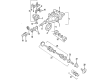
 Cadillac Differential
 Cadillac Drive Shaft
 Cadillac Axle Shaft
 Cadillac CV Boot
 Cadillac CV Joint
 Cadillac Differential Bearing
 Cadillac Differential Cover
 Cadillac Differential Seal
 Cadillac Driveshaft Yokes
 Cadillac Pinion Washer
 Cadillac Slip Yoke
 Cadillac Universal Joint