ChevyParts
My Garage
My Account
Cart
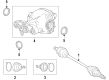
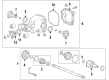
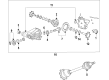
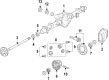
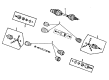
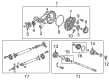
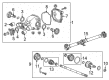
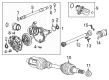
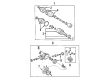
OEM Cadillac Drive Shaft
Axle Shaft- Select Vehicle by Model
- Select Vehicle by VIN
Select Vehicle by Model
orMake
Model
Year
Select Vehicle by VIN
For the most accurate results, select vehicle by your VIN (Vehicle Identification Number).
107 Drive Shafts found

Cadillac Drive Shaft Part Number: 23440333
$810.39 MSRP: $1573.06You Save: $762.67 (49%)Ships in 1-3 Business DaysProduct Specifications- Other Name: Shaft Assembly-Propeller; Driveshaft; Shaft, Propeller
Cadillac Drive Shaft Part Number: 23465054
$702.67 MSRP: $1369.71You Save: $667.04 (49%)Ships in 1-3 Business DaysProduct Specifications- Other Name: Shaft Assembly-Propeller; Driveshaft; Shaft, Propeller
- Replaces: 22761751


Cadillac Drive Shaft Part Number: 84859330
$426.34 MSRP: $670.83You Save: $244.49 (37%)Ships in 1-3 Business DaysProduct Specifications- Other Name: Shaft Assembly-Propeller; Driveshaft; Shaft, Propeller
- Replaced by: 86519099
- Replaces: 84717493, 84568313

Cadillac Drive Shaft Part Number: 23280385
$590.44 MSRP: $933.22You Save: $342.78 (37%)Ships in 1-3 Business DaysProduct Specifications- Other Name: Shaft Assembly-Propeller; Driveshaft; Shaft, Propeller
- Replaced by: 23339370

Cadillac Drive Shaft Part Number: 84997911
$481.65 MSRP: $761.28You Save: $279.63 (37%)Ships in 1-3 Business DaysProduct Specifications- Other Name: Shaft Assembly-Propeller; Shaft, Propeller
- Replaced by: 87821416


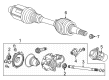
Cadillac Axle Shafts, Rear Part Number: 84649188
$104.61 MSRP: $163.86You Save: $59.25 (37%)Ships in 1-3 Business DaysProduct Specifications- Other Name: Shaft Assembly-Rear Axle; Axle Shaft
- Position: Rear

Cadillac Drive Shaft Part Number: 84202540
$1030.35 MSRP: $1628.53You Save: $598.18 (37%)Ships in 1-3 Business DaysProduct Specifications- Other Name: Shaft Assembly-Propeller; Driveshaft; Drive Shaft Assembly; Shaft, Propeller
- Replaces: 22760929, 23469163, 23251186

Cadillac Drive Shaft Part Number: 84859331
$532.40 MSRP: $841.29You Save: $308.89 (37%)Ships in 1-3 Business DaysProduct Specifications- Other Name: Shaft Assembly-Propeller; Driveshaft; Drive Axle
- Replaced by: 86519100
Cadillac Axle Assembly Part Number: 26023855
$468.86 MSRP: $741.05You Save: $272.19 (37%)Ships in 1-3 Business DaysProduct Specifications- Other Name: Shaft Kit; CV Axle Assembly; Axle Shaft; CV Axle
- Replaced by: 26078548

Cadillac Drive Shaft Part Number: 84055550
$373.71 MSRP: $587.88You Save: $214.17 (37%)Ships in 1-3 Business DaysProduct Specifications- Other Name: Shaft Assembly-Propeller; Driveshaft; Drive Shaft Assembly; Shaft, Propeller
Cadillac Drive Shaft Part Number: 23440334
$705.29 MSRP: $907.71You Save: $202.42 (23%)Product Specifications- Other Name: Shaft Assembly-Propeller; Driveshaft; Shaft, Propeller

Cadillac Drive Shaft Part Number: 23282618
$692.22 MSRP: $1094.06You Save: $401.84 (37%)Ships in 1-3 Business DaysProduct Specifications- Other Name: Shaft Assembly-Propeller; Driveshaft; Shaft, Propeller

Cadillac Drive Shaft Part Number: 84997912
$338.82 MSRP: $533.12You Save: $194.30 (37%)Ships in 1-3 Business DaysProduct Specifications- Other Name: Shaft Assembly-Propeller; Shaft, Propeller
- Replaced by: 85816901
- Replaces: 84712239
Cadillac Drive Shaft Part Number: 84890312
$428.01 MSRP: $702.33You Save: $274.32 (40%)Ships in 1-2 Business DaysProduct Specifications- Other Name: Shaft Assembly-Propeller; Driveshaft; Drive Shaft Assembly; Shaft, Propeller
- Replaces: 84055551, 84684900, 84643838

Cadillac Axle Assembly, Front Passenger Side Part Number: 84422108
$196.84 MSRP: $309.72You Save: $112.88 (37%)Ships in 1-3 Business DaysProduct Specifications- Other Name: Shaft Assembly-Front Wheel Drive Half; Axle Shaft
- Position: Front Passenger Side
- Replaced by: 87829456
Cadillac Drive Shaft Part Number: 23339369
$738.98 MSRP: $1167.98You Save: $429.00 (37%)Ships in 1-3 Business DaysProduct Specifications- Other Name: Shaft Assembly-Propeller; Driveshaft; Shaft, Propeller
- Replaces: 23280384, 23465055
Cadillac Drive Shaft Part Number: 23279085
$607.82 MSRP: $960.68You Save: $352.86 (37%)Ships in 1-3 Business DaysProduct Specifications- Other Name: Shaft Assembly-Propeller; Driveshaft; Shaft, Propeller
- Replaces: 23121563, 22935469

Cadillac Drive Shaft Part Number: 25752723
$243.81 MSRP: $904.77You Save: $660.96 (74%)Ships in 1-2 Business DaysProduct Specifications- Other Name: Shaft, Propeller; Driveshaft
- Replaces: 25757679

Cadillac Axle Assembly, Front Passenger Side Part Number: 84422106
$206.82 MSRP: $325.43You Save: $118.61 (37%)Ships in 1-3 Business DaysProduct Specifications- Other Name: Shaft Assembly-Front Wheel Drive Half; Axle Shaft
- Position: Front Passenger Side
- Replaced by: 87829454
Cadillac Drive Shaft Part Number: 23282617
$516.36 MSRP: $816.15You Save: $299.79 (37%)Product Specifications- Other Name: Shaft Assembly-Propeller; Driveshaft; Shaft, Propeller
- Replaces: 23121562, 22935468
| Page 1 of 6 |Next >
1-20 of 107 Results
Cadillac Drive Shaft
Want to cut long-term maintenance and repair costs? Choose OEM Drive Shaft. Those parts deliver top durability you can trust. On our site, you'll find a huge catalog of genuine Cadillac parts. Prices are unbeatable, so you can keep more in your pocket. Every OEM Cadillac Drive Shaft includes a manufacturer's warranty. You can also get an easy return policy that keeps buying risk free. Fast delivery, get your car on the road quickly. It's simple to search, compare, and order. Stop guessing about quality or fit. Order today and save with parts that last.
Cadillac Drive Shaft Parts Questions & Experts Answers
- Q: How to replace the rear Drive Shaft on Cadillac Escalade?A:The first step to change the rear propeller shaft requires accurate markings of driveline elements relative to the shafts and axles prior to disassembly which includes both propeller shafts and drive axles and pinion flanges and output shafts requiring exact reassembly positioning as original. You should raise the vehicle to note the propeller shaft position regarding the front yoke of the rear axle and both the transmission and Transfer Case. Use a socket and wrench to remove the boltages as well as yoke retainers attached to the rear axle pinion yoke . Refrain from using tools along the yoke and Universal Joint interface and prevent striking the ears of the yoke while removing it. To remove the propeller shaft from the vehicle start by sliding the rear axle pinion yoke forward after disconnecting it from the transmission or Transfer Case motion. The Slip Yoke splines require inspection for proper lubrication after which you should apply gm p/n 12345879 (Canadian P/N 10953511) or equivalent lubrication matching gm specification 9985830 (RWD w/4 speed Automatic Transmission). To install the propeller shaft in the transmission or Transfer Case identify reference marks from removal resulting in proper shaft alignment with the rear axle pinion yoke where appropriate reference marks should be situated. First install the retainers and bolts and then secure the yoke retainer bolts until they achieve a torque of 25 n.m (18 lb ft). Finally, lower the vehicle.
- Q: How to replace the front drive shaft in an AWD on Cadillac CTS?A:The first step to replace front propeller shaft in an awd vehicle starts with vehicle elevation and support. Remove the lower engine shield and the right Catalytic Converter and front drive axle heat shield while taking notes about the propeller shaft position relative to the transfer case flanges and front drive axle. Start by untightening the transfer case drive flange front propeller mounting bolts and their corresponding locks followed by the detachments of front drive axle front propeller mounting bolts and their locks from the front drive axle. The front propeller shaft detachment requires a flat-bladed screwdriver to separate it from both transfer case and front drive axle drive flanges before removing the shaft from the vehicle. To install the propeller shaft maintain proper cone positioning inside the drive flanges after ensuring the reference marks on the shaft match correctly with both transfer case and front drive axle drives. Drive the propeller shaft into first the front drive axle flange followed by the transfer case drive flange. Tighten mounting bolts and locks of the front drive axle flange first then the mounting bolts and locks of the rear drive axle flange in sequence to a torque of 40 n.m (29 lb ft). The repair work requires reinstalling the front drive axle heat shield along with the right Catalytic Converter and lower engine shield before the support is removed and the vehicle is lowered.
- Q: How to Service and Repair the Drive Shaft on a Cadillac SRX?A:Begin front propeller shaft replacement by supporting the car from its height and eliminating the propeller shaft heat shield. Take time to mark the propeller shaft CV Joint position relative to the transfer case flange. First remove the propeller shaft CV Joint-to-differential flange bolts before putting a flat-bladed tool into the differential flange notch. The front end propeller shaft movement toward the car's rear will free up the CV Joint from its connection with the differential pinion flange before removing the CV Joint-to-transfer case flange bolts. The transfer case will release from its connection point by inserting a flat-bladed tool into the notch located on the transfer case flange and then moving the propeller shaft ahead of the vehicle's frame. The inspection of the propeller shaft must involve tests for rotational freedom between the CV Joint and propeller shaft tube and evaluations of grease leakage and CV Joint damage or CV Joint seal damage in addition to identifying any CV Joint binding. Front propeller shaft replacement is needed when problems are discovered. To mount the propeller shaft the transfer case flange requires alignment with the coned CV Joint before fastening the shaft to both flange types. Replace damaged and worn propeller shaft-to-flange bolts before applying gm p/n 12345493 threadlocker to cleaned threads for the bolts which will need 10 minutes to cure. The threadlocker needs 10 minutes of cure time before applying it to components. Secure the CV Joint-to-differential flange bolts by using crescent washers before torquing them in sequential order to 40 n.m (29 lb ft). The repair process for propeller shaft-to-flange bolts should be repeated then followed by installing the front propeller shaft coupler-to-transfer case flange bolts with crescent washers which must be tightened in order to 40 n.m (29 lb ft) torque values to prevent CV Joint rotational movement with respect to the propeller shaft tube. Place the propeller shaft heat shield in its proper position then lower the vehicle.


