ChevyParts
My Garage
My Account
Cart
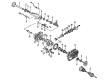
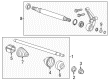
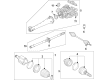
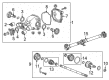
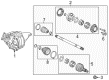
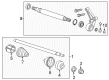
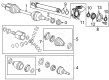
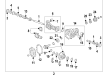
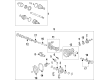
OEM Cadillac CV Boot
Axle Boot- Select Vehicle by Model
- Select Vehicle by VIN
Select Vehicle by Model
orMake
Model
Year
Select Vehicle by VIN
For the most accurate results, select vehicle by your VIN (Vehicle Identification Number).
81 CV Boots found


Cadillac Inner Boot, Front Part Number: 26062618
$33.23 MSRP: $54.75You Save: $21.52 (40%)Product Specifications- Other Name: Boot Kit, Front Wheel Drive Axle Shaft; CV Boot; Outer Boot; Boot Kit, Front Axle
- Position: Front


Cadillac Inner CV Joint Boot, Front Part Number: 84148576
$37.61 MSRP: $58.91You Save: $21.30 (37%)Ships in 1-3 Business DaysProduct Specifications- Other Name: Boot Kit, Front Wheel Drive Axle Shaft; CV Boot; Inner Boot
- Position: Front

Cadillac Inner Boot, Front Part Number: 20957184
$44.33 MSRP: $60.69You Save: $16.36 (27%)Ships in 1-3 Business DaysProduct Specifications- Other Name: Boot Kit, Front Wheel Drive Axle Shaft; CV Boot
- Position: Front

Cadillac Outer CV Joint Boot, Rear Part Number: 84207678
$24.12 MSRP: $37.78You Save: $13.66 (37%)Ships in 1-3 Business DaysProduct Specifications- Other Name: Boot Kit-Rear Wheel Drive Shaft CV Joint; CV Boot; Outer Boot
- Position: Rear

Cadillac Outer Boot, Rear Passenger Side Part Number: 19260856
$38.60 MSRP: $61.28You Save: $22.68 (38%)Ships in 1-2 Business DaysProduct Specifications- Other Name: Boot Kit, Rear Axle Universal Joint; CV Boot
- Position: Rear Passenger Side
Cadillac Outer Boot, Rear Driver Side Part Number: 84150160
$38.83 MSRP: $60.82You Save: $21.99 (37%)Ships in 1-3 Business DaysProduct Specifications- Other Name: Boot Kit-Rear Wheel Drive Shaft CV Joint; CV Boot; Boot Kit, Rear Axle Universal Joint
- Position: Rear Driver Side
Cadillac Outer CV Joint Boot, Rear Part Number: 84207690
$14.77 MSRP: $36.04You Save: $21.27 (60%)Ships in 1-2 Business DaysProduct Specifications- Other Name: Boot Kit-Rear Wheel Drive Shaft CV Joint; CV Boot; Outer Boot
- Position: Rear

Cadillac Outer Boot, Rear Part Number: 19206244
$189.81 MSRP: $301.35You Save: $111.54 (38%)Product Specifications- Other Name: Boot Kit, Rear Axle Universal Joint; CV Boot; Inner Boot
- Position: Rear

Cadillac Inner Boot, Front Part Number: 19302754
$62.80 MSRP: $98.36You Save: $35.56 (37%)Ships in 1-3 Business DaysProduct Specifications- Other Name: Boot Kit, Front Wheel Drive Axle Shaft; CV Boot
- Position: Front
Cadillac Inner CV Joint Boot, Rear Part Number: 84387105
$31.73 MSRP: $49.71You Save: $17.98 (37%)Ships in 1-3 Business DaysProduct Specifications- Other Name: Boot Kit-Rear Wheel Drive Shaft Tri-Pot Joint; CV Boot; Inner Boot
- Position: Rear
- Replaces: 84207571
Cadillac Outer CV Joint, Rear Part Number: 19260858
$38.96 MSRP: $61.85You Save: $22.89 (38%)Ships in 1-2 Business DaysProduct Specifications- Other Name: Boot Kit, Rear Axle Universal Joint; CV Joint; CV Boot; Outer Boot
- Position: Rear
Cadillac Inner CV Joint Boot, Rear Part Number: 84387108
$30.80 MSRP: $48.24You Save: $17.44 (37%)Ships in 1-3 Business DaysProduct Specifications- Other Name: Boot Kit-Rear Wheel Drive Shaft Tri-Pot Joint; CV Boot; Inner Boot; Boot Kit, Rear Axle Universal Joint
- Position: Rear
- Replaces: 84207708


Cadillac Inner Boot, Front Part Number: 26062615
$27.79 MSRP: $43.53You Save: $15.74 (37%)Product Specifications- Other Name: Boot Kit, Front Wheel Drive Axle Shaft; CV Boot; Boot Kit, Front Axle
- Position: Front


Cadillac Outer CV Joint Boot, Front Part Number: 13318003
$19.75 MSRP: $30.94You Save: $11.19 (37%)Product Specifications- Other Name: Boot Kit, Front Wheel Drive Axle Shaft; CV Boot; Outer Boot; Boots
- Position: Front


Cadillac Seal Kit, Front Part Number: 26059842
Product Specifications- Other Name: Boot Kit, Front Axle; CV Boot; CV Joint Boot Kit for Front Wheel Drive Axle Shaft; includes outer and inner seals.
- Position: Front
- Replaces: 26099016


Cadillac Outer Boot, Front Part Number: 26037370
Product Specifications- Other Name: Boot Kit, Front Axle; CV Boot
- Position: Front
- Replaces: 26032807

Cadillac Boot Kit, Front Part Number: 84392104
$27.14 MSRP: $42.51You Save: $15.37 (37%)Product Specifications- Other Name: Boot Kit, Front Wheel Drive Axle Shaft; CV Boot; Outer Boot
- Position: Front
- Replaced by: 87842370

Cadillac Inner CV Joint Boot, Front Part Number: 87863492
$39.03 MSRP: $61.13You Save: $22.10 (37%)Product Specifications- Other Name: Boot Kit, Front Wheel Drive Axle Shaft; Inner Boot; Boot Kit, Front Axle
- Position: Front

Cadillac Outer CV Joint Boot, Front Part Number: 87842370
$27.14 MSRP: $42.51You Save: $15.37 (37%)Product Specifications- Other Name: Boot Kit, Front Wheel Drive Axle Shaft; Outer Boot; Boot Kit, Front Axle
- Position: Front
- Replaces: 84392104

Cadillac Inner CV Joint Boot, Front Part Number: 39196364
$21.96 MSRP: $34.40You Save: $12.44 (37%)Product Specifications- Other Name: Boot Kit, Front Wheel Drive Axle Shaft; CV Boot; Inner Boot; Boots
- Position: Front
- Replaces: 13333928
| Page 1 of 5 |Next >
1-20 of 81 Results
Cadillac CV Boot
Want to cut long-term maintenance and repair costs? Choose OEM CV Boot. Those parts deliver top durability you can trust. On our site, you'll find a huge catalog of genuine Cadillac parts. Prices are unbeatable, so you can keep more in your pocket. Every OEM Cadillac CV Boot includes a manufacturer's warranty. You can also get an easy return policy that keeps buying risk free. Fast delivery, get your car on the road quickly. It's simple to search, compare, and order. Stop guessing about quality or fit. Order today and save with parts that last.
Cadillac CV Boot Parts Questions & Experts Answers
- Q: How to replace the Front CV Boot and CV Joint on a Wheel Drive Shaft Inner Joint on Cadillac CTS?A:To replace the front wheel drive shaft inner joint boot you must first take off the wheel drive shaft and secure it to a soft jawed vise. Use a flat bladed tool to unattach the boot retaining clamp from the boot for the tripot housing, and side cutters for boot clamp from the boot for wheel drive shaft. Subsequently, remove the tripod housing from the wheel drive shaft and use the required tool to remove retaining clip and the tripot spider from the wheel drive shaft . Take off the boot from the wheel drive shaft and check the inner joint for damage and excess wear. To assemble, place the boot and the clamp on the wheel drive shaft while making sure that the boot is located in the grooved wheel drive shaft. Mount the tripot spider assembly until it is pressed against the shoulder and mount the retaining ring in the wheel drive shaft by using the tool suited for the task. Close the boot clamp with the j 42572 - drive shaft seal clamp pliers , ensuring the gap will be 1.0 mm (0.040 in). Add half of the lubricant into the boot and half into the tripot housing, after that mount the tripod housing on the wheel drive shaft. Put the boot clamp on the boot for tripot housing and the boot clamp on the boot for wheel drive . Lastly, clamp the boot using the j 35566 - earless seal clamp tool, clean off extra lubricant from the wheel drive shaft, and rotate the tripot housing assembly in order to spread lubricant around the tripot joint before the installation of the wheel drive shaft.
- Q: How to replace the front outer CV Boot and CV Joint on Cadillac SRX?A:If you want to repair or replace the front wheel drive shaft outer joint along with its seal start by removing the drive shaft from your vehicle. Install the j 42572 drive shaft seal clamp pliers on the Axle Shaft to crimp the small retaining clamp after wrapping both pieces with a shop towel. Position the wheel drive shaft horizontally in a bench vise before extracting the large and small seal retaining clamps from the outer joint seal using a side cutter tool. Use j 42572 drive shaft seal clamp pliers to first clamp the small seal retaining clamp onto the Axle Shaft by wrapping this area with a shop towel. Then separate the seal from the joint outer race and wipe away the grease from the joint inner race, cage, and balls. Use a horizontally positioned outer joint housing while placing a wood block between seal and joint for hammering the block. A brass drift against the inner race compresses the Axle Shaft retaining clip when needed. Discard the Axle Shaft retaining ring and seal but clean all parts with solvent before inspecting for damage following outer joint removal. Assemble the cage with its larger curve corners facing upwards before you insert the inner race component. Verify complete assembly before proceeding. Drive balls inside the element one after another while feeding service kit grease at 60 percent concentration into the outer joint until all balls cover the slots between cage pockets. Once the Axle Shaft receives a new retaining clamp and seal along with a new retaining ring needs installation. Insert the inner race splines into the Axle Shaft splines before compressing the Axle Shaft retaining ring and driving the outer joint onto the shaft with a wood block and hammer. Use the j 42572 drive shaft seal clamp pliers to crimp both sets of retaining clamps before checking the outer joint's motion through wheel drive shaft rotation.
- Q: How to replace the outer CV Boot and CV Joint on Cadillac XLR?A:To replace wheel drive shaft outer joint and boot, you will need to pick up some tools which include. Pliers for drive axle seal clamp, (J42572) and axle seal crimp tool (J46588). Start by wrapping a shop towel around the Axle Shaft and fix the wheel drive shaft on a horizontal position in a bench vise. Dislodge the large retaining clamp for the seal from the cv joint seal using the axle seal crimp tool (J 46588), followed by the small retaining clamp which can be cut off with a side cutter. Dissassemble the seal from the outer race of the joint and wipe away the grease from the pieces of the joint and separate the outer joint from the Axle Shaft by applicating the retaining clip of the Axle Shaft by means of wood block and hammer. After removing the Axle Shaft retaining ring and seal, make sure you to clean every component with solvent and leave them in air till they dried out. In case of installation, align the cage and the inner race accurately, install the inner race in the cage with the grooved surface facing up. Align the cage and inner to outer race and install the balls sequentially without any gaps. The new small seal retaining clamp should then be installed onto the Axle Shaft followed by installation of the seal and Axle Shaft retaining ring by using grease from the service kit. Push the inner race splines onto the Axle Shaft and compress the retaining ring, drive the outer joint on to the shaft using a wood block and hammer. Finally, crimp the small seal retain clamp using drive axle seal clamp pliers (J 42572) and latch the large clamp using axle seal crimp tool (J 46588) with the appropriate alignment of all parts and inspected for damages prior to reinstallation.


