ChevyParts
My Garage
My Account
Cart
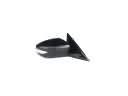
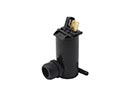
OEM Cadillac Washer Reservoir
Windshield Washer Reservoir- Select Vehicle by Model
- Select Vehicle by VIN
Select Vehicle by Model
orMake
Model
Year
Select Vehicle by VIN
For the most accurate results, select vehicle by your VIN (Vehicle Identification Number).
63 Washer Reservoirs found


Cadillac Washer Reservoir Part Number: 13311008
$27.41 MSRP: $48.93You Save: $21.52 (44%)Ships in 1-2 Business DaysProduct Specifications- Other Name: Container, Windshield Washer Solvent; Reservoir; Container, Windshield Washer


Cadillac Washer Reservoir Part Number: 22927764
$75.29 MSRP: $117.50You Save: $42.21 (36%)Product Specifications- Other Name: Container, Windshield Washer

Cadillac Washer Reservoir Part Number: 85148186
$47.43 MSRP: $84.70You Save: $37.27 (44%)Ships in 1-3 Business DaysProduct Specifications- Other Name: Container, Windshield Washer; Reservoir

Cadillac Washer Reservoir Part Number: 84898655
$73.33 MSRP: $130.94You Save: $57.61 (44%)Ships in 1-2 Business DaysProduct Specifications- Other Name: Container, Windshield Washer

Cadillac Washer Reservoir Part Number: 15942521
$50.00 MSRP: $89.28You Save: $39.28 (44%)Ships in 1-2 Business DaysProduct Specifications- Other Name: Reservoir Assembly; Reservoir
- Replaced by: 20999339
Cadillac Washer Reservoir Part Number: 84766488
$120.82 MSRP: $216.72You Save: $95.90 (45%)Product Specifications- Other Name: Container, Windshield Washer; Reservoir
- Replaces: 84475653

Cadillac Washer Reservoir Part Number: 20865557
$36.09 MSRP: $56.53You Save: $20.44 (37%)Ships in 1-3 Business DaysProduct Specifications- Other Name: Container Kit, Windshield Washer

Cadillac Reservoir Part Number: 23140046
$118.21 MSRP: $185.99You Save: $67.78 (37%)Ships in 1-3 Business DaysProduct Specifications- Other Name: Container, Windshield Washer
- Replaces: 22905716

Cadillac Washer Reservoir Part Number: 84964546
$77.91 MSRP: $122.00You Save: $44.09 (37%)Ships in 1-3 Business DaysProduct Specifications- Other Name: Container, Windshield Washer; Reservoir
- Replaces: 84563484

Cadillac Washer Reservoir Part Number: 84942152
$77.75 MSRP: $121.75You Save: $44.00 (37%)Ships in 1-3 Business DaysProduct Specifications- Other Name: Container, Windshield Washer; Reservoir
- Replaces: 84562344

Cadillac Reservoir Part Number: 23231226
$146.87 MSRP: $231.10You Save: $84.23 (37%)Ships in 1-3 Business DaysProduct Specifications- Other Name: Container, Windshield Washer
- Replaces: 23144364

Cadillac Washer Reservoir Part Number: 19257295
$48.45 MSRP: $75.91You Save: $27.46 (37%)Ships in 1-3 Business DaysProduct Specifications- Other Name: Container, Windshield Washer Solvent; Container, Windshield Washer
- Replaces: 19207319

Cadillac Washer Reservoir Part Number: 23354831
$45.48 MSRP: $71.24You Save: $25.76 (37%)Ships in 1-3 Business DaysProduct Specifications- Other Name: Container, Windshield Washer
Cadillac Washer Reservoir Part Number: 25866754
$31.28 MSRP: $49.02You Save: $17.74 (37%)Ships in 1-3 Business DaysProduct Specifications- Other Name: Container Kit-Windshield Washer Solvent

Cadillac Washer Reservoir Part Number: 23310397
$63.32 MSRP: $99.16You Save: $35.84 (37%)Ships in 1-3 Business DaysProduct Specifications- Other Name: Container, Windshield Washer

Cadillac Washer Reservoir Part Number: 84816823
$65.26 MSRP: $102.21You Save: $36.95 (37%)Ships in 1-3 Business DaysProduct Specifications- Other Name: Container, Windshield Washer; Reservoir

Cadillac Washer Reservoir Part Number: 84560880
$77.29 MSRP: $121.05You Save: $43.76 (37%)Ships in 1-3 Business DaysProduct Specifications- Other Name: Container, Windshield Washer; Reservoir
- Replaced by: 86506881

Cadillac Washer Reservoir Part Number: 88958119
$147.90 MSRP: $232.71You Save: $84.81 (37%)Ships in 1-3 Business DaysProduct Specifications- Other Name: Container, Windshield Washer

Cadillac Washer Reservoir Part Number: 88958249
$193.71 MSRP: $256.50You Save: $62.79 (25%)Ships in 1-2 Business DaysProduct Specifications- Other Name: Container, Windshield Washer Solvent; Container, Windshield Washer


Cadillac Washer Reservoir Part Number: 10367083
$67.54 MSRP: $105.79You Save: $38.25 (37%)Product Specifications- Other Name: Container Kit, Windshield Washer; Container, Windshield Washer
| Page 1 of 4 |Next >
1-20 of 63 Results
Cadillac Washer Reservoir
Want to cut long-term maintenance and repair costs? Choose OEM Washer Reservoir. Those parts deliver top durability you can trust. On our site, you'll find a huge catalog of genuine Cadillac parts. Prices are unbeatable, so you can keep more in your pocket. Every OEM Cadillac Washer Reservoir includes a manufacturer's warranty. You can also get an easy return policy that keeps buying risk free. Fast delivery, get your car on the road quickly. It's simple to search, compare, and order. Stop guessing about quality or fit. Order today and save with parts that last.
Cadillac Washer Reservoir Parts Questions & Experts Answers
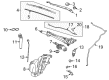
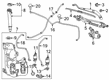
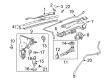
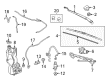
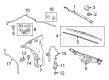
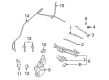
- Q: How to replace the washer reservoir without RPO code CE4 on Cadillac CTS?A:You must begin by opening the hood and lifting the condenser seal to access the washer solvent container for replacement when rpo code ce4 is absent. Use a tool to remove both the washer solvent container cap and the bolt that holds the fill neck to the upper tie bar. Start by taking off both the lower air deflector and the headlamp which matches the vehicle's left-hand drive configuration for lhd or right-hand drive configuration for rhd. Move solvent out of the container while you unplug the washer hose from the Washer Pump and detach the electrical connector which holds the washer solvent container in place. Only disconnect the electrical connectors of both the Washer Pump and washer solvent level sensor before removing the fasteners securing the container. Move the clinch nut off the horizontal bracket body rail connection before lifting the container from its key hole slot position in the body rail and guiding the fill neck through the radiator support for removal from the vehicle. Place the Washer Pump together with the washer level sensor and horizontal bracket and container cap into the new container. The washer system installation requires users to attach washer components to the new container followed by filling the radiator support with the filler neck and securing the electrical harness retainer clip. Position the container over the stud on the tie bar outer reinforcement panel before fitting the clinch nut stud into the key hole slot on the body rail. Verify that the stud rests properly on the panel. Install the six nuts at positions 1, 2 and 6 and tighten them to 6 n.m (53 lb in) torque specification together with both the clinch nut and the horizontal bracket nut set to the same level. Use washer hose to link the Washer Pump to its counterpart device. Pair electrical connectors by attaching one to Washer Pump and another to washer solvent level sensor. Secure the bolt to the upper tie bar then apply torque at 6 n.m (53 lb in). Afterward replace the front bumper fascia with the headlamp assembly and lower air deflector. Position the condenser seal while filling the washer solvent container until you install the cap then close the hood.
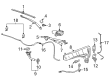
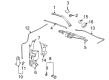
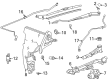
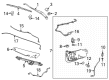
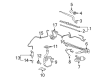
- Q: How to replace the washer reservoir on Cadillac SRX?A:First open the hood and remove the cap from washer solvent container to perform replacement. Begin by removing both the lower air deflector and the front bumper fascia then unplug the passenger side headlamp for lhd or the driver side headlamp for rhd configurations. Remove the washer fluid before disconnecting its hoses from the washing pumps. Detach the container electrical connector retention clip while also separating electrical links from washer pumps and washer solvent level sensor. Unfasten the container and direct its fill neck down through the radiator support until you can fully remove the system from the vehicle. Install the washer pumps with washer level sensor into the new washer solvent container as you put the horizontal bracket and container cap on it. Feed the new container's filler tube up through its radiator support space and lock the electrical connection piece. Insert the solvent container fasteners into place and tighten them to 6 n.m (53 lb in). Plug the washer hose and electrical wires into their correct positions on each Washer Pump and the washer solvent fuel gauge. Put back the headlamp unit along with the front bumper and lower air deflector. Fit the washer solvent container filler neck over the upper tie bar and fasten it with a bolt at 6 n.m torque. Use washer solvent to fill the container and seal it with the cap while closing the hood.
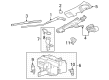
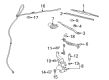
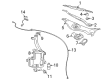
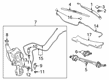
- Q: How to replace the washer reservoir on Cadillac XLR?A:Open the hood first, then use a tool to take out the plastic retainer from the upper neck of the washer solvent container filler tube , which is located by the master cylinder. Make sure the lift does not hit the left front fender by raising and supporting the vehicle. Take out the left front wheel and fasteners (1, 2, 3) from the left front wheelhouse splash shield, making sure to remember how the fender is positioned. Cut the output hose away from the Washer Pump and pour out the washer solvent into an appropriate container. Pull the retaining tab to disconnect the headlamp washer output line , and take off the electrical connectors from both washer pumps and the level sensor. Take the washer solvent container mounting bolts (1, 2) out, and lift the container off while making sure not to let the fender get in the way. For assembly, put the washer pumps and level sensor into the new container, and then put the washer solvent container in place. Put the bolts back in place and make sure to tighten them to 11 n.m (97 lb in). Connect the electrical wires to the washer pumps and level sensor, then secure both the Washer Pump output hose and the headlamp washer output hose , making sure the hose clamp slides into place. Place the fender in alignment and fit back the left front lower wheelhouse splash shield and fasteners (1, 2, 3), and then put on the left front wheel. After lowering the vehicle, put a new plastic retainer onto the washer solvent container tube, and fill the container with washer solvent. Finally, make sure to test the headlamp Washer Pump, windshield Washer Pump, level sensor, and the warning lamp.