ChevyParts
My Garage
My Account
Cart
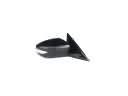
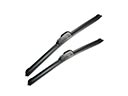
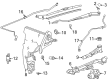
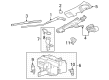
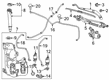
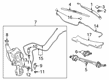
OEM Cadillac Wiper Arm
Windshield Wiper Arm- Select Vehicle by Model
- Select Vehicle by VIN
Select Vehicle by Model
orMake
Model
Year
Select Vehicle by VIN
For the most accurate results, select vehicle by your VIN (Vehicle Identification Number).
114 Wiper Arms found


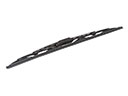
Cadillac Wiper Insert, Passenger Side Part Number: 15890057
$16.07 MSRP: $28.70You Save: $12.63 (45%)Ships in 1-2 Business DaysProduct Specifications- Other Name: Wiper Assembly-Windshield; Insert; Wiper, Windshield Wiper Blade
- Position: Passenger Side


Cadillac Wiper Arm, Passenger Side Part Number: 22917500
$53.45 MSRP: $95.44You Save: $41.99 (44%)Product Specifications- Other Name: Arm, Windshield Wiper Transmission
- Position: Passenger Side
- Replaces: 25872302, 20959488, 20773356


Cadillac Wiper Arm, Passenger Side Part Number: 15043063
$44.93 MSRP: $80.24You Save: $35.31 (45%)Ships in 1-3 Business DaysProduct Specifications- Other Name: Arm, Windshield Wiper; Arm, Windshield Wiper Transmission
- Position: Passenger Side
- Replaces: 15010226, 22144822


Cadillac Wiper Arm, Driver Side Part Number: 22872978
$78.95 MSRP: $140.98You Save: $62.03 (44%)Product Specifications- Other Name: Arm, Windshield Wiper Arm; Front Arm
- Position: Driver Side
- Replaces: 20837225

Cadillac Wiper Arm, Driver Side Part Number: 25872299
$49.31 MSRP: $88.06You Save: $38.75 (44%)Product Specifications- Other Name: Arm Assembly-Windshield Wiper (Non-Styled); Front Arm; Arm, Windshield Wiper Transmission
- Position: Driver Side
- Replaces: 15916551


Cadillac Wiper Arm, Driver Side Part Number: 22917502
$44.77 MSRP: $69.87You Save: $25.10 (36%)Product Specifications- Other Name: Arm, Windshield Wiper Transmission; Front Arm
- Position: Driver Side
- Replaces: 25879117


Cadillac Wiper Arm, Rear Part Number: 15711688
$91.58 MSRP: $163.54You Save: $71.96 (44%)Ships in 1-2 Business DaysProduct Specifications- Other Name: Arm, Rear Window Wiper/Washer
- Position: Rear


Cadillac Wiper Blade Insert, Driver Side Part Number: 25892081
$7.78 MSRP: $13.91You Save: $6.13 (45%)Product Specifications- Other Name: Wiper-Windshield; Wiper, Windshield Wiper Blade
- Position: Driver Side

Cadillac Wiper Insert, Driver Side Part Number: 20932035
$6.69 MSRP: $11.95You Save: $5.26 (45%)Ships in 1-3 Business DaysProduct Specifications- Other Name: Wiper Assembly-Windshield; Insert; Wiper, Windshield Wiper Blade
- Position: Driver Side

Cadillac Wiper Arm, Driver Side Part Number: 20910191
$39.02 MSRP: $69.69You Save: $30.67 (45%)Ships in 1-3 Business DaysProduct Specifications- Other Name: Arm-Windshield Wiper; Arm, Windshield Wiper Arm
- Position: Driver Side

Cadillac Wiper Arm, Driver Side Part Number: 20791463
$34.46 MSRP: $61.54You Save: $27.08 (44%)Ships in 1-3 Business DaysProduct Specifications- Other Name: Arm, Windshield Wiper Arm
- Position: Driver Side

Cadillac Wiper Arm, Passenger Side Part Number: 23282660
$38.63 MSRP: $68.98You Save: $30.35 (44%)Ships in 1-3 Business DaysProduct Specifications- Other Name: Arm, Windshield Wiper Arm
- Position: Passenger Side

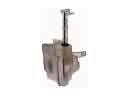
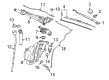
Cadillac Wiper Transmission Part Number: 84697726
$65.90 MSRP: $117.68You Save: $51.78 (44%)Ships in 1-3 Business DaysProduct Specifications- Other Name: Transmission, Windshield Wiper Transmission; Wiper Linkage; Gear & Linkage

Cadillac Wiper Arm, Passenger Side Part Number: 85594222
$37.96 MSRP: $67.78You Save: $29.82 (44%)Ships in 1-3 Business DaysProduct Specifications- Other Name: Arm, Windshield Wiper Arm
- Position: Passenger Side

Cadillac Wiper Arm, Passenger Side Part Number: 84697728
$39.93 MSRP: $71.30You Save: $31.37 (44%)Ships in 1-2 Business DaysProduct Specifications- Other Name: Arm, Windshield Wiper Arm
- Position: Passenger Side
Cadillac Wiper Arm, Driver Side Part Number: 23282659
$37.62 MSRP: $67.18You Save: $29.56 (44%)Ships in 1-3 Business DaysProduct Specifications- Other Name: Arm, Windshield Wiper Arm
- Position: Driver Side

Cadillac Wiper Arm, Driver Side Part Number: 84863618
$29.81 MSRP: $53.24You Save: $23.43 (45%)Ships in 1-3 Business DaysProduct Specifications- Other Name: Arm, Windshield Wiper Arm; Front Arm
- Position: Driver Side
- Replaces: 84273580

Cadillac Wiper Arm, Passenger Side Part Number: 84300512
$32.61 MSRP: $58.24You Save: $25.63 (45%)Ships in 1-3 Business DaysProduct Specifications- Other Name: Arm, Windshield Wiper Arm; Front Arm
- Position: Passenger Side

Cadillac Wiper Arm, Passenger Side Part Number: 84627535
$45.74 MSRP: $81.68You Save: $35.94 (44%)Ships in 1-3 Business DaysProduct Specifications- Other Name: Arm, Windshield Wiper Arm
- Position: Passenger Side
Cadillac Wiper Arm, Driver Side Part Number: 84934481
$34.32 MSRP: $61.28You Save: $26.96 (44%)Product Specifications- Other Name: Arm, Windshield Wiper Arm; Front Arm
- Position: Driver Side
- Replaces: 23308233, 84300511, 23299101
| Page 1 of 6 |Next >
1-20 of 114 Results
Cadillac Wiper Arm
Want to cut long-term maintenance and repair costs? Choose OEM Wiper Arm. Those parts deliver top durability you can trust. On our site, you'll find a huge catalog of genuine Cadillac parts. Prices are unbeatable, so you can keep more in your pocket. Every OEM Cadillac Wiper Arm includes a manufacturer's warranty. You can also get an easy return policy that keeps buying risk free. Fast delivery, get your car on the road quickly. It's simple to search, compare, and order. Stop guessing about quality or fit. Order today and save with parts that last.
Cadillac Wiper Arm Parts Questions & Experts Answers
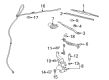
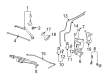
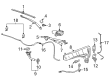
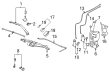
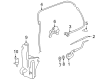
- Q: How to replace the wiper arm (RHD) on Cadillac CTS?A:Begin by parking the wipers in the park position and opening the hood assembly to replace the Wiper Arm (RHD). The wiper setting process includes the driver side wiper alignment with the orange line at the blade tip at the windshield center lower position and the passenger side wiper alignment with the orange dot at the Wiper Blade inner tip at the center lower windshield area. Begin by removing covers (2,5) on each Wiper Arm nut (3,6) while maintaining the arm in position to remove the nut (3,6). To remove the driver side Wiper Arm first detach the upper hood assist rods from the assist rod ball studs while applying pressure only at the end of the hood assist rod to prevent damage. Open the hood by moving it toward the air inlet grille panel and secure it with support. First attempt Wiper Arm removal from the Wiper Arm drive spindle using the Wiper Arm puller (J 39822), followed by drive spindle knurls cleaning with a fine wire brush before Wiper Blade removal from Wiper Arm. To install wiper blades first place the Wiper Blade on the Wiper Arm then guide the passenger side Wiper Arm by aligning its tip toward the orange dot on the windshield's outer lower edge while setting the driver side Wiper Arm by matching its tip with the orange line on the windshield's lower center. From the Drive Shaft position the Wiper Arm until it reaches the appropriate spot then fasten it in place with the nut using a torque of 35 n.m (26 lb ft) under steady Wiper Arm pressure. Install the hood assist rods into assist rod ball studs on the hood assembly while also securing the wiper nut covers before closing the hood for verification that the wipers and wash function correctly without the driver side wiper surpassing its designated wipe area.
- Q: How to replace the windshield wiper arm on Cadillac SRX?A:Start the work by showing wipers to the park position then lifting the hood latch. The driver side wiper must be placed against the orange line on the center lower part of the windshield tip while the passenger side wiper should rest on an orange dot beside the Wiper Blade on the right lower windshield area. Unscrew cover parts (2 and 5) from hand nuts (3 and 6) before removing hand nuts (3 and 6) from drive spindle parts. You must apply pressure to the end of the liftgate/hood assist rod at its removal or attachment point to prevent damage. When taking off the driver side Wiper Arm first disconnect the upper hood assist rod from both ball studs and lower the hood towards the air inlet for support. When the Wiper Arm refuses to loosen from its drive spindle employees must attach the j 39822 (Wiper Arm Puller) before they remove it. First clean the drive spindle knurls with a fine wire brush before you detach the wiperblade from the easy-release wiperarm. To put the Wiper Blade in place connect it first to the Wiper Arm then align the passenger blade tip to the orange dot and the driver blade tip to the orange line. Position the Wiper Arm on the drive spindle and keep it fixed while tightening the nut (3, 6) to 35 nm (26 lb ft). Fix the upper hood support rods to their metal ends on the hood panel then put on Wiper Arm covers before plugging in the hood. Use the wipers and wash mode to test operation making sure the steering side wiper stays within its set wiping range.
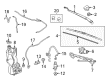
- Q: How to replace the wiper arm on Cadillac XLR?A:You must perform the following steps before replacing the Wiper Arm: open the hood, turn to accy ignition position, set the Wiper Switch to delay position. Put the Ignition Switch into off mode when the wiper arms stop their mid-stroke movement. Mark the windshield at each Wiper Blade with masking tape for wiper replacement orientation. Take off the washer hose connection to the air inlet grille and remove the Wiper Arm nut shield as well as the nut. Hold the hinged joint of the Wiper Arm and push it toward the windshield using rocking movements to free it from the wiper shaft before taking out both the Wiper Arm and the Wiper Blade . Install the Wiper Blade onto the Wiper Arm before checking if the wiper transmission shaft and Wiper Arm splines have corrosion. Clean these areas if necessary. Place the Wiper Blade tip against the masking tape marks on the windshield surface before fixing it onto the wiper transmission splined shaft. First fit the Wiper Arm nut on and torque it to 29 n.m (21 lb ft), and then place the Wiper Arm nut cover together with the washer hose back on the air inlet grille panel. Check the wiper movement after undoing the tape from the windshield.