ChevyParts
My Garage
My Account
Cart
OEM Chevrolet Aveo Front Cross-Member
Front Engine Cross Member- Select Vehicle by Model
- Select Vehicle by VIN
Select Vehicle by Model
orMake
Model
Year
Select Vehicle by VIN
For the most accurate results, select vehicle by your VIN (Vehicle Identification Number).
3 Front Cross-Members found

Chevrolet Aveo Suspension Crossmember Part Number: 95950333
$815.06 MSRP: $1224.06You Save: $409.00 (34%)Ships in 1-3 Business Days
Chevrolet Aveo Suspension Crossmember Part Number: 96653535
Chevrolet Aveo Suspension Crossmember Part Number: 96535050
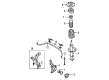
Chevrolet Aveo Front Cross-Member
Want to cut long-term maintenance and repair costs? Choose OEM Front Cross-Member. Those parts deliver top durability you can trust. On our site, you'll find a huge catalog of genuine Chevrolet Aveo parts. Prices are unbeatable, so you can keep more in your pocket. Every OEM Chevrolet Aveo Front Cross-Member includes a manufacturer's warranty. You can also get an easy return policy that keeps buying risk free. Fast delivery, get your car on the road quickly. It's simple to search, compare, and order. Stop guessing about quality or fit. Order today and save with parts that last.
Chevrolet Aveo Front Cross-Member Parts Questions & Experts Answers
- Q: How to replace the front cross-member of the suspension on Chevrolet Aveo?A:To change the front suspension crossmember, first, lift and prop the vehicle, then remove the front tire and wheel assemblies. Next, remove the Control Arm ball joint and stabilizer shaft link nut, lower and the tie rod end ball joint. Unbolt the mounts of the engine reaction rod and drain the power steering fluid before loosening off the fittings of the power steering pipe and the lower end of the intermediate shaft joint. It is very important to support the crossmember so that it does not drop when mounting bolts are removed. Following that, unfasten the crossmember assembly, and disconnect the stabilizer bar, power steering gear set, and Control Arm from the crossmember. For installation, start with the stabilizer bar, power steering gear set, and Control Arm installation onto the crossmember. Then, attach a crossmember to the assembly front pinned to the body nut and rear pinned to the body bolt and tighten them to 150 n.m (111 lb ft). Join the intermediate shaft lower joint and fittings of power steering pipe by ensuring that the fittings are tightened to 22 n.m (16 lb ft). Install the engine mounting reaction rod bolts with a torque of 60 n.m (44 lbs ft), then apply the nut for the tie rod end ball joint with 45 n.m (33 lb ft). In the last stages, you should install the Control Arm ball joint and stabilizer shaft link nut, lower and reattach the front tire and wheel assemblies, and lower the vehicle.

Related Chevrolet Aveo Parts
 Chevrolet Aveo Control Arm
 Chevrolet Aveo Control Arm Bushing
 Chevrolet Aveo Sway Bar Link
 Chevrolet Aveo Ball Joint
 Chevrolet Aveo Coil Spring Insulator
 Chevrolet Aveo Coil Springs
 Chevrolet Aveo Control Arm Bolt
 Chevrolet Aveo Shock Absorber
 Chevrolet Aveo Shock And Strut Mount
 Chevrolet Aveo Steering Knuckle
 Chevrolet Aveo Sway Bar Bracket
 Chevrolet Aveo Sway Bar Kit