ChevyParts
My Garage
My Account
Cart
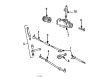
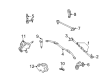
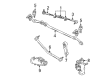
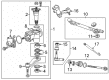
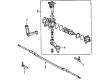
OEM Chevrolet Center Link
Steering Drag Center Link- Select Vehicle by Model
- Select Vehicle by VIN
Select Vehicle by Model
orMake
Model
Year
Select Vehicle by VIN
For the most accurate results, select vehicle by your VIN (Vehicle Identification Number).
37 Center Links found

Chevrolet Center Link Part Number: 26037645
$65.01 MSRP: $124.00You Save: $58.99 (48%)Product Specifications- Other Name: Rod Kit, Steering Connecting; Drag Link


Chevrolet Drag Link Part Number: 26039568
Product Specifications- Other Name: Rod, Steering Connecting; Center Link


Chevrolet Intermediate Rod Part Number: 26057014
Product Specifications- Other Name: Rod Kit, Steering Linkage Connect; Intermed Rod; Rod Kit, Steering Connecting


Chevrolet Center Link Part Number: 22913603
$216.22 MSRP: $340.21You Save: $123.99 (37%)Product Specifications- Other Name: Rod Kit, Steering Connecting; Steering Center Link; Drag Link


Chevrolet Center Link Part Number: 26001371
Product Specifications- Other Name: Rod; Steering Center Link; Drag Link


Chevrolet Drag Link Part Number: 26048566
Product Specifications- Other Name: Rod Kit, Steering Linkage Connect; Steering Drag Link; Center Link; Rod Kit, Steering Connecting


Chevrolet Center Link Part Number: 19149619
Product Specifications- Other Name: Rod Kit, Steering Connecting; Drag Link
- Replaces: 89040375, 12471375

Chevrolet Drag Link Part Number: 26039645
Product Specifications- Other Name: Rod, Steering Connecting; Center Link

Chevrolet Center Link Part Number: 26037644
Product Specifications- Other Name: Rod Kit, Steering Connecting; Drag Link; Rod Kit, Steering Intermediate

Chevrolet Center Link Part Number: 22913604
$217.54 MSRP: $342.28You Save: $124.74 (37%)Product Specifications- Other Name: Rod Kit, Steering Connecting; Drag Link
Chevrolet Center Link Part Number: 26021270
Product Specifications- Other Name: Rod, Steering Connecting; Drag Link

Chevrolet Center Link Part Number: 12386615
Product Specifications- Other Name: Rod Kit, Steering Connecting; Drag Link
- Replaces: 26034085

Chevrolet Center Link Part Number: 26023000
Product Specifications- Other Name: Rod Kit, Steering Connecting; Drag Link Repair Kit; Steering Tie Rod End; Outer Tie Rod End; Drag Link; Center Link Assembly

Chevrolet Center Link Part Number: 26055302
Product Specifications- Other Name: Rod Kit, Steering Connecting; Drag Link
Chevrolet Center Link Part Number: 26038980
Product Specifications- Other Name: Rod Kit, Steering Connecting; Drag Link

Chevrolet Center Link Part Number: 26059109
Product Specifications- Other Name: Rod Kit, Steering Connecting; Drag Link; Rod Kit, Steering Intermediate
- Replaces: 26037685
Chevrolet Center Link Part Number: 26038989
Product Specifications- Other Name: Rod Kit, Steering Connecting; Drag Link
Chevrolet Center Link Part Number: 26059126
Product Specifications- Other Name: Rod Kit, Steering Connecting; Drag Link; Rod Kit, Steering Intermediate
- Replaces: 07837639, 7837639, 26037646
Chevrolet Center Link Part Number: 7837639
Product Specifications- Other Name: Rod Assembly, Intermediate; Drag Link
- Replaced by: 26059126

Chevrolet Center Link Part Number: 12471385
Product Specifications- Other Name: Rod Kit, Steering Connecting; Steering Tie Rod End; Drag Link
- Position: Inner
| Page 1 of 2 |Next >
1-20 of 37 Results
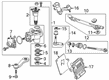
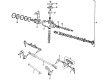
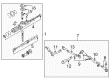
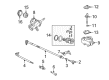
Chevrolet Center Link
Choose OEM Center Link, you're making the optimal decision for superior quality and perfect performance. You can feel confident because each component goes through stringent quality checks. Every part is carefully built to comply with Chevrolet's factory specifications. You'll enjoy a smooth, worry-free installation that fits just right. At ChevyPartsGiant.com, you'll find it easy to get top-quality OEM Chevrolet Center Link. You can shop at highly competitive prices and protect your budget. All our genuine Chevrolet parts include a dependable manufacturer's warranty. You'll also appreciate our straightforward return policy and swift delivery services for extra convenience.
Chevrolet Center Link Parts and Q&A
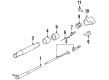
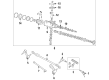
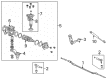
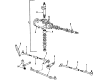
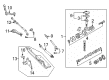
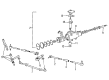
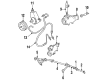
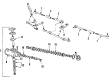
- Q: How to service and repair the center link on Chevrolet K3500?A:To service and repair the Center Link, start with raising the vehicle, place jack stands to support it. Take out the steering shock absorber depending on the relay rod, if available. Use the correct tool to remove all Tie Rod and ball joints. Do not reuse the idler arm ball stud nut while removing the inner Tie Rod Ball Joint from the relay rod. Then, take off the idler arm ball stude nut and pirman arm nut. Use the universal steering linkage puller (J 24319-01) to remove the relay rod from the idler arm ball stud and the pitman arm ball stud. If available, drag the link from the pitman shaft. Check for damage on Tie Rod threads and ball stud, check for excess wear on ball stud seals and clean ball stud threads. For installation, secure the relay rod to the idler arm ball stud and the pitman arm ball stud making sure that the seal is on the stud. Applying the steering linkage installer (12 mm) (J 29193) or the steering linkage installer (14 mm) (J 29194) tighten the ball stud to 62 nm (46 ft. Lbs.) to seat tapers and then take out the installer. Put on the new idler arm prevailing torque nut and tighten it to 62 nm (46 ft. Lbs.) along with the new pitman arm prevailing torque nut. Lastly, install the Tie Rod inner ball joints to the relay rod and the steering shock absorber to the relay rod if equipped.

Related Chevrolet Parts
 Chevrolet Power Steering Pump
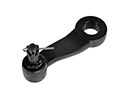 Chevrolet Pitman Arm
 Chevrolet Drag Link
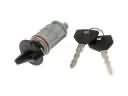 Chevrolet Ignition Lock Cylinder
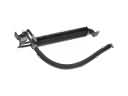 Chevrolet Power Steering Cooler
 Chevrolet Power Steering Hose
 Chevrolet Power Steering Reservoir
 Chevrolet Rack And Pinion
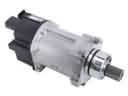 Chevrolet Power Steering Assist Motor
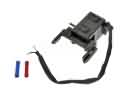 Chevrolet Shift Interlock Solenoid
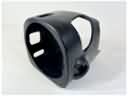 Chevrolet Steering Column Cover
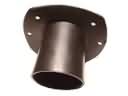 Chevrolet Steering Column Seal
Browse Chevrolet Center Link by Models
S10 C10 Tahoe Camaro Impala Silverado 1500 Silverado 2500 HD Caprice Blazer El Camino K10 Astro C20 C1500 C2500 C30 C3500 Express 1500 Express 2500 Express 3500 G10 G20 G30 K1500 K20 K2500 K30 K3500 K5 Blazer Monte Carlo P30 S10 Blazer Silverado 2500 Silverado 3500 Suburban 1500 Avalanche 1500 Avalanche 2500 C10 Suburban C1500 Suburban C20 Suburban C2500 Suburban K10 Suburban K1500 Suburban K20 Suburban K2500 Suburban P20 R10 R10 Suburban R1500 Suburban R20 R20 Suburban R2500 R2500 Suburban R30 R3500 Silverado 1500 Classic Silverado 1500 HD Silverado 1500 HD Classic Silverado 2500 HD Classic Silverado 3500 Classic Silverado 3500 HD Suburban 2500 Suburban 3500 HD V10 V10 Suburban V1500 Suburban V20 V20 Suburban V2500 Suburban V30 V3500