ChevyParts
My Garage
My Account
Cart
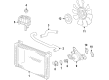
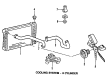
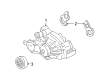
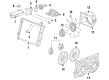
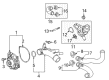
OEM Chevrolet Express 3500 Water Pump
H2O Pump- Select Vehicle by Model
- Select Vehicle by VIN
Select Vehicle by Model
orMake
Model
Year
Select Vehicle by VIN
For the most accurate results, select vehicle by your VIN (Vehicle Identification Number).
13 Water Pumps found


Chevrolet Express 3500 Water Pump Part Number: 12637105
$260.71 MSRP: $482.35You Save: $221.64 (46%)


Chevrolet Express 3500 Water Pump Part Number: 89060527
$232.95 MSRP: $456.07You Save: $223.12 (49%)Ships in 1-3 Business Days


Chevrolet Express 3500 Water Pump Part Number: 12703898
$187.62 MSRP: $364.18You Save: $176.56 (49%)Ships in 1-2 Business Days


Chevrolet Express 3500 Water Pump Part Number: 12681417
$289.52 MSRP: $561.92You Save: $272.40 (49%)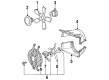
Chevrolet Express 3500 Water Pump Part Number: 19168610
$223.61 MSRP: $433.95You Save: $210.34 (49%)Ships in 1-2 Business Days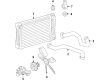
Chevrolet Express 3500 Water Pump Part Number: 19168609
$249.47 MSRP: $484.18You Save: $234.71 (49%)Ships in 1-2 Business Days
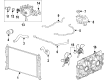
Chevrolet Express 3500 Water Pump Part Number: 12725728
$282.59 MSRP: $553.28You Save: $270.69 (49%)Chevrolet Express 3500 Water Pump Part Number: 12708487
$171.67 MSRP: $508.16You Save: $336.49 (67%)Ships in 1-2 Business Days
Chevrolet Express 3500 Water Pump Part Number: 12707676
$166.89 MSRP: $493.96You Save: $327.07 (67%)Ships in 1-2 Business Days
Chevrolet Express 3500 Water Pump Part Number: 12645126
$168.76 MSRP: $327.52You Save: $158.76 (49%)Ships in 1-2 Business Days
Chevrolet Express 3500 Water Pump Part Number: 89018166
Chevrolet Express 3500 Water Pump Part Number: 12685964

Chevrolet Express 3500 Water Pump Part Number: 12600767
Chevrolet Express 3500 Water Pump
Want to cut long-term maintenance and repair costs? Choose OEM Water Pump. Those parts deliver top durability you can trust. On our site, you'll find a huge catalog of genuine Chevrolet Express 3500 parts. Prices are unbeatable, so you can keep more in your pocket. Every OEM Chevrolet Express 3500 Water Pump includes a manufacturer's warranty. You can also get an easy return policy that keeps buying risk free. Fast delivery, get your car on the road quickly. It's simple to search, compare, and order. Stop guessing about quality or fit. Order today and save with parts that last.
Chevrolet Express 3500 Water Pump Parts Questions & Experts Answers
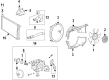
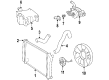
- Q: How to service and repair a water pump on Chevrolet Express 3500?A:Being safe while working on the Water Pump means disconnecting the battery negative cable from the battery terminal first. First take off the air cleaner, let all engine coolant drain out then remove the air intake duct from the Throttle Body. Take out the coolant recovery reservoir while you remove both the upper Fan Shroud and the Fan Clutch segment. First disconnect the Drive Belt from its route on the pulleys. Then you should remove the bolts that secure the Water Pump Pulley to the Water Pump assembly. Remove all hoses attached to the Water Pump before taking out the Water Pump mounting bolts and the gasket with the pump. Check if the engine block and Water Pump bolts have damaged threads during restoration. Before installation insert the gaskets and Water Pump while applying gm p/n 12346004 (thread sealant) to the Water Pump mounting bolts. Tighten these bolts to 45 nm [33 ft. Lbs]. Plug in the Water Pump connections to the lower Radiator Hose, heater outlet hose, and by-pass hose before fastening its rotating component with 25 nm (18 ft lbs) torque. Place the Drive Belt first then add the Fan Clutch followed by upper Fan Shroud and finally install the coolant recovery reservoir air duct to Throttle Body and air cleaner assembly. Attach the battery negative terminal last while using proper testing tools to eliminate all air from the cooling system. Also test the system for any leaks afterward.

Related Chevrolet Express 3500 Parts
 Chevrolet Express 3500 A/C Condenser Fan
 Chevrolet Express 3500 Belt Tensioner Bolt
 Chevrolet Express 3500 Coolant Reservoir Cap
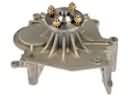 Chevrolet Express 3500 Cooling Fan Bracket
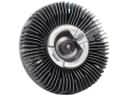 Chevrolet Express 3500 Fan Clutch
 Chevrolet Express 3500 Fan Shroud
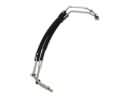 Chevrolet Express 3500 Oil Cooler Hose
 Chevrolet Express 3500 Radiator
 Chevrolet Express 3500 Radiator Cap
 Chevrolet Express 3500 Radiator fan
 Chevrolet Express 3500 Thermostat Housing
 Chevrolet Express 3500 Water Pump Gasket