ChevyParts
My Garage
My Account
Cart
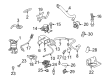
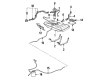
OEM Chevrolet Impala Fuel Rail
Engine Fuel Rail- Select Vehicle by Model
- Select Vehicle by VIN
Select Vehicle by Model
orMake
Model
Year
Select Vehicle by VIN
For the most accurate results, select vehicle by your VIN (Vehicle Identification Number).
16 Fuel Rails found


Chevrolet Impala Fuel Rail Part Number: 12629929
$160.74 MSRP: $326.46You Save: $165.72 (51%)


Chevrolet Impala Fuel Rail Part Number: 12608366
$197.95 MSRP: $358.28You Save: $160.33 (45%)
Chevrolet Impala Fuel Rail Part Number: 92264711
$1305.85 MSRP: $2063.93You Save: $758.08 (37%)Ships in 1-3 Business DaysChevrolet Impala Fuel Rail Part Number: 92264693
$739.48 MSRP: $1168.77You Save: $429.29 (37%)Ships in 1-3 Business Days
Chevrolet Impala Fuel Rail Part Number: 17113608
$119.91 MSRP: $225.16You Save: $105.25 (47%)Ships in 1-2 Business Days
Chevrolet Impala Fuel Rail Part Number: 12701658
$183.80 MSRP: $329.68You Save: $145.88 (45%)Ships in 1-3 Business Days
Chevrolet Impala Fuel Rail Part Number: 12654644
$251.84 MSRP: $455.82You Save: $203.98 (45%)Ships in 1-3 Business DaysChevrolet Impala Fuel Rail Part Number: 12627090
$251.84 MSRP: $455.82You Save: $203.98 (45%)Ships in 1-2 Business Days
Chevrolet Impala Fuel Rail Part Number: 12593604
$252.28 MSRP: $512.37You Save: $260.09 (51%)Ships in 1-2 Business Days
Chevrolet Impala Fuel Rail Part Number: 12584908
$226.88 MSRP: $460.82You Save: $233.94 (51%)Ships in 1-2 Business Days
Chevrolet Impala Fuel Rail Part Number: 24503754


Chevrolet Impala Fuel Rail Part Number: 24508941

Chevrolet Impala Fuel Rail Part Number: 17113607

Chevrolet Impala Fuel Rail Part Number: 17113251
Chevrolet Impala Return Line Part Number: 17113095
Chevrolet Impala Fuel Rail Part Number: 12587077
Chevrolet Impala Fuel Rail
Want to cut long-term maintenance and repair costs? Choose OEM Fuel Rail. Those parts deliver top durability you can trust. On our site, you'll find a huge catalog of genuine Chevrolet Impala parts. Prices are unbeatable, so you can keep more in your pocket. Every OEM Chevrolet Impala Fuel Rail includes a manufacturer's warranty. You can also get an easy return policy that keeps buying risk free. Fast delivery, get your car on the road quickly. It's simple to search, compare, and order. Stop guessing about quality or fit. Order today and save with parts that last.
Chevrolet Impala Fuel Rail Parts and Q&A
- Q: How to replace the fuel rail assembly on Chevrolet Impala?A:The first step to replace the Fuel Rail assembly should be the release of fuel pressure from the system while cleaning both the rail assembly and its connections. The next step consists of disconnecting both the fuel feed and fuel return pipes from their connections to the Fuel Rail and then following up with vacuum line separation from the Fuel Pressure Regulator. Proceed to remove the ignition coil wires as well as disconnect the Fuel Injector electrical connectors before unthreading the Fuel Rail hold-down bolts. Cautiously pull the Fuel Rail section using matched muscles across each side. Place the Fuel Rail assembly on the Intake Manifold while hand-seating fuel injectors. Each serviced component needs new o-rings and all Fuel Injector o-rings should receive a light application of clean engine oil before installation. Fasten the Fuel Rail hold-down bolts at 10 n.m (89 lb in) torque while connecting the Fuel Injector electrical connections and fuel feed pipes as well as fuel return pipes to the rail assembly. The vacuum channel should be reattached to the pressure regulator followed by coil wire installation and fuel cap tightening until secure while reconnecting the negative battery terminal. A leak inspection occurs by engaging the ignition switch on for 2 seconds, followed by 10 seconds off before re-engaging the ignition on where you check for fuel leakage. Settlement to install the fuel injection sight shield completes the process.
- Q: How should the fuel rail assembly be serviced to prevent dirt and contaminants from entering the fuel passages on Chevrolet Impala?A:Before servicing the Fuel Rail assembly workers need to protect fuel passages from contamination through hole plugging and fitting capping procedures. Start by reducing fuel pressure levels from the system before cleaning all parts of the Fuel Rail assembly along with its connections. Remove the fuel feed pipes together with the fuel return pipes from the Fuel Rail while you remove the vacuum line from the Fuel Pressure Regulator then detach the wiring harness from the Fuel Rail. Evap purge solenoid removal comes first with position adjustment for Spark Plug Wires after their removal from the upper Intake Manifold and then disconnect Fuel Injector electrical connectors. You must remove the Fuel Rail nuts before extracting the Fuel Rail using matched force on each side. It is essential to position the Fuel Injector o-rings properly when installing the part so that the black o-ring faces up while the brown o-ring rests at the bottom. The Fuel Rail assembly must receive motor oil on all new o-rings before technicians place it on the Intake Manifold by hand while seating each Fuel Injector without tools. Put the Fuel Rail nuts in position and securely tighten them to 10 n.m (89 lb in) afterward connect the Fuel Injector electrical connectors together with the Spark Plug Wires and evap purge solenoid. The wiring harness should be reconnected to the Fuel Rail then the fuel feed and return pipes must be joined before installing the vacuum line to the Fuel Pressure Regulator. Complete fuel fill cap tightening then connect the negative Battery Cable followed by referencing the instructions for turning the ignition. After completing the first inspection for leaks inspect once more for fuel leakage then examine the final leak state. Near the end of the operation install the Fuel Injector sight shield.


Related Chevrolet Impala Parts
 Chevrolet Impala Gas Cap
 Chevrolet Impala Fuel Injector
 Chevrolet Impala Fuel Pressure Regulator
 Chevrolet Impala Fuel Tank
 Chevrolet Impala Air Hose
 Chevrolet Impala Fuel Injector O-Ring
 Chevrolet Impala Fuel Line Clamps
 Chevrolet Impala Fuel Pressure Sensor
 Chevrolet Impala Fuel Pump Gasket
 Chevrolet Impala Fuel Tank Sending Unit
 Chevrolet Impala Fuel Tank Strap
 Chevrolet Impala Vapor Pressure Sensor