ChevyParts
My Garage
My Account
Cart
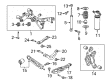
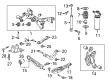
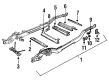
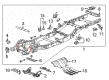
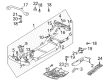
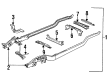
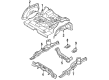
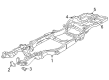
OEM Chevrolet Rear Crossmember
Rear Suspension Crossmember- Select Vehicle by Model
- Select Vehicle by VIN
Select Vehicle by Model
orMake
Model
Year
Select Vehicle by VIN
For the most accurate results, select vehicle by your VIN (Vehicle Identification Number).
39 Rear Crossmembers found

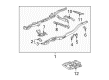
Chevrolet Suspension Crossmember, Rear Part Number: 84176773
$426.80 MSRP: $638.09You Save: $211.29 (34%)Ships in 1-3 Business DaysProduct Specifications- Other Name: Cradle Assembly-Rear; Crossmember
- Position: Rear
- Replaced by: 26443910

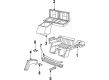
Chevrolet Suspension Crossmember, Rear Part Number: 84176775
$447.34 MSRP: $671.82You Save: $224.48 (34%)Ships in 1-3 Business DaysProduct Specifications- Other Name: Cradle Assembly-Rear Suspension; Crossmember
- Position: Rear
- Replaced by: 26443909


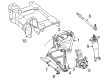
Chevrolet Crossmember Part Number: 15981865
Product Specifications- Other Name: Member, Frame Support Cross; Crossmember, Rear Frame Cross

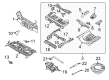
Chevrolet Rear Crossmember Part Number: 20909393
$135.12 MSRP: $202.01You Save: $66.89 (34%)Product Specifications- Other Name: Crossmember-Rear
- Position: Rear
- Replaced by: 84339602

Chevrolet Rear Crossmember Part Number: 15672405
Product Specifications- Other Name: Member, Rear Cross; Crossmember, Rear Frame Cross
- Position: Rear

Chevrolet Rear Crossmember Part Number: 14069823
Product Specifications- Other Name: Crossmember, Rear; Member, Rear Frame Cross
- Position: Rear

Chevrolet Suspension Crossmember, Rear Part Number: 10317602
Product Specifications- Other Name: Crossmember, Rear Frame Cross
- Position: Rear
- Replaces: 10266824

Chevrolet Front Crossmember Part Number: 96404493
Product Specifications- Other Name: Bar, Floor Pan; Crossmember, Rear Frame Cross; Sill, Floor Pan

Chevrolet Rear Crossmember Part Number: 91176914
Product Specifications- Other Name: Crossmember, Rear; Crossmember, Rear Frame Cross
- Position: Rear


Chevrolet Rear Crossmember Part Number: 14067782
Product Specifications- Other Name: Crossmember, Rear Frame Cross; Member, Rear Frame Cross
- Position: Rear
Chevrolet Crossmember, Rear Part Number: 14024585
Product Specifications- Other Name: Crossmember, Rear Frame Cross
- Position: Rear

Chevrolet Rear Crossmember Part Number: 14024579
Product Specifications- Other Name: Crossmember, Rear Frame Cross
- Position: Rear
Chevrolet Rear Crossmember Part Number: 15036400
Product Specifications- Other Name: Crossmember, Rear; Crossmember, Rear Frame Cross
- Position: Rear

Chevrolet Rear Crossmember Part Number: 95972301
Product Specifications- Other Name: Crossmember Assembly, Rear; Crossmember, Rear Frame Cross
- Position: Rear
- Replaces: 96813465, 96532558

Chevrolet Crossmember, Rear Part Number: 15989669
Product Specifications- Other Name: Crossmember, Rear Frame Cross
- Position: Rear

Chevrolet Crossmember, Rear Part Number: 15529437
Product Specifications- Other Name: Crossmember, Rear Frame Cross
- Position: Rear

Chevrolet Rear Crossmember Part Number: 91173984
Product Specifications- Other Name: Crossmember, Rear Frame Cross
- Position: Front and Rear

Chevrolet Crossmember Part Number: 15017008
Product Specifications- Other Name: Crossmember, Intermediate (Transmission Support Cross Member); Crossmember, Intermediate(Transmission Support Cross Member)
- Position: Rear
- Replaces: 12477746, 12377857

Chevrolet Rear Crossmember Part Number: 12377858
Product Specifications- Other Name: Crossmember, Rear; Crossmember, Rear Frame Cross
- Position: Rear
- Replaces: 12383971

Chevrolet Crossmember, Rear Part Number: 15659303
Product Specifications- Other Name: Crossmember, Rear Frame Cross
- Position: Rear
| Page 1 of 2 |Next >
1-20 of 39 Results
Chevrolet Rear Crossmember
Want to cut long-term maintenance and repair costs? Choose OEM Rear Crossmember. Those parts deliver top durability you can trust. On our site, you'll find a huge catalog of genuine Chevrolet parts. Prices are unbeatable, so you can keep more in your pocket. Every OEM Chevrolet Rear Crossmember includes a manufacturer's warranty. You can also get an easy return policy that keeps buying risk free. Fast delivery, get your car on the road quickly. It's simple to search, compare, and order. Stop guessing about quality or fit. Order today and save with parts that last.
Chevrolet Rear Crossmember Parts Questions & Experts Answers
- Q: How to replace the Rear Crossmember in the rear suspension on Chevrolet Corvette?A:First lift your vehicle then support it and disconnect all tire and wheel parts. Disengage wheel speed sensor harness connectors when disconnecting park brake cables from actuator levers and electronic suspension control (ESC) shock absorbers harnesses when equipped. Follow this sequence to replace the crossmember: disconnect first the rear suspension position sensors, the inner tie rod end studs and lower control arms from their crossmember attachment. Begin by supporting the lower control arms and tie rods and rear suspension knuckles before breaking free the transverse spring. Position the transmission support fixture (J 42055) onto a transmission jack before placing and securely fastening it to the transmission for support. Disassemble all electrical harness retainers and brake pipe retainers from the crossmember before using a transmission jack to position it underneath the Rear Crossmember. Secure the transmission jack in place. Use only hand tools to remove the Rear Crossmember mounting nuts then discard them. Installation requires the correct alignment of crossmember dowel pins to frame rails plus transaxle mount studs to the crossmember using new crossmember mounting nuts. Through manual operation only install the new rear suspension crossmember mounting nuts before tightening them to 110 n.m (81 lb ft). Remove the transmission support fixture (J 42055) from the transmission followed by removing the jack from the crossmember. Reinstall all electrical harness retainers and brake pipe retainers onto the crossmember before installing the transaxle mount lower nuts and transverse spring and lower control arms and inner tie rod end studs. If your vehicle includes esc Shock Absorber harnesses, install rear suspension position sensors before connecting electrical connectors to the esc Shock Absorber harnesses and attaching park brake cables to actuator levers followed by reconnecting the wheel speed sensor harness connector. After installation of tires and wheels you should lower the vehicle to perform measurements for rear trim height adjustment and complete rear wheel alignment procedures.
- Q: How to service and repair the Rear Crossmember on Chevrolet Prizm?A:In order to service and repair the rear suspension cross-member, it is important to raise, and support the vehicle. To remove the lh rear suspension Trailing Arm, you need to remove the nut and bolt to disconnect the rear suspension knuckle to the rear suspension Trailing Arm, while at the same time separating the rear suspension Trailing Arm on the rh to separate it also. Next, take off the 2 nuts, 3 washers, and lh rear suspension rear lower Control Arm, and then the same of the rh rear suspension rear lower Control Arm. Support the rear suspension crossmember using a jack, then remove the 2 bolts holding the rear suspension support brace to body and the 4 bolts holding the rear suspension crossmember to the body before lifting the crossmember. In case of a replacement of the rear suspension crossmembers, take off the two bolts and the rear suspension support bracket from the crossbar. Remove the two inner bolts, four washers, lh rear suspension front lower Control Arm, and rh rear suspension front lower Control Arm, from the rear suspension crossmember. For installation, attach the rear suspension support brace to the rear suspension cross member using 2 bolts secured to 19 nm (14 ft. Lbs) and do not install the lower Control Arm until the rear lower Control Arm is installed. Mount the lh and rh rear suspension front lower control arms, 4 washers and 2 inner bolts without tightening. Jack up the rear suspension crossmember and secure with 6 bolts, tightening the 4 outer bolts to 74 nm (55 ft. Lbs.) and the 2 inner to 19 nm (14 ft. Lbs.). Take out the jack and then install the lh rear suspension rear lower Control Arm, and install 3 washers plus 2 nuts loosely; then install the rh rear suspension rear lower Control Arm and the same components. Mount the lh rear suspension Trailing Arm to the rear suspension knuckle and do not tighten the bolt and do the same on the rh rear suspension Trailing Arm. Wheels off, lower and three, and drive a lift rack. Lift suspension by bouncing the vehicle and allow to settle and tighten the 2 rear suspension Trailing Arm to knuckle nuts and bolts to 91 nm (67 ft. Lbs.) and 4 rear suspension Control Arm nuts and bolts to 125 nm (89 ft. Lbs.). Check the rear wheel alignment and correct it if required prior to taking the car off the alignment rack.
- Q: How to replace the rear crossmember for the steering gear on Chevrolet SSR?A:You should first raise and support the vehicle to begin the replacement of the rear steering gear crossmember. Unbolt the rear mounting points of the rear steering gear crossmember as well as the rear mounting bolts on the front steering gear crossmember and carefully take the crossmember out from the vehicle. Align the rear steering gear crossmember with its mounting holes, put in the bolts, and tighten them to 50 N.m (37 lb ft). Following this, put in and tighten the rear mounting bolts for the front steering gear crossmember to 50 N.m (37 lb ft), then lower the vehicle.


Related Chevrolet Parts
 Chevrolet Emblem
 Chevrolet Door Hinge
 Chevrolet Door Striker
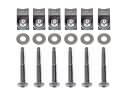 Chevrolet Bed Mounting Hardware
 Chevrolet Door Seal
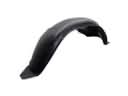 Chevrolet Fender Splash Shield
 Chevrolet Floor Pan
 Chevrolet Front Cross-Member
 Chevrolet Instrument Panel Light Bulb
 Chevrolet Lift Support
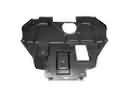 Chevrolet Underbody Splash Shield
 Chevrolet Weather Strip
Browse Chevrolet Rear Crossmember by Models
S10 C10 Tahoe Equinox SSR Silverado 2500 HD Caprice Blazer Tracker K10 Trax Trailblazer Corvette C20 Aveo C1500 C2500 C30 C3500 City Express K1500 K20 K2500 K30 K3500 K5 Blazer Metro Prizm Uplander Venture Aveo5 C10 Suburban C1500 Suburban C20 Suburban C2500 Suburban K10 Suburban K1500 Suburban K20 Suburban K2500 Suburban R10 R10 Suburban R1500 Suburban R20 R20 Suburban R2500 R2500 Suburban R30 R3500 Silverado 3500 HD V10 V10 Suburban V1500 Suburban V20 V20 Suburban V2500 Suburban V30 V3500