ChevyParts
My Garage
My Account
Cart
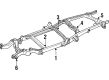
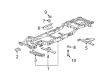
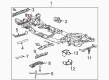
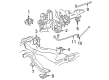
OEM Chevrolet Front Cross-Member
Front Engine Cross Member- Select Vehicle by Model
- Select Vehicle by VIN
Select Vehicle by Model
orMake
Model
Year
Select Vehicle by VIN
For the most accurate results, select vehicle by your VIN (Vehicle Identification Number).
129 Front Cross-Members found

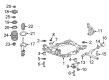
Chevrolet Engine Cradle Part Number: 25884446
$193.25 MSRP: $347.34You Save: $154.09 (45%)Ships in 1-2 Business DaysProduct Specifications- Other Name: Cradle, Chassis
- Position: Front
- Replaces: 15231119, 22660608, 15231120, 15941460

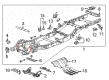
Chevrolet Trans Crossmember Part Number: 23108758
$184.75 MSRP: $273.75You Save: $89.00 (33%)Ships in 1-2 Business DaysProduct Specifications- Other Name: Crossmember, Transmission Mounting; Transfer Case Mount; Transmission Mount
- Replaces: 25798388

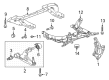
Chevrolet Front Crossmember Part Number: 42786177
$688.87 MSRP: $1034.54You Save: $345.67 (34%)Ships in 1-3 Business DaysProduct Specifications- Other Name: Extension-Drivetrain & Front Suspension Cross Member
- Position: Front
- Replaced by: 42799078

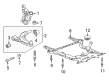
Chevrolet Engine Cradle, Front Part Number: 39098952
$1041.60 MSRP: $1564.28You Save: $522.68 (34%)Ships in 1-3 Business DaysProduct Specifications- Other Name: Cradle Assembly-Front
- Position: Front
- Replaced by: 42703220

Chevrolet Crossmember Part Number: 19317739
$559.66 MSRP: $955.89You Save: $396.23 (42%)Ships in 1-2 Business DaysProduct Specifications- Other Name: Crossmember, Intermediate

Chevrolet Trans Crossmember Part Number: 23294386
$137.47 MSRP: $205.52You Save: $68.05 (34%)Ships in 1-3 Business DaysProduct Specifications- Other Name: Crossmember, Transmission Mounting; Transfer Case Mount; Transmission Mount
- Replaces: 94772477

Chevrolet Center Crossmember Part Number: 85654481
$166.49 MSRP: $248.92You Save: $82.43 (34%)Ships in 1-2 Business DaysProduct Specifications- Other Name: Crossmember; Crossmember, Front Frame Cross Member
Chevrolet Trans Crossmember Part Number: 23108759
$179.89 MSRP: $266.55You Save: $86.66 (33%)Ships in 1-2 Business DaysProduct Specifications- Other Name: Crossmember, Transmission Mounting; Transfer Case Mount; Transmission Mount
- Replaces: 25798389

Chevrolet Glove Box Assembly Part Number: 84788134
$110.13 MSRP: $163.92You Save: $53.79 (33%)Ships in 1-3 Business DaysProduct Specifications- Other Name: Compartment Assembly-Instrument Panel *Dark Atmospher; Crossmember
- Replaced by: 85010644

Chevrolet Front Crossmember Part Number: 87834852
$96.17 MSRP: $143.15You Save: $46.98 (33%)Ships in 1-2 Business DaysProduct Specifications- Other Name: Crossmember; Crossmember, Front Frame Cross Member
- Replaces: 84339717, 15719509, 86810928, 23106554, 84891467

Chevrolet Front Crossmember Part Number: 85654471
$107.02 MSRP: $159.28You Save: $52.26 (33%)Ships in 1-2 Business DaysProduct Specifications- Other Name: Crossmember-Front; Crossmember; Crossmember, Front Frame Cross Member
- Position: Front
Chevrolet Trans Crossmember Part Number: 94772479
$47.45 MSRP: $70.63You Save: $23.18 (33%)Ships in 1-3 Business DaysProduct Specifications- Other Name: Crossmember, Transmission Mounting; Transfer Case Mount; Transmission Mount

Chevrolet Crossmember Part Number: 15163518
$173.11 MSRP: $258.82You Save: $85.71 (34%)Ships in 1-2 Business DaysProduct Specifications- Other Name: Crossmember, Frame Bell Housing (Attaches To Frame Andside Rails); Crossmember, Frame Bell Housing(Attaches To Frame And Side Rails)
- Position: Front

Chevrolet Engine Cradle Part Number: 20850582
$251.99 MSRP: $376.74You Save: $124.75 (34%)Product Specifications- Other Name: Crossmember; Crossmember, Front Frame Cross Member
- Position: Front
- Replaces: 15864492, 15215882


Chevrolet Trans Crossmember Part Number: 15076525
$244.71 MSRP: $385.03You Save: $140.32 (37%)Product Specifications- Other Name: Crossmember, Transmission Support; Transfer Case Mount; Transmission Mount; Crossmember, Transmission Mounting


Chevrolet Trans Crossmember Part Number: 15148804
Product Specifications- Other Name: Crossmember, Transmission Support; Transfer Case Mount; Transmission Mount; Support; Crossmember, Transmission Mounting
- Replaces: 15652999


Chevrolet Crossmember, Front Part Number: 15659413
Product Specifications- Other Name: Crossmember, Front Frame Cross Member; Crossmember, Intermediate(Transmission Support Cross Member)
- Position: Front


Chevrolet Trans Crossmember Part Number: 15204342
$80.38 MSRP: $125.91You Save: $45.53 (37%)Product Specifications- Other Name: Crossmember, Transmission Mounting; Transfer Case Mount; Transmission Mount


Chevrolet Front Crossmember Part Number: 15085421
Product Specifications- Other Name: Crossmember, Intermediate (Transmission Support Cross Member); Crossmember; Crossmember, Intermediate(Transmission Support Cross Member)


Chevrolet Transmission Support Part Number: 15148807
$93.03 MSRP: $145.71You Save: $52.68 (37%)Product Specifications- Other Name: Crossmember, Transmission Mounting; Transfer Case Mount; Trans Crossmember; Transmission Mount
- Replaces: 15974875
| Page 1 of 7 |Next >
1-20 of 129 Results
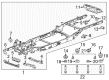
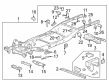
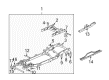
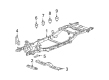
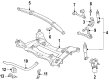
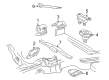
Chevrolet Front Cross-Member
Choose OEM Front Cross-Member, you're making the optimal decision for superior quality and perfect performance. You can feel confident because each component goes through stringent quality checks. Every part is carefully built to comply with Chevrolet's factory specifications. You'll enjoy a smooth, worry-free installation that fits just right. At ChevyPartsGiant.com, you'll find it easy to get top-quality OEM Chevrolet Front Cross-Member. You can shop at highly competitive prices and protect your budget. All our genuine Chevrolet parts include a dependable manufacturer's warranty. You'll also appreciate our straightforward return policy and swift delivery services for extra convenience.
Chevrolet Front Cross-Member Parts and Q&A
- Q: How to replace the Front Cross-Member and Rear Crossmember on Chevrolet Colorado?A:To replace the crossmember, you should lift the vehicle, then pull out the mounting nuts/bolts and take out the crossmember from the vehicle. For installation, put the crossmember back and make sure no traces of the original adhesive patch remain. Clean the bolts' threads with the help of denatured alcohol or something equivalent and let dry prior to threading threadlocker gm p/n 12345493 (Canadian P/N 10953488). Then, put the bolts and nuts and tighten the bolts to 60 n.m (44 lb ft), and finally lower the vehicle.
- Q: How to replace the Front Cross-Member on a 4WD on Chevrolet S10?A:Firstly, elevate and support the vehicle in the right way to change the transmission support on a 4wd vehicle. Hold the transmission to use a transmission jack and disconnect the transmission wiring harness from the transmission support if necessary. Unbolt the transmission mount to the transmission support stud nuts, and if required, remove the catalytic converter hanger bracket from the transmission support. After that, take the nuts and bolts, as well as the transmission support from the frame to the pickups and utilities, with bravada and zr 2 models also infested by this pest, before the transmission support itself can be removed. For installation, start by locating the transmission support and to adhere to the fastener notice in service precautions. Mount the transmission support to the nuts and bolts for the frame for the zr2s, where they tighten at 54 n.m (40 lb ft), then replicate this for the bravadas and pickups and utilities, in which they tighten at 54 n.m (40 lb ft). Reattach it to the transmission support, mounting bolts with 17 n.m (13 lb ft). If applicable. Next, install the transmission mount to the transmission support nuts and tighten it up to 57 n.m (42 lb ft), if any transmission wiring harness had been disconnected, you would need to reconnect it at this time. Finally lift of the transmission jack and let the vehicle down.


Related Chevrolet Parts
 Chevrolet Emblem
 Chevrolet Cup Holder
 Chevrolet Door Lock Cylinder
 Chevrolet Door Striker
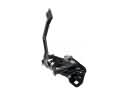 Chevrolet Hood Latch
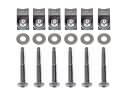 Chevrolet Bed Mounting Hardware
 Chevrolet Body Mount Hole Plug
 Chevrolet Door Seal
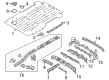
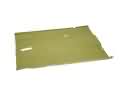 Chevrolet Floor Pan
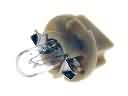 Chevrolet Instrument Panel Light Bulb
 Chevrolet Rear Crossmember
 Chevrolet Weather Strip
Browse Chevrolet Front Cross-Member by Models
S10 Colorado C10 Tahoe Cruze Malibu Camaro Equinox Impala SSR Avalanche Silverado 1500 Silverado 2500 HD Caprice Suburban Blazer Tracker K10 Trailblazer Astro Corvette C20 Aveo Bolt EUV Bolt EV C1500 C2500 C30 C3500 Celebrity City Express Express 1500 Express 2500 Express 3500 G10 G20 G30 K1500 K20 K2500 K30 K3500 K5 Blazer Metro P30 Prizm S10 Blazer Silverado 2500 Sprint Lumina APV Suburban 1500 Trailblazer EXT Avalanche 1500 Avalanche 2500 Aveo5 C10 Suburban C1500 Suburban C20 Suburban C2500 Suburban K10 Suburban K1500 Suburban K20 Suburban K2500 Suburban P20 R10 R10 Suburban R1500 Suburban R20 R20 Suburban R2500 R2500 Suburban R30 R3500 Silverado 1500 Classic Silverado 1500 HD Silverado 1500 HD Classic Silverado 2500 HD Classic Silverado 3500 HD Suburban 2500 V10 V10 Suburban V1500 Suburban V20 V20 Suburban V2500 Suburban V30 V3500