Make sure this part fits

GM 20850582
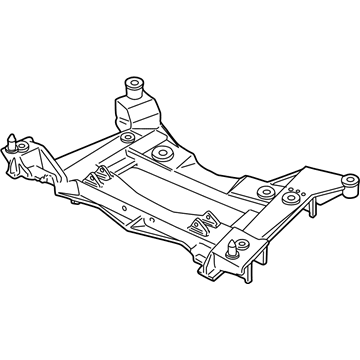
Engine Cradle

2004-2013 GM

Customer Questions & Expert Answers (10)
GM 20850582 Engine Cradle
  • Part Description
    Crossmember
  • Position
    Front
  • Replaces
    15864492, 15215882
  • Manufacturer
    General Motors
Make sure this part fits
$251.99 MSRP: $376.74
You Save: $124.75 (34%)
Currently Unavailable

Due to manufacturer supply shortage, this item isn't currently available for ordering.

  • Related Parts
  • Product Specifications
  • Vehicle Fitment
  • Customer Questions & Expert Answers
  • Product Specifications

    BrandGenuine GM
    Manufacturer Part Number20850582
    Part DescriptionCrossmember
    Other NamesCrossmember, Front Frame Cross Member
    Item Dimensions37.8 x 24.7 x 10.2 inches
    Item Weight38.20 Pounds
    PositionFront
    ConditionNew
    Fitment TypeDirect Replacement
    Replaces15864492, 15215882
    ManufacturerGeneral Motors
    SKU20850582
    WarrantyThis genuine GM part is guaranteed by GM's factory warranty.
    Shipping & ReturnShipping Policy Return Policy
    Warning: California's Proposition 65
  • Vehicle Fitment

    Year Make Model Trim Engine
    2004-2009 Cadillac XLRBase, Platinum, V8 Cyl 4.4 L GAS, 8 Cyl 4.6 L GAS
    2005-2013 Chevrolet Corvette427, Base, Grand Sport, ZR18 Cyl 6.0 L GAS, 8 Cyl 6.2 L GAS, 8 Cyl 7.0 L GAS
  • Customer Questions & Expert Answers

    Q:
    Can you help me check if this 20850582 is the right part for my car? Posted by ChevyPartsGiant Specialist
    A:
    Please Select Your Vehicle model to see if part number 20850582 is suitable before ordering.
    Posted by ChevyPartsGiant Specialist
    Q:
    How to replace the Front Cross-Member on Cadillac XLR? Posted by Customer
    A:
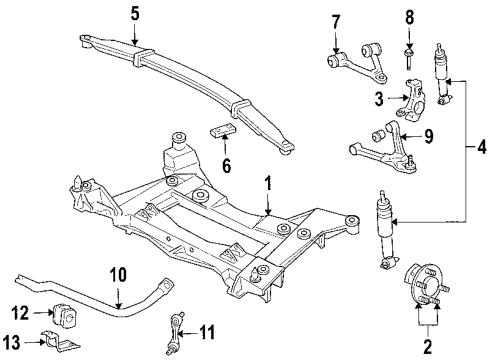
    To replace the front suspension crossmember, one can start by supporting it using engine support fixture (J38853-B). Lift and hold the vehicle, and remove the tire and wheel assemblies. Next, discharge the steering linkage outer Tie Rod End stud nuts and disconnect the electronic suspension control (ESC) sensor links. Take out the stabilizer shaft of the vehicle and take away the intermediate shaft lower coupling being connected to the steering gear. Disconnect the bolts from the electronic brake control module (EBCM)/brake pressure modulator valve (BPMV) bracket and hold up and move the ebcm/bpmv and bracket clear of the crossmember. Break the power steering gear mounting bolts and the power steering fluid cooler from the crossmember. Raise the power steering gear from the crossmember and hold it. Extract the transverse spring from a motor vehicle by using: transverse spring compressor (J 33432-A). Release the lower Shock Absorber from the lower control arms, and withdraw the lower Control Arm bolts from the crossmember. Place transmission jack under crossmember, be sure to remove the Engine Mount lower nuts. Remove the wheel speed sensor wiring harness, the electrical harness from the clips and also the brake pipe from clips on the crossmember. Remove the crossmember mounting nuts and take down the crossmember from the vehicle. During installation, elevate the crossmember to the vehicle so that the dowel pins are aligned to the frame rails and the Engine Mount studs. Replace new cross member mounting nuts and tighten up to 110 n.m (81 lb ft). Attach the Engine Mount lower nuts, secure the wheel speed sensor wiring harness retainer clips, and plug in the electrical harness into its clips along the cross member. Attach the brake pipe to the clips, and install the transverse spring with the j 33432-a attached to the crossmember. Mount the lower Control Arm and the shock absorbers to the lower control arms, and tighten Shock Absorber lower mounting nuts to 28 n.m (21 lb ft). Mount the crossmember by bolting the power steering to the crossmember, and tightening the mounting bolts to 100 n.m (74 lb ft), then install the bolts to the bpmv bracket. Connect intermediate shaft to the steering gear, install steering linkage outer tie rod ends to the steering knuckles, and reconnect esc sensor links. Finally, install stabilizer shaft, tire and wheel assemblies, lower vehicle, uninstall engine support fixture and conduct a vehicle front end alignment.
    Posted by ChevyPartsGiant Specialist
    Q:
    How to Properly Handle the Front Cross-Member Replacement Process on Cadillac XLR? Posted by Customer
    A:
    To replace the front suspension crossmember, start with the engine being supported by the engine support fixture (J41158-B) and the vehicle being raised. Be aware that new tire and wheel sets may have designated 'left' and 'right' sides. For the previous car, the outermost part on the right side was removed first, and during installation, the opposite order was followed. Undo the stabilizer shaft, detaching the intermediate shaft lower coupling from the steering gear, and, as well as the bolts from the electronic brake control module (EBCM)/brake pressure modulator valve (BPMV) bracket. Support the ebcm/bpmv and bracket away from the crossmember, then remove the bolts from the power steering gear and the power steering fluid cooler, and remove them from the crossmember. Lift the power steering gear up off of the cross-member and support it. The transverse spring compressor (J 33432-A) must be applied to remove the transverse spring from the vehicle by the lifting of this spring. However, the lower Shock Absorber bolts must then be disconnected from the lower control arms; this in turn requires the removal of the lower Control Arm bolts from this arm's position into the position of the crossmember. Jack up the vehicle by keeping the transmission jack under the crossmember, then remove the lower nuts of the mount under the engine, disconnect the wiring harness of the wheel speed from the panel, disconnect the electrical harness from the clips, and the clips themselves at the crossmember from the brake pipe. Disassemble the crossmember mounting nuts and bring the crossmember down through the vehicle. For installation put the crossmember up to the vehicle and align the dowel pins to the frame rails and the engine mount studs and use new crossmember mounting nuts tighten up to 110 n.m (81 lb ft). Install engine mount lower nuts, secure the wheel speed sensor wiring harness to the retaining clips, the brake pipe on the retaining clips, and the electrical harness on the clips of the crossmember. Install the transverse spring with the aid of the transverse spring compressor (J 33432-A) attached, then install the lower Control Arm as well as the shock absorbers to the lower control arms with the aid of tightening the nuts that hold the bottom of the Shock Absorber with 28 n.m (21 lb ft). Mount the power steering gear to the cross member, fastening the mounting bolts to 100 n.m (74 lb ft), followed by the bolts to the bpmv bracket, and linking the intermediate shaft to the steering gear, and mounting the steering linkage outer tie rods to the steering knuckles. Lastly, connect esc sensor links place the stabilizer shaft, re-mount the tire and wheel assemblies, lower the vehicle and remove the engine support fixture, conduct the vehicle front-end alignment.
    Posted by ChevyPartsGiant Specialist
    Q:
    What should be done with the brake pressure modulator valve bracket for the 2005 Cadillac XLR? Posted by Customer
    A:
    Install the bolts to the brake pressure modulator valve bracket.
    Posted by ChevyPartsGiant Specialist
    See expert answers on similar Front Cross-Member
    Q:
    What components should be secured to the crossmember for the 2006 Chevrolet Corvette? Posted by Customer
    A:
    Secure the wheel speed sensor wiring harness, brake pipe, and electrical harness to the crossmember.
    Posted by ChevyPartsGiant Specialist
    See expert answers on similar Front Cross-Member
    Q:
    What should be done after removing the tools for the 2010 Chevrolet Corvette? Posted by Customer
    A:
    Install the generator, connect the negative battery cable, and perform a vehicle front end alignment.
    Posted by ChevyPartsGiant Specialist
    See expert answers on similar Front Cross-Member
    Q:
    What should be disconnected from the lower control arms for the 2011 Chevrolet Corvette? Posted by Customer
    A:
    Disconnect the lower shock absorber bolts from the lower control arms, and remove the lower control arm bolts from the crossmember.
    Posted by ChevyPartsGiant Specialist
    See expert answers on similar Front Cross-Member
    Q:
    What should be done after supporting the engine for the 2008 Chevrolet Corvette? Posted by Customer
    A:
    Raise and support the vehicle.
    Posted by ChevyPartsGiant Specialist
    See expert answers on similar Front Cross-Member
    Q:
    How should the engine be supported for the 2005 Chevrolet Corvette? Posted by Customer
    A:
    Support the engine using the Engine Support Fixture (J 41803) and the Universal Engine Support Fixture (J 28467-B).
    Posted by ChevyPartsGiant Specialist
    See expert answers on similar Front Cross-Member
    Q:
    How should the new crossmember be aligned for the 2007 Chevrolet Corvette? Posted by Customer
    A:
    Align the dowel pins to the frame rails and the engine mount studs.
    Posted by ChevyPartsGiant Specialist
    See expert answers on similar Front Cross-Member
    If you have any questions about this product, please don't hesitate to ask us. We will be happy to help you!

OEM GM 20850582, Excellent Performance and Perfect Fitment

To ensure reliability, purchase GM part # 20850582 Engine Cradle. It is sometimes referred to as GM Front Cross-Member. Choosing OEM parts is the optimal decision for guaranteeing superior quality and perfect performance. These components undergo stringent quality checks and are carefully constructed to comply with GM's factory specifications, ensuring a smooth installation process.

ChevyPartsGiant.com is a leading supplier of genuine GM parts such as GM 20850582 Engine Cradle. Our website boasts an extensive inventory of OEM GM parts, available at highly competitive prices in the market. Should you require any new genuine GM parts, rest assured we will deliver them swiftly and efficiently to your doorstep. Furthermore, all our parts come with the assurance of a manufacturer's warranty. For detailed Chevy parts information, click here.
Choose ChevyPartsGiant for discounted prices, exceptional service and fast delivery