ChevyParts
My Garage
My Account
Cart
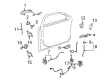
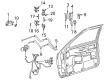
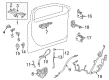
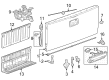
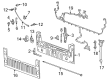
OEM Chevrolet Door Hinge
Interior Door Hinge- Select Vehicle by Model
- Select Vehicle by VIN
Select Vehicle by Model
orMake
Model
Year
Select Vehicle by VIN
For the most accurate results, select vehicle by your VIN (Vehicle Identification Number).
502 Door Hinges found


Chevrolet Hinge, Driver Side Part Number: 15116303
$53.20 MSRP: $79.18You Save: $25.98 (33%)Ships in 1-2 Business DaysProduct Specifications- Other Name: Hinge, End Gate Closing; Door Hinge
- Position: Driver Side


Chevrolet Lower Hinge, Front Upper Part Number: 15929358
$15.07 MSRP: $21.75You Save: $6.68 (31%)Product Specifications- Other Name: Hinge, Front Door Upper Hinge; Door Hinge; Upper Hinge; Hinge, Front Door Lower Hinge
- Position: Front Upper
- Replaces: 22723976


Chevrolet Lower Hinge, Front Driver Side Part Number: 15981549
$89.50 MSRP: $128.06You Save: $38.56 (31%)Product Specifications- Other Name: Hinge Kit, Front Side Door Lower (Body Side); Door Hinge; Hinge Kit, Door Hinge
- Position: Front Lower Driver Side

Chevrolet Lower Hinge, Front Upper Part Number: 13576849
$14.02 MSRP: $20.87You Save: $6.85 (33%)Ships in 1-2 Business DaysProduct Specifications- Other Name: Hinge Assembly-Front Side Door Upper; Door Hinge; Upper Hinge; Hinge, Front Door Lower Hinge; Hinge, Front Door Upper Hinge
- Position: Front Upper

Chevrolet Upper Hinge, Front Lower Part Number: 13576848
$62.52 MSRP: $90.23You Save: $27.71 (31%)Ships in 1-2 Business DaysProduct Specifications- Other Name: Hinge, Front Door Lower Hinge; Door Hinge; Lower Hinge; Hinge, Front Door Upper Hinge
- Position: Front Lower

Chevrolet Hinge, Passenger Side Part Number: 84785254
$30.28 MSRP: $45.08You Save: $14.80 (33%)Ships in 1-2 Business DaysProduct Specifications- Other Name: Hinge Assembly-Pick Up Box End Gate Closure Side; Hinge, Rear Compartment Lid And End Gate
- Position: Passenger Side
Chevrolet Hinge, Driver Side Part Number: 84785255
$22.83 MSRP: $33.97You Save: $11.14 (33%)Ships in 1-2 Business DaysProduct Specifications- Other Name: Hinge Assembly-Pick Up Box End Gate Closure Side; Hinge, Rear Compartment Lid And End Gate
- Position: Driver Side

Chevrolet Hinge, Driver Side Part Number: 86778158
$86.60 MSRP: $128.89You Save: $42.29 (33%)Ships in 1-3 Business DaysProduct Specifications- Other Name: Hinge Assembly-Pick Up Box End Gate Closure Side; Hinge, End Gate Closing
- Position: Driver Side
- Replaces: 84714739

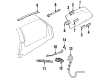
Chevrolet Hinge, Front Upper Passenger Side Part Number: 16625902
$34.08 MSRP: $45.08You Save: $11.00 (25%)Product Specifications- Other Name: Hinge Assembly-Front Side Door Upper; Door Hinge; Hinge, Front Door Upper Hinge
- Position: Front Upper Passenger Side

Chevrolet Lower Hinge, Passenger Side Part Number: 15981566
$44.86 MSRP: $85.56You Save: $40.70 (48%)Product Specifications- Other Name: Hinge Kit, Door Hinge; Door Hinge
- Position: Passenger Side
Chevrolet Lower Hinge, Driver Side Part Number: 15981565
$53.97 MSRP: $102.95You Save: $48.98 (48%)Product Specifications- Other Name: Hinge Kit, Door Hinge; Door Hinge
- Position: Driver Side

Chevrolet Hinge, Passenger Side Part Number: 20824307
Product Specifications- Other Name: Hinge Assembly-Pick Up Box End Gate (End Gate Side) (1/2 Moon Cup); Door Hinge; Hinge, End Gate Closing
- Position: Passenger Side
- Replaces: 15116304

Chevrolet Glass Hinge, Rear Driver Side Part Number: 10124263
Product Specifications- Other Name: Hinge, Rear Compartment Lid And End Gate; Hinge
- Position: Rear Driver Side

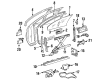
Chevrolet Hinge Strap, Passenger Side Part Number: 12392852
Product Specifications- Other Name: Hinge; Door Hinge; Upper Hinge; Hinge Strap Anchor Plate; Hinge Kit, Rear Side Door Upper Hinge; Hinge, Rear Side Door Upper Hinge
- Position: Passenger Side
Chevrolet Lower Hinge, Passenger Side Part Number: 15981550
Product Specifications- Other Name: Hinge Kit, Door Hinge; Door Hinge
- Position: Passenger Side

Chevrolet Hinge, Driver Side Part Number: 14046218
Product Specifications- Other Name: Hinge, End Gate Closing
- Position: Driver Side

Chevrolet Hinge, Passenger Side Part Number: 14046217
Product Specifications- Other Name: Hinge, End Gate Closing
- Position: Passenger Side

Chevrolet Hinge Part Number: 15260499
Product Specifications- Other Name: Liftgate Hinge; Door Hinge; Hinge, End Gate Closing

Chevrolet Hinge Strap, Rear Lower Passenger Side Part Number: 12392854
Product Specifications- Other Name: Hinge Kit, Rear Side Door Lower Hinge; Door Hinge; Lower Hinge; Hinge Strap Anchor Plate; Hinge Kit, Rear Side Door Upper Hinge; Hinge, Rear Side Door Lower Hinge
- Position: Rear Lower Passenger Side

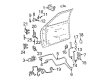
Chevrolet Upper Hinge, Rear Driver Side Part Number: 16633459
Product Specifications- Other Name: Hinge, Rear Side Door Upper Hinge; Door Hinge; Hinge
- Position: Rear Upper Driver Side
- Replaces: 16632257
| Page 1 of 26 |Next >
1-20 of 502 Results
Chevrolet Door Hinge
Want to cut long-term maintenance and repair costs? Choose OEM Door Hinge. Those parts deliver top durability you can trust. On our site, you'll find a huge catalog of genuine Chevrolet parts. Prices are unbeatable, so you can keep more in your pocket. Every OEM Chevrolet Door Hinge includes a manufacturer's warranty. You can also get an easy return policy that keeps buying risk free. Fast delivery, get your car on the road quickly. It's simple to search, compare, and order. Stop guessing about quality or fit. Order today and save with parts that last.
Chevrolet Door Hinge Parts Questions & Experts Answers
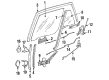
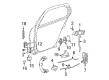
- Q: How to replace the front side door hinge on the body side on Chevrolet Colorado?A:The first stage to replace the hinge on the body side of the front side door requires opening the door to detach the bolt that secures the check link between the body and door. Move the front door wiring harness grommet from the body followed by disconnecting its harness connectors. The bolts holding the front Door Hinge keeper straps should be removed. The front door requires assisted lifting from its locations on body side hinges before moving it to a clean safe surface. Use a clean rag to clean up the body side hinges then apply greasy pencil marks and marker writing to indicate the front Door Hinge positions. The body side hinges should have their retaining bolts removed before being detached from the body. Users should place the body side front Door Hinge at the alignment marks before installing the body side Door Hinge bolts while tightening them to 27 nm (20 lb ft). A helper should place the front door on body side hinge straps followed by securing bolt installation at the front Door Hinge keeper straps using 25 nm (18.4 lb ft) torque setting. The front door wiring connectors must be connected before installing the grommet through the body section. The final step includes installing the bolt that retains the front Door Check link to the body with a torque of 25 nm (18.4 lb ft) followed by an inspection of door operation and alignment.
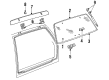
- Q: How to replace the rear door hinge on Chevrolet Malibu?A:The procedure demands keeping the rear door shut during changes with separate attention given to individual hinges while starting by replacing the broken one. You should first open the front door to reach the rear door hinges. Use a clean rag to wipe both mounting surfaces and apply marks at hinge positions through the use of a grease pencil or marker. First remove bolts from the doorside rear door hinge before moving on to the bolts of the bodyside rear door hinge and finally take out the rear door hinge from the vehicle . Secure the bodyside rear door hinge by aligning it according to the specified marks then tighten the bolts to 33 N.m (24 lb ft). Put the bolts through the doorside rear door hinge before securing them with identical torque requirements. Inspect the rear door for correct operation while finishing the inspection by closing the front door.
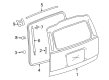
- Q: How to replace the rear side door hinge on Chevrolet Tahoe?A:The first step to replace the rear side door hinge involves removing all panels while eliminating extra sealant from the current hinge before marking its location on the hinge pillar. Use 100 grit or finer sandpaper to smooth the existing hinge while finding its four pillar welds but avoid penetrating the door with the centers of punch marks. Drill holes through the hinge at each marked spot using a 13 mm rotabroach hole saw. Additional help can be provided through chiseling to detach the door from the hinge. Welded metal needs complete removal from the door plane to achieve a flat condition for the service hinge to fit. Repair all broken door sections before cleaning the mounting surface areas of the backing plate and installing the service hinge within scribe-marked areas. Drill 3 mm (1/8 in) pilot holes first and follow up with drilling 11.5 mm (29/64 in) holes for the studs at each correct door location marked by center punch. The process requires cleanups of each bare metal area followed by application of approved corrosion-fighting primer and complete application of full-bodied caulk onto the hinge mounting points for adequate sealing purposes. Secure the hinge to the pillar nuts at a torque of 25 N.m (18 lb ft) and then position the hinge alongside the backing plate through the door holes before finishing surfaces according to need and installing sealants followed by putting back all components. The procedure for bodyside hinge replacement involves panel removal before sealer elimination and existing hinge sanding and weld marking with a center punch. Drill through the hinge base only and finish by removing the hinge. Start by cleaning the pillar surface then position the service hinge followed by center punching the stud positions before drilling pilot holes and then drilling for the studs. The technician must clean bare metal surfaces first then apply anti-corrosion primer before installing the stud (GM P/N 15017230) into the hinge with fish wire (GM P/N 15017229). Install the hinge to the pillar using supplied nuts before tightening the stud with nuts (GM P/N 11516746) to 25 N.m (18 lb ft) while cleaning surfaces for subsequent refinishing that includes application of sealers to be followed by reinstallation of all related panels and components.


Related Chevrolet Parts
 Chevrolet Tailgate Latch
 Chevrolet Center Console Latch
 Chevrolet Tailgate Lock
 Chevrolet Car Speakers
 Chevrolet Dash Panel Vent Portion Covers
 Chevrolet Dash Panels
 Chevrolet Door Armrest
 Chevrolet Door Latch Cable
 Chevrolet Floor Pan
 Chevrolet Lift Support
 Chevrolet Side View Mirrors
 Chevrolet Wiper Blade
Browse Chevrolet Door Hinge by Models
Nova S10 Colorado C10 Tahoe Cruze Malibu Camaro Equinox Impala SS SSR Avalanche Silverado 1500 Silverado 2500 HD Caprice Classic Cobalt Suburban Traverse Blazer HHR Sonic Tracker Volt El Camino K10 Spark Trax Trailblazer Astro Cavalier Corvette C20 Aveo Beretta Bolt EUV Bolt EV C1500 C2500 C30 C3500 Celebrity City Express Corsica Express 1500 Express 2500 Express 3500 G10 G20 G30 K1500 K20 K2500 K30 K3500 K5 Blazer Lumina Metro Monte Carlo P30 Prizm S10 Blazer Silverado 2500 Sprint Uplander Venture Lumina APV Silverado 3500 Suburban 1500 Trailblazer EXT Avalanche 1500 Avalanche 2500 Aveo5 C10 Suburban C1500 Suburban C20 Suburban C2500 Suburban Captiva Sport Citation II Cruze Limited Impala Limited K10 Suburban K1500 Suburban K20 Suburban K2500 Suburban Malibu Limited P20 R10 R10 Suburban R1500 Suburban R20 R20 Suburban R2500 R2500 Suburban R30 R3500 Silverado 1500 Classic Silverado 1500 HD Silverado 1500 HD Classic Silverado 1500 LD Silverado 1500 LTD Silverado 2500 HD Classic Silverado 3500 Classic Silverado 3500 HD Spark EV Spectrum Suburban 2500 V10 V10 Suburban V1500 Suburban V20 V20 Suburban V2500 Suburban V30 V3500