ChevyParts
My Garage
My Account
Cart
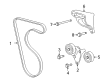
OEM Chevrolet Silverado 2500 Drive Belt
Serpentine Belt- Select Vehicle by Model
- Select Vehicle by VIN
Select Vehicle by Model
orMake
Model
Year
Select Vehicle by VIN
For the most accurate results, select vehicle by your VIN (Vehicle Identification Number).
3 Drive Belts found


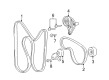
Chevrolet Silverado 2500 Serpentine Belt Part Number: 12637204
$44.85 MSRP: $97.10You Save: $52.25 (54%)Ships in 1-3 Business Days


Chevrolet Silverado 2500 Serpentine Belt Part Number: 12637202
$45.89 MSRP: $100.22You Save: $54.33 (55%)Ships in 1-2 Business Days


Chevrolet Silverado 2500 Serpentine Belt Part Number: 12576447
$22.29 MSRP: $41.86You Save: $19.57 (47%)
Chevrolet Silverado 2500 Drive Belt
Our website offers an extensive catalog of genuine Chevrolet Silverado 2500 Drive Belt at unbeatable prices. Every OEM Chevrolet Silverado 2500 Drive Belt comes with a manufacturer's warranty, an easy return policy, and rapid delivery service. Don't miss out on this great opportunity!
Chevrolet Silverado 2500 Drive Belt Parts Questions & Experts Answers
- Q: How to replace the drive belt for 4.8L, 5.3L, and 6.0L engines on Chevrolet Silverado 2500?A: The Drive Belt replacement procedure starts with duct clamp loosening at the Throttle Body and mass airflow/intake air temperature sensor before disconnecting the radiator inlet hose from the outlet duct and removing the air cleaner outlet duct. A breaker bar equipped with a hex-head socket on the Drive Belt tensioner bolt should be used for clockwise rotation to lower belt tension. First remove the belt from its resting position on the pulleys and tensioner. Then remove tension from the Drive Belt tensioner while removing the breaker bar and socket. The inspection of all belts should start with checking the pulley surfaces. Install the new Drive Belt over all pulleys except the idler pulley. Insert the breaker bar with its hex-head socket onto the Belt Tensioner Bolt where you should turn the tensioner clockwise to relax the belt. Then install the Drive Belt below the idler pulley. Remove the breaker bar along with the socket while following the slowness when releasing tension from the belt tensioner. The Drive Belt should be checked for correct installation and alignment before installing the air cleaner outlet duct. Align the arrow on the Throttle Body end of the duct with the Throttle Body attaching stud. To conclude the installation reconnect the radiator inlet hose clip to the outlet duct then tighten all air cleaner outlet duct clamp screws at both the Throttle Body and maf/iat sensor to 7 nm (62 inch lbs.).

Related Chevrolet Silverado 2500 Parts
 Chevrolet Silverado 2500 Coolant Pipe
 Chevrolet Silverado 2500 Coolant Reservoir
 Chevrolet Silverado 2500 Coolant Reservoir Cap
 Chevrolet Silverado 2500 Cooling Hose
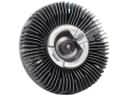 Chevrolet Silverado 2500 Fan Clutch
 Chevrolet Silverado 2500 Fan Shroud
 Chevrolet Silverado 2500 Radiator Cap
 Chevrolet Silverado 2500 Radiator Hose
 Chevrolet Silverado 2500 Thermostat
 Chevrolet Silverado 2500 Transmission Oil Cooler
 Chevrolet Silverado 2500 Water Pump
 Chevrolet Silverado 2500 Water Pump Pulley